Configuring the SenseCAP M2 Multiplatform LoRaWAN Gateway with 4G Backhaul for the IN865 Indian Frequency Band.

Difficulté
Moyen
Durée
4 heure(s)
Catégories
Électronique
Coût
35 USD ($)
Sommaire
- 1 Étape 1 - About the project
- 2 Étape 2 - Get PCBs for Your Projects Manufactured
- 3 Étape 3 - Configuring the SenseCAP M2 LoRaWAN Gateway with 4G Backhaul for the IN865 Indian Frequency Band
- 4 Étape 4 - Architecture
- 5 Étape 5 - Cellular 4G Configuration
- 6 Étape 6 - LoRa Channel Plan Settings
- 7 Étape 7 - TTN Configuration
- 8 Étape 8 - Gateway Configuration
- 9 Étape 9 - Checking the Gateway Connection Status
- 10 Étape 10 - SenseCAP Mate APP Method
- 11 Commentaires
Matériaux
Outils
Étape 1 - About the project
In my initial foray into LoRa technologies, I developed a single-channel LoRa Gateway. This gateway was designed to connect with only one end node (Sensors) at a time. Communication with application servers was facilitated through Wi-Fi connectivity embedded within the gateway itself.
My Wi-Fi Backhaul single channel LoRa Gateway Project Link: https://www.hackster.io/vinayyn/single-channel-lora-gateway-using-wio-e5-lora-and-blynk-20b9ec
Ethernet Backhaul single channel LoRa Gateway Project Link:
https://www.hackster.io/vinayyn/ethernet-enhanced-lora-gateway-minimizing-delay-017503
After days of working on the project, I wanted to connect multiple End Nodes (Sensors) with significantly reduced power consumption. I updated them to the LoRaWan by modifying the firmware. When I started looking for a gateway to connect the multiple End nodes, I found that the gateway costs were too high and they did not fit into my budget.
After conducting thorough research, I reached out to numerous manufacturers and distributors worldwide, only to discover that their gateway prices consistently fell around $500. They highlighted the outdoor compatibility and expansive coverage capabilities of their products. My investigation further revealed that all manufacturers utilized the Semtech SX130X baseband LoRa® chip for gateways, with antenna specifications tailored to regional ISM bands and operating ranges. Most of their products offered Wifi and Ethernet Backhaul exclusively. I concluded that these gateways were not suitable for outdoor implementation due to the need for a physical connection to the gateway. Subsequently, I identified a few gateways equipped with 2G/3G/4G support. However, these features came at an additional cost of $100-$300 USD, and their parameter specifications varied from country to country, rendering them incompatible in my region.
While scouring manufacturer and reseller websites, I stumbled upon SenseCAP products on the Seeed Studio website. The gateways' starting price was $99 for Ethernet and Wi-Fi backhaul and $149 for Wifi, Ethernet, and 2G/3G/4G Support. I then contacted a member of their technical team to inquire about 4G band compatibility in India. The team provided me with the necessary details, prompting me to reach out to an Indian network operator for their technical specifications.
EU868 4G Version Suppotive Bands
Upon signing an NDA with the network provider, they furnished the requested details. However, further investigation revealed that this information was readily available on the Indian Government's Telecommunication portal. The results were favorable as the SenseCAP Multi-Platform LoRaWAN Indoor Gateway(SX1302-4G) - EU868 aligned with the operating parameters.
Indian 4G Band Details "LTE-FDD:B1/B3/B7/B20 LTE-TDD: B40/B41"
Without hesitation, I procured the SenseCAP Multi-Platform LoRaWAN Indoor Gateway(SX1302-4G) - EU868 at $149, including $30 shipping and $90 Indian customs fees.


Étape 2 - Get PCBs for Your Projects Manufactured
This project was successfully completed because of the help and support from NextPCB. Guys if you have a PCB project, please visit their website and get exciting discounts and coupons.
NextPCB offers high-quality, reliable PCB starting at $1.9, and multilayer starting at $6.9. Also, everyone can enjoy free PCB assembly for 5 boards! Also, NextPCB is having a year end sale in which anyone can register through their website and get a $30 Coupon which can be used for ordering PCBs.
You can also try HQDFM free online PCB Gerber viewer to check your PCB design and avoid costly errors.

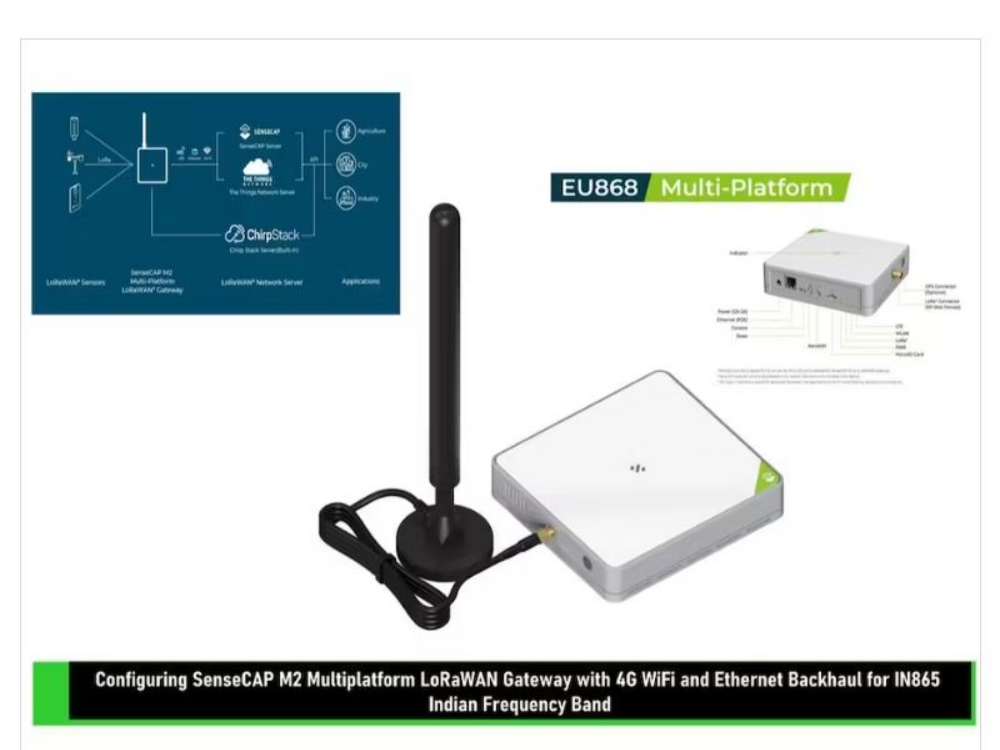
Étape 3 - Configuring the SenseCAP M2 LoRaWAN Gateway with 4G Backhaul for the IN865 Indian Frequency Band
Before configuring the gateway, it is essential to familiarize yourself with its specifications.
Key Features
- Support Multiple LoRaWAN® Network Servers: Compatible with multiple LNS like AWS, TTN, ChirpStack, etc. via using the Packet Forwarder / Basics™ Station mode.
- Built-in LoRaWAN Network Server: Provide a fast and reliable solution for launching a LoRaWAN network.
- Support Power-over-Ethernet (PoE): For users who need to power the gateway on Ethernet instead of an extra power supply cable, the PoE feature is also added to this device, making your deployment more reliable and faster.
- Wide-range Coverage and Strong Signal: Provides up to 10km of LoRaWAN® coverage and strong signal, allowing users to send data with extremely long ranges at low data rates.
- Excellent and Stable Performance: The gateway is powered by the mature hardware solution MT7628 and Semtech SX1302 baseband Long Range chip. It supports Cellular(optional)、Wi-Fi and Ethernet internet connection.
- Professional Management Tools and Cloud Services: Users could easily set up the gateway in a few simple steps via Web Interface. SenseCAP Portal and SenseCAP Local Console are also developed for users to monitor and manage the gateway efficiently and easily.


Étape 4 - Architecture
Interface
Now Iets configure the Gateway
SenseCAP M2 Multi-Platform LoRaWAN® Gateway can be configured in 2 ways: 1. Wi-Fi/ Ethernet access to the SenseCAP Local Console 2. Access the SenseCAP Local Console via SenseCAP Portal remotely
Here I will configure The Gateway using the AP hotspot
Step 1: Press the button for 5 seconds until the blue indicator flashes slowly to enter the configuration mode.
Step 2:Turn ON your Laptop/tablet/ Mobile/Wi-Fi, and scan for available networks. then search for the hotspot name SenseCAP_XXXXXX, and enter the default password 12345678; Once Connected, Find the IPV4 Address of your Device
Step 3: Get your device Username and Password details from the back panel of the gateway device label.
Step 4: Log into the Local Console by inputting the IP Address (192.168.168.1) in your browser to enter the Local Console. it is called asLuCi Console. Then input your device username and password, and click the Login button.
Wi-Fi Configuration
The indicator light located on the top of the gateway will illuminate solid green to indicate a successful connection to the Wi-Fi network.


Étape 5 - Cellular 4G Configuration
Step 1: Plug your SIM card into the Nano-SIM card slot.
Locate the SIM card slot on your SenseCAP Multi-Platform LoRaWAN Indoor Gateway(SX1302-4G). It is typically found on the side or bottom of the device.
Power off the gateway.
- Insert the SIM card into the SIM card slot. Ensure the SIM card is oriented correctly, with the gold-colored contacts facing down.
- Gently push the SIM card into the slot until it clicks into place.
- Power on the gateway.
- Verify the SIM card is detected. The indicator light will illuminate solid green to indicate a successful connection to the cellular network.
Step 2: Log in to the Lucipage, and click on Network - Cellular
Step 3: Set up the APN info, and click Save and Apply to apply your settings.
The default APN for Vodafone-Idea 4G Nano SIM is "www". However, the APN may vary depending on the service provider. It is always advisable to check with your service provider for the latest APN settings.
Once the changes are saved, the gateway will apply the updated settings.


Étape 6 - LoRa Channel Plan Settings
Navigate to LoRa > Channel Plan
Select the Region and Frequency plan.
After setting, click Save&Apply
Connecting to TTN
There are two ways to connect to the Things Network: Packet forward and Basics™ Station. Choose a way to connect your gateway.
Semtech UDP Packet Forwarder is the original LoRaWAN® packet forwarder, connecting to servers through the Semtech UDP protocol.
LoRa Basics™ Station is the preferred way of connecting Gateways to The Things Stack.
Connecting via Packet Forwarders
The Semtech UDP Packet Forwarder is the original LoRaWAN® packet forwarder, connecting to servers through the Semtech UDP protocol.


Étape 7 - TTN Configuration
Step 1: Log into The Things Stack. If you don't have a TTN account, please register first.
Step 2: Register the gateway
Gateway EUI: Gateway EUI can be found on the device label or Local Console
Gateway ID: A unique identifier for your gateway(the ID must contain only lowercase letters, numbers, and dashes)
Gateway name: A name of your gateway
Frequency plan: Select the corresponding frequency according to your gateway version
You can check the Gateway in the overview after successful registration.


Étape 8 - Gateway Configuration
Step 1: LoRa Network Settings
Navigate to LoRa > LoRa Network
Step 2: Set Mode to Packet Forward
Step 3:Packet Forwarder Settings:
Gateway EUI: It will automatically get the EUI of the connected gateway
Server Address: For Semtech UDP Packet Forwarder use 'server-address' The 'server-address' is the address of your The Things Stack deployment. See Server Addresses for more info.
Server Port(Up/Down): The Up Port and Down Port are typically 1700.
Other settings can be left as default or can be changed to suit your requirements.
Click Save&Apply to apply your settings

Étape 9 - Checking the Gateway Connection Status
After the settings are completed, we can view the live data of your gateway.
You can see that our gateway is connected to TTN now.
Gateway Sucess
After powering on the gateway, there are two ways for you to check the gateway working status:

Étape 10 - SenseCAP Mate APP Method
In the SenseCAP Mate App, Online status indicates Online when the gateway is connected to the network.
Bind the gateway[1]
SenseCAP Mate APP supports device configuration and remote management.
- Step 1: Download the SenseCAP Mate APP
- Step 2: Log in to the APP If it is your first time using the SenseCAP platform, please register an account first.
- Step 3: Add the device
Click the + in the upper right corner and select Add device Then scan the QR code on your gateway label.
Set up your device name and location. Then confirm your settings. After successful binding, you will see your gateway in the Device directory.


Published
 Français
 English
 Deutsch
 Español
 Italiano
 Português