Will guide you through implementing neo pixel with Node-Red and Raspberry Pi 4.

Difficulté
Facile
Durée
2 heure(s)
Catégories
Électronique
Coût
65 USD ($)
Sommaire
- 1 Introduction
- 2 Étape 1 - Get PCBs For Your Projects Manufactured
- 3 Étape 2 - What You’ll Need
- 4 Étape 3 - Wiring the NeoPixel LED Strip
- 5 Étape 4 - Installing Node-RED and node-red-node-pi-neopixel
- 6 Étape 5 - Creating a Node-RED Flow
- 7 Étape 6 - JSON Files:
- 8 Étape 7 - Neo Pixel Node Setup:
- 9 Étape 8 - Deployment Setup:
- 10 Étape 9 - Conclusion
- 11 Commentaires
Introduction
NeoPixel LEDs are a popular type of addressable RGB LEDs that can create amazing effects and animations. They are easy to control with a microcontroller like Arduino, but what if you want to use them with a Raspberry Pi? In this article, we’ll show you how to use Node-RED, a graphical programming tool, to control NeoPixel LEDs with a Raspberry Pi.
Matériaux
Outils
Étape 1 - Get PCBs For Your Projects Manufactured
You must check out PCBWAY for ordering PCBs online for cheap!
You get 10 good-quality PCBs manufactured and shipped to your doorstep for cheap. You will also get a discount on shipping on your first order. Upload your Gerber files onto PCBWAY to get them manufactured with good quality and quick turnaround time. PCBWay now could provide a complete product solution, from design to enclosure production. Check out their online Gerber viewer function. With reward points, you can get free stuff from their gift shop.
Étape 2 - What You’ll Need
To follow this tutorial, you’ll need the following components:
- A Raspberry Pi board with Raspbian OS installed
- A WS2812B NeoPixel LED strip
- Some jumper wires
You’ll also need to install Node-RED and the node-red-node-pi-neopixel node on your Raspberry Pi. We’ll explain how to do that later.
Étape 3 - Wiring the NeoPixel LED Strip
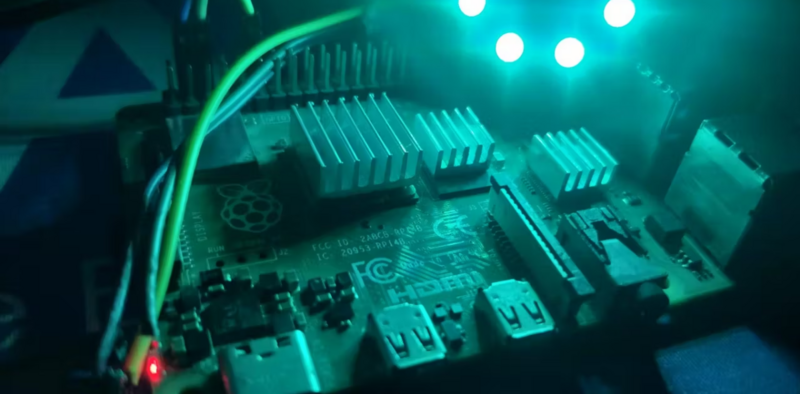
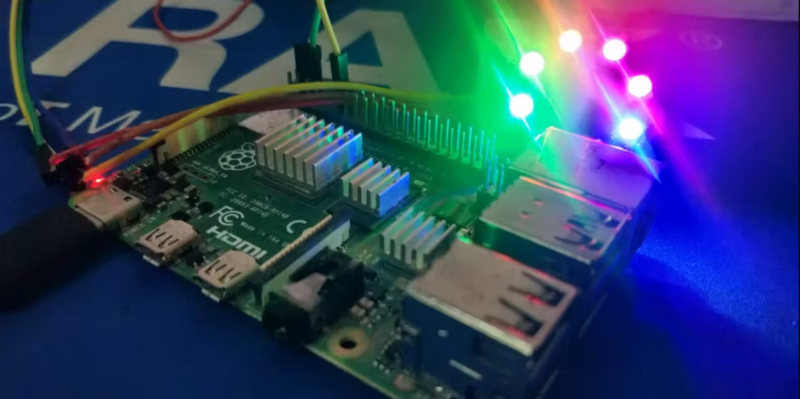
The NeoPixel LED strip has three wires: 5V, GND, and DATA. The 5V and GND wires provide power to the LEDs, while the DATA wire carries the signal that controls the color and brightness of each LED.
The Raspberry Pi can provide 5V and GND from its GPIO pins and connect the DATA pin to GPIO 18. The reason we use GPIO 18 is because it supports PWM (pulse-width modulation), which is needed by the node-red-node-pi-neopixel node. You can use other PWM-enabled GPIO pins, but you’ll need to change the settings accordingly.
Étape 4 - Installing Node-RED and node-red-node-pi-neopixel
Node-RED is a graphical programming tool that lets you create applications by connecting nodes that perform different functions. You can install Node-RED on your Raspberry Pi by following this guide.
To control the NeoPixel LEDs with Node-RED, you need to install a special node called node-red-node-pi-neopixel. This node can drive a strip of NeoPixel or WS2812 LEDs from a Raspberry Pi. You can install it by running the following command.
npm install node-red-node-pi-neopixel
You also need to install the Neopixel python driver, which is used by the node-red-node-pi-neopixel node. The easiest way to do that is to use the Unicorn HAT drivers install script, which you can run with this command:
After installing node-red-node-pi-neopixel, you need to restart Node-RED for the changes to take effect.
Étape 5 - Creating a Node-RED Flow
Now that everything is set up, you can create a Node-RED flow to control the NeoPixel LEDs. A flow is a collection of nodes that are connected by wires. Each node has an input and an output and can perform some action or function.
To create a flow, you need to open the Node-RED editor in your web browser. By default, it runs on port 1880 of your Raspberry Pi’s IP address. For example, if your Raspberry Pi’s IP address is 192.168.1.3, you can access the Node-RED editor at http://192.168.1.3:1880.
In the editor, you’ll see a palette of nodes on the left side, a workspace in the middle, and an info panel on the right side. You can drag nodes from the palette to the workspace and connect them by dragging wires from one node’s output to another node’s input.
Here’s an example of a neo-pixel flow that controls the LEDs based on our user inputs.
To create this flow, you need to do the following steps:
- Drag Copy and import the below JSON node-red flow.
- Change the LED count
Étape 6 - JSON Files:
[ { "id": "60627e22237dc214", "type": "tab", "label": "Flow 2", "disabled": false, "info": "", "env": [] }, { "id": "f0395033145e84d7", "type": "ui_colour_picker", "z": "60627e22237dc214", "name": "Color Picker", "label": "COLOR PICKER", "group": "cd687a95.00e108", "format": "rgb", "outformat": "string", "showSwatch": true, "showPicker": true, "showValue": true, "showHue": false, "showAlpha": false, "showLightness": true, "square": "false", "order": 1, "width": 0, "height": 0, "passthru": true, "topic": "", "topicType": "str", "x": 490, "y": 380, "wires": [ [ "f6f366218f267026" ] ] }, { "id": "f6f366218f267026", "type": "function", "z": "60627e22237dc214", "name": "Set Color", "func": "var count = global.get('count')
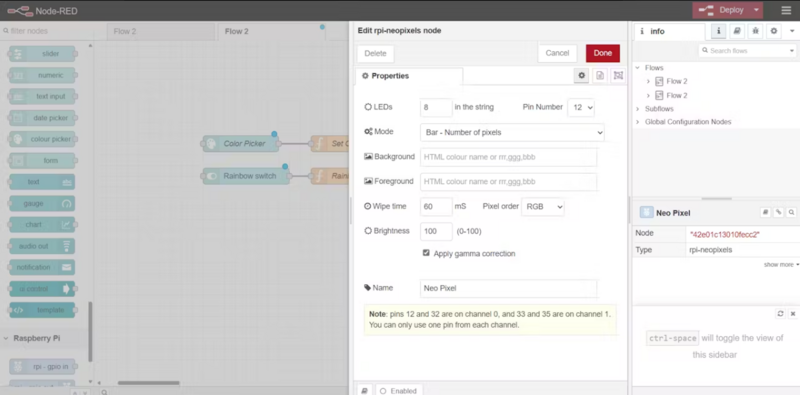
Étape 7 - Neo Pixel Node Setup:
Select the PIN and change the LED count as per your neo-pixel configuration.
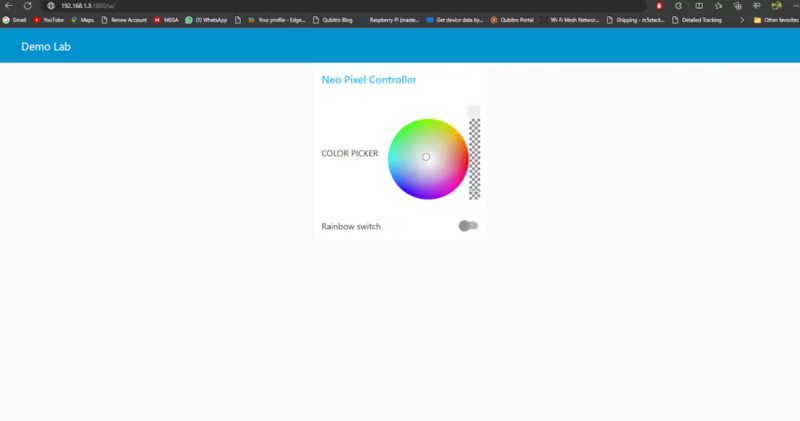
Étape 8 - Deployment Setup:
Next hit the deployment button and navigate to the UI page of the Node-red with /ui in the node-red page URL.
You can select the LED color via the neo-pixel circle. Also, if you toggle the rainbow switch it will apply the rainbow effect to the ring.
Étape 9 - Conclusion
In this article, I have shown you how to control NeoPixel LEDs with Node-RED and Raspberry Pi.
Published
 Français
 English
 Deutsch
 Español
 Italiano
 Português