| Ligne 1 : | Ligne 1 : | ||
{{ {{tntn|Tuto Details}} | {{ {{tntn|Tuto Details}} | ||
| + | |SourceLanguage=none | ||
| + | |Language=es | ||
| + | |IsTranslation=0 | ||
|Main_Picture=Montaje_P3steel_-_Tutorial_4_-_Puesta_a_Punto_1.jpg | |Main_Picture=Montaje_P3steel_-_Tutorial_4_-_Puesta_a_Punto_1.jpg | ||
|Licences=Attribution (CC BY) | |Licences=Attribution (CC BY) | ||
| Ligne 10 : | Ligne 13 : | ||
|Cost=450 | |Cost=450 | ||
|Currency=EUR (€) | |Currency=EUR (€) | ||
| − | |||
| − | |||
| − | |||
}} | }} | ||
{{ {{tntn|Introduction}} | {{ {{tntn|Introduction}} | ||
| Ligne 24 : | Ligne 24 : | ||
{{ {{tntn|Tuto Step}} | {{ {{tntn|Tuto Step}} | ||
|Step_Title=Comprobación del LCD | |Step_Title=Comprobación del LCD | ||
| − | |Step_Content= | + | |Step_Content= |
| − | |||
|Step_Picture_00=Montaje_P3steel_-_Tutorial_4_-_Puesta_a_Punto_comprobacion-lcd-1-1200.jpg | |Step_Picture_00=Montaje_P3steel_-_Tutorial_4_-_Puesta_a_Punto_comprobacion-lcd-1-1200.jpg | ||
}} | }} | ||
{{ {{tntn|Tuto Step}} | {{ {{tntn|Tuto Step}} | ||
|Step_Title=Comprobación de los ventiladores a 12V | |Step_Title=Comprobación de los ventiladores a 12V | ||
| − | |Step_Content= | + | |Step_Content= |
|Step_Picture_00=Montaje_P3steel_-_Tutorial_4_-_Puesta_a_Punto_comprobacion-vent-3010-1-1200.jpg | |Step_Picture_00=Montaje_P3steel_-_Tutorial_4_-_Puesta_a_Punto_comprobacion-vent-3010-1-1200.jpg | ||
|Step_Picture_01=Montaje_P3steel_-_Tutorial_4_-_Puesta_a_Punto_comprobacion-vent-6010-1-1200.jpg | |Step_Picture_01=Montaje_P3steel_-_Tutorial_4_-_Puesta_a_Punto_comprobacion-vent-6010-1-1200.jpg | ||
| Ligne 36 : | Ligne 35 : | ||
{{ {{tntn|Tuto Step}} | {{ {{tntn|Tuto Step}} | ||
|Step_Title=Comprobación del ventilador de capa | |Step_Title=Comprobación del ventilador de capa | ||
| − | |Step_Content= | + | |Step_Content= |
| − | |||
| − | |||
| − | |||
|Step_Picture_00=Montaje_P3steel_-_Tutorial_4_-_Puesta_a_Punto_LCD_MG_9624ffv.jpg | |Step_Picture_00=Montaje_P3steel_-_Tutorial_4_-_Puesta_a_Punto_LCD_MG_9624ffv.jpg | ||
|Step_Picture_01=Montaje_P3steel_-_Tutorial_4_-_Puesta_a_Punto_LCD_MG_9626.jpg | |Step_Picture_01=Montaje_P3steel_-_Tutorial_4_-_Puesta_a_Punto_LCD_MG_9626.jpg | ||
| Ligne 46 : | Ligne 42 : | ||
{{ {{tntn|Tuto Step}} | {{ {{tntn|Tuto Step}} | ||
|Step_Title=Comprobación del fusor | |Step_Title=Comprobación del fusor | ||
| − | |Step_Content= | + | |Step_Content= |
| − | |||
| − | |||
|Step_Picture_00=Montaje_P3steel_-_Tutorial_4_-_Puesta_a_Punto_LCD_MG_9629.jpg | |Step_Picture_00=Montaje_P3steel_-_Tutorial_4_-_Puesta_a_Punto_LCD_MG_9629.jpg | ||
|Step_Picture_01=Montaje_P3steel_-_Tutorial_4_-_Puesta_a_Punto_LCD_MG_9628.jpg | |Step_Picture_01=Montaje_P3steel_-_Tutorial_4_-_Puesta_a_Punto_LCD_MG_9628.jpg | ||
| Ligne 58 : | Ligne 52 : | ||
{{ {{tntn|Tuto Step}} | {{ {{tntn|Tuto Step}} | ||
|Step_Title=Comprobación de la cama caliente | |Step_Title=Comprobación de la cama caliente | ||
| − | |Step_Content= | + | |Step_Content= |
| − | |||
| − | |||
|Step_Picture_00=Montaje_P3steel_-_Tutorial_4_-_Puesta_a_Punto_LCD_MG_9633.jpg | |Step_Picture_00=Montaje_P3steel_-_Tutorial_4_-_Puesta_a_Punto_LCD_MG_9633.jpg | ||
|Step_Picture_01=Montaje_P3steel_-_Tutorial_4_-_Puesta_a_Punto_LCD_MG_9632.jpg | |Step_Picture_01=Montaje_P3steel_-_Tutorial_4_-_Puesta_a_Punto_LCD_MG_9632.jpg | ||
| Ligne 68 : | Ligne 60 : | ||
{{ {{tntn|Tuto Step}} | {{ {{tntn|Tuto Step}} | ||
|Step_Title=Sentido de los ejes | |Step_Title=Sentido de los ejes | ||
| − | |Step_Content= | + | |Step_Content= |
| − | |||
| − | |||
|Step_Picture_00=Montaje_P3steel_-_Tutorial_4_-_Puesta_a_Punto_LCD_MG_9638.jpg | |Step_Picture_00=Montaje_P3steel_-_Tutorial_4_-_Puesta_a_Punto_LCD_MG_9638.jpg | ||
|Step_Picture_01=Montaje_P3steel_-_Tutorial_4_-_Puesta_a_Punto_LCD_MG_9639.jpg | |Step_Picture_01=Montaje_P3steel_-_Tutorial_4_-_Puesta_a_Punto_LCD_MG_9639.jpg | ||
| Ligne 79 : | Ligne 69 : | ||
{{ {{tntn|Tuto Step}} | {{ {{tntn|Tuto Step}} | ||
|Step_Title=Calibración del eje Z | |Step_Title=Calibración del eje Z | ||
| − | |Step_Content= | + | |Step_Content= |
| − | |||
| − | |||
| − | |||
| − | |||
| − | |||
|Step_Picture_00=Montaje_P3steel_-_Tutorial_4_-_Puesta_a_Punto_comprobacion-z-motor-3-1200.jpg | |Step_Picture_00=Montaje_P3steel_-_Tutorial_4_-_Puesta_a_Punto_comprobacion-z-motor-3-1200.jpg | ||
|Step_Picture_01=Montaje_P3steel_-_Tutorial_4_-_Puesta_a_Punto_comprobacion-z-motor-1-1200.jpg | |Step_Picture_01=Montaje_P3steel_-_Tutorial_4_-_Puesta_a_Punto_comprobacion-z-motor-1-1200.jpg | ||
| Ligne 92 : | Ligne 77 : | ||
{{ {{tntn|Tuto Step}} | {{ {{tntn|Tuto Step}} | ||
|Step_Title=Calibración del sensor de nivelación automática de la superficie de impresión | |Step_Title=Calibración del sensor de nivelación automática de la superficie de impresión | ||
| − | |Step_Content= | + | |Step_Content= |
| − | |||
| − | |||
| − | |||
| − | |||
| − | |||
| − | |||
|Step_Picture_00=Montaje_P3steel_-_Tutorial_4_-_Puesta_a_Punto_LCD_MG_9621.jpg | |Step_Picture_00=Montaje_P3steel_-_Tutorial_4_-_Puesta_a_Punto_LCD_MG_9621.jpg | ||
|Step_Picture_00_annotation={"version":"2.4.1","objects":[],"height":600,"width":600} | |Step_Picture_00_annotation={"version":"2.4.1","objects":[],"height":600,"width":600} | ||
}} | }} | ||
{{ {{tntn|Tuto Step}} | {{ {{tntn|Tuto Step}} | ||
| − | |Step_Title= | + | |Step_Title=Ajuste del desfase del 3DTouch |
|Step_Content= | |Step_Content= | ||
|Step_Picture_00=Montaje_P3steel_-_Tutorial_4_-_Puesta_a_Punto_calibrar-Z-3d-touch-2-1200.jpg | |Step_Picture_00=Montaje_P3steel_-_Tutorial_4_-_Puesta_a_Punto_calibrar-Z-3d-touch-2-1200.jpg | ||
| − | |Step_Picture_01 | + | |Step_Picture_01=Montaje_P3steel_-_Tutorial_4_-_Puesta_a_Punto_calibrar-Z-3d-touch-3-1200.jpg |
| − | + | |Step_Picture_01_annotation={"version":"2.4.1","objects":[],"height":600,"width":600} | |
| − | | | + | |Step_Picture_02_annotation={"version":"2.4.1","objects":[],"height":600,"width":600} |
| − | | | ||
| − | |||
}} | }} | ||
{{ {{tntn|Tuto Step}} | {{ {{tntn|Tuto Step}} | ||
| Ligne 118 : | Ligne 95 : | ||
{{ {{tntn|Tuto Step}} | {{ {{tntn|Tuto Step}} | ||
|Step_Title=Colocación del cristal templado de borosilicato (Opcional) | |Step_Title=Colocación del cristal templado de borosilicato (Opcional) | ||
| − | |Step_Content= | + | |Step_Content= |
| − | |||
| − | |||
| − | |||
| − | |||
| − | |||
| − | |||
| − | |||
| − | |||
}} | }} | ||
{{ {{tntn|Tuto Step}} | {{ {{tntn|Tuto Step}} | ||
Version du 1 juin 2019 à 14:00
Montaje P3steel - Tutorial 4 - Puesta a Punto


Difficulté
Facile
Durée
30 minute(s)
Catégories
Électronique, Machines & Outils
Coût
450 EUR (€)
Sommaire
- 1 Étape 1 - Comprobación del LCD
- 2 Étape 2 - Comprobación de los ventiladores a 12V
- 3 Étape 3 - Comprobación del ventilador de capa
- 4 Étape 4 - Comprobación del fusor
- 5 Étape 5 - Comprobación de la cama caliente
- 6 Étape 6 - Sentido de los ejes
- 7 Étape 7 - Calibración del eje Z
- 8 Étape 8 - Calibración del sensor de nivelación automática de la superficie de impresión
- 9 Étape 9 - Ajuste del desfase del 3DTouch
- 10 Étape 10 - Comprobación del recorrido máximo de los ejes
- 11 Étape 11 - Colocación del cristal templado de borosilicato (Opcional)
- 12 Étape 12 - Colocación del soporte del filamento
- 13 Étape 13 - Colocación del cristal con recubrimiento microposoro (Opcional)
- 14 Commentaires
Matériaux
Outils
Étape 1 - Comprobación del LCD

Étape 2 - Comprobación de los ventiladores a 12V


Étape 3 - Comprobación del ventilador de capa


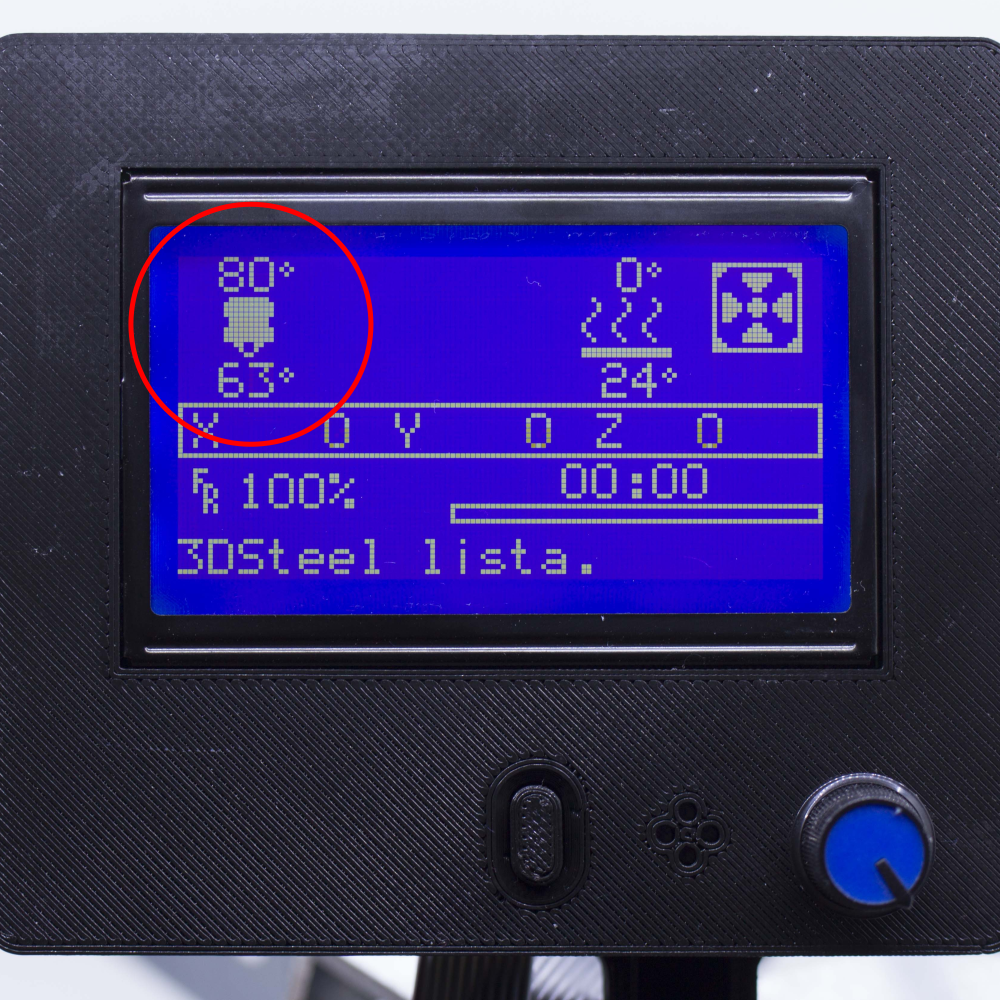
Étape 4 - Comprobación del fusor


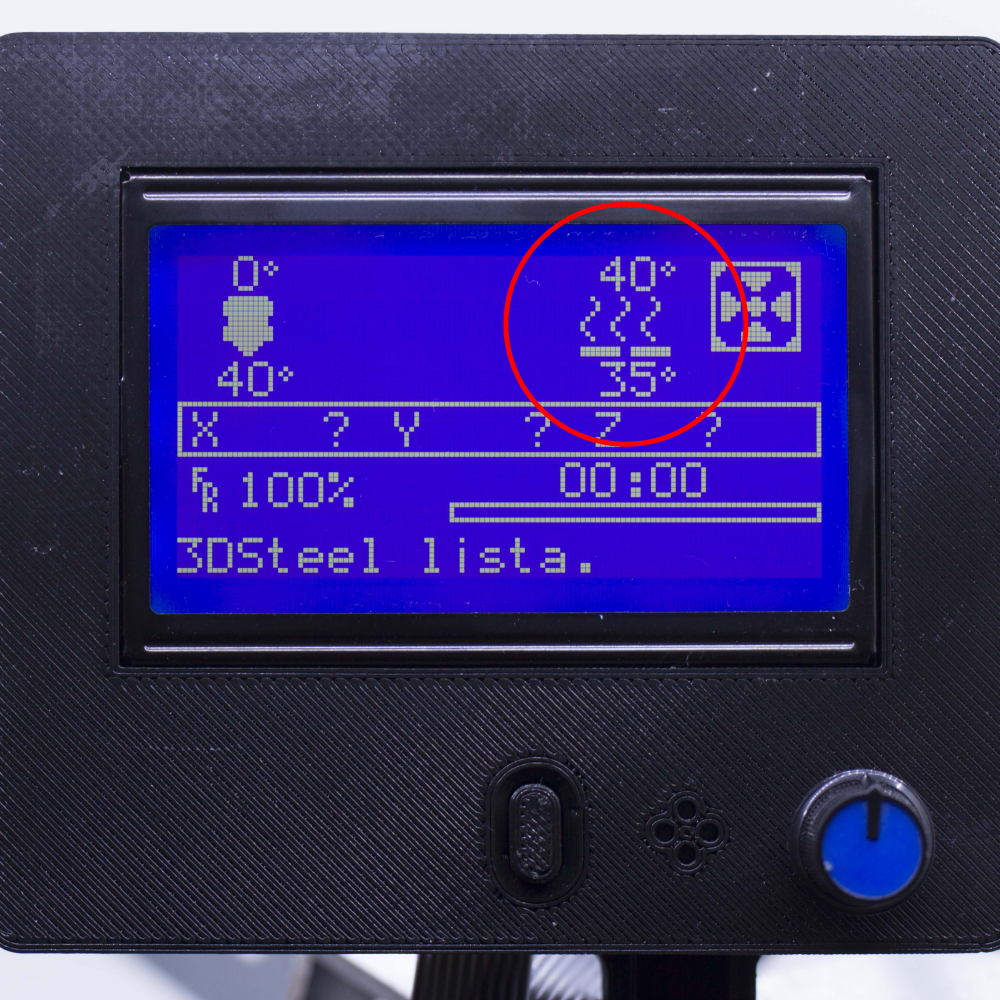
Étape 5 - Comprobación de la cama caliente


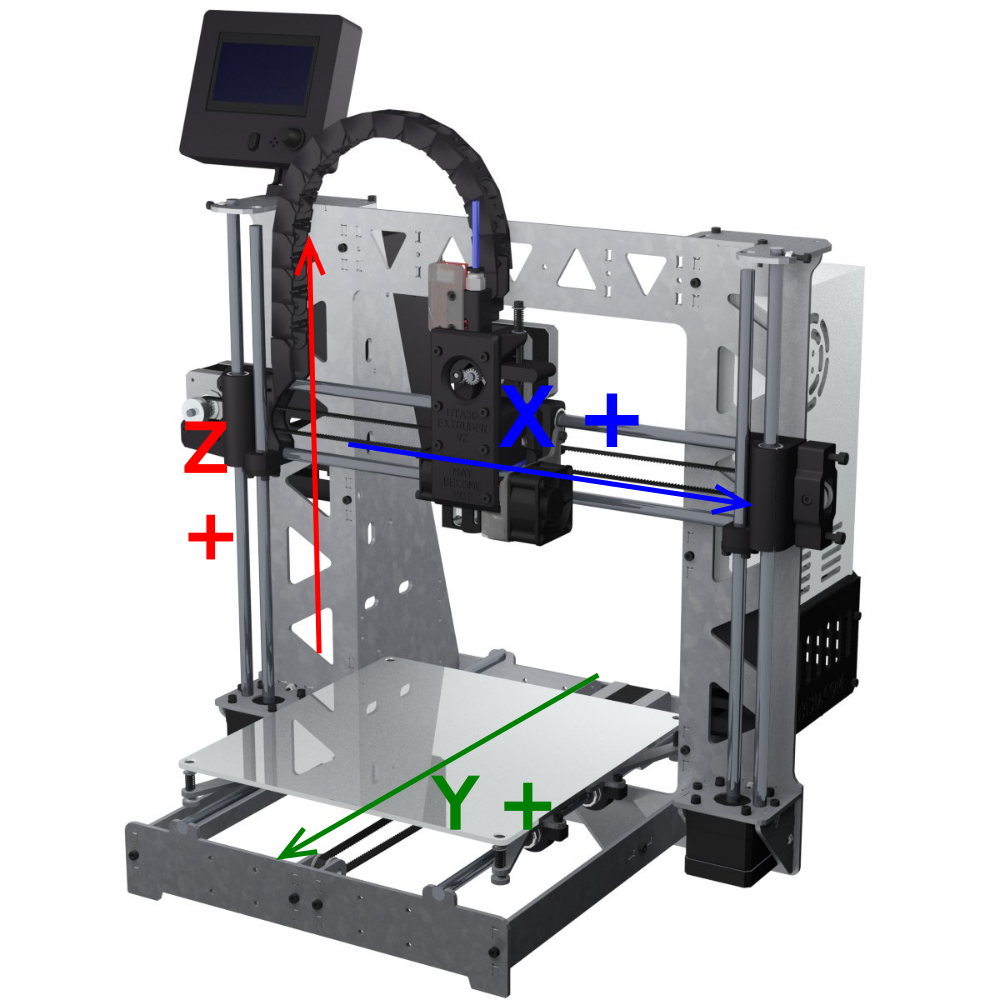
Étape 6 - Sentido de los ejes


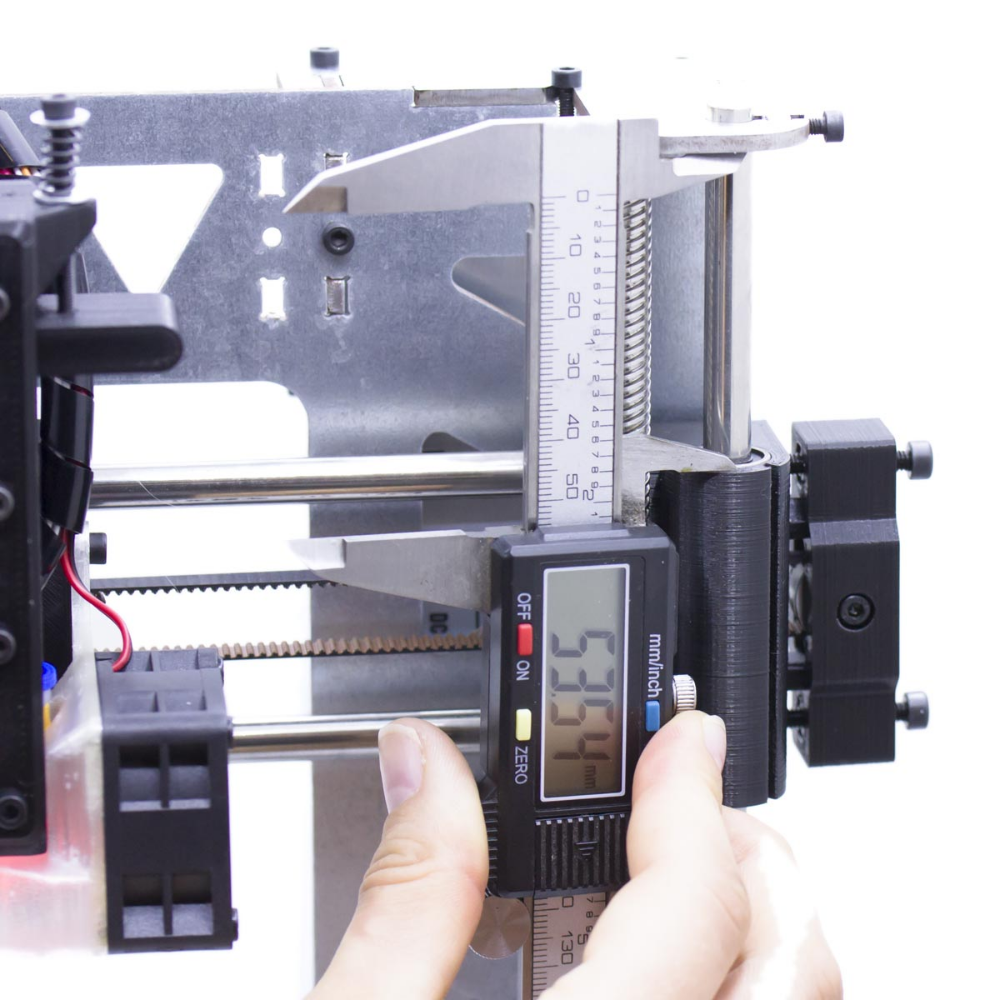
Étape 7 - Calibración del eje Z


Étape 8 - Calibración del sensor de nivelación automática de la superficie de impresión
Étape 9 - Ajuste del desfase del 3DTouch


Étape 10 - Comprobación del recorrido máximo de los ejes
Étape 11 - Colocación del cristal templado de borosilicato (Opcional)
Étape 12 - Colocación del soporte del filamento
Étape 13 - Colocación del cristal con recubrimiento microposoro (Opcional)
Draft
 Français
 English
 Deutsch
 Español
 Italiano
 Português