(update property name) |
|||
| Ligne 1 : | Ligne 1 : | ||
| − | {{ | + | {{Tuto Details |
|Main_Picture=Montaje_P3steel_-_Tutorial_2_-_Eje_X_y_extrusor_48.jpg | |Main_Picture=Montaje_P3steel_-_Tutorial_2_-_Eje_X_y_extrusor_48.jpg | ||
|Licences=Attribution (CC BY) | |Licences=Attribution (CC BY) | ||
| Ligne 14 : | Ligne 14 : | ||
|IsTranslation=0 | |IsTranslation=0 | ||
}} | }} | ||
| − | {{ | + | {{Introduction |
|Introduction=En este segundo tutorial de la impresora 3DSteel, vamos a ensamblar el eje X, el eje Z y el extrusor. | |Introduction=En este segundo tutorial de la impresora 3DSteel, vamos a ensamblar el eje X, el eje Z y el extrusor. | ||
| Ligne 27 : | Ligne 27 : | ||
[https://www.hta3d.com/3dsteel www.hta3d.com/3dsteel] | [https://www.hta3d.com/3dsteel www.hta3d.com/3dsteel] | ||
}} | }} | ||
| − | {{ | + | {{Materials |
|Step_Picture_00=Montaje_P3steel_-_Tutorial_1_-_Estructura_y_eje_Y_aviso_peligro_5_5-4.jpg | |Step_Picture_00=Montaje_P3steel_-_Tutorial_1_-_Estructura_y_eje_Y_aviso_peligro_5_5-4.jpg | ||
|Material=Tornillería: | |Material=Tornillería: | ||
| Ligne 65 : | Ligne 65 : | ||
* Tenacillas | * Tenacillas | ||
* Tijeras o tenacillas de corte | * Tijeras o tenacillas de corte | ||
| − | |Prerequisites={{ | + | |Prerequisites={{Prerequisites |
|Prerequisites=Montaje P3steel - Tutorial 1 - Estructura y eje Y | |Prerequisites=Montaje P3steel - Tutorial 1 - Estructura y eje Y | ||
}} | }} | ||
}} | }} | ||
| − | {{ | + | {{Separator}} |
| − | {{ | + | {{Tuto Step |
|Step_Title=Preparación varillas en el carro del eje X | |Step_Title=Preparación varillas en el carro del eje X | ||
|Step_Content=<big>Componentes:</big> | |Step_Content=<big>Componentes:</big> | ||
| Ligne 84 : | Ligne 84 : | ||
|Step_Picture_01=Montaje_P3steel_-_Tutorial_2_-_Eje_X_y_extrusor_6.jpg | |Step_Picture_01=Montaje_P3steel_-_Tutorial_2_-_Eje_X_y_extrusor_6.jpg | ||
}} | }} | ||
| − | {{ | + | {{Tuto Step |
|Step_Title=Ensamblaje del eje X: X motor, carro, X idler y varillas | |Step_Title=Ensamblaje del eje X: X motor, carro, X idler y varillas | ||
|Step_Content=<big>Componentes:</big> | |Step_Content=<big>Componentes:</big> | ||
| Ligne 103 : | Ligne 103 : | ||
|Step_Picture_05=Montaje_P3steel_-_Tutorial_2_-_Eje_X_y_extrusor_X-Eje-2.jpg | |Step_Picture_05=Montaje_P3steel_-_Tutorial_2_-_Eje_X_y_extrusor_X-Eje-2.jpg | ||
}} | }} | ||
| − | {{ | + | {{Tuto Step |
|Step_Title=Montaje del eje X en la estructura | |Step_Title=Montaje del eje X en la estructura | ||
|Step_Content=En este paso vamos a ensamblar el eje X con el eje Z. | |Step_Content=En este paso vamos a ensamblar el eje X con el eje Z. | ||
| Ligne 122 : | Ligne 122 : | ||
|Step_Picture_01=Montaje_P3steel_-_Tutorial_2_-_Eje_X_y_extrusor_14.jpg | |Step_Picture_01=Montaje_P3steel_-_Tutorial_2_-_Eje_X_y_extrusor_14.jpg | ||
}} | }} | ||
| − | {{ | + | {{Tuto Step |
|Step_Title=Montaje motores del eje Z | |Step_Title=Montaje motores del eje Z | ||
|Step_Content=<big>Componentes:</big> | |Step_Content=<big>Componentes:</big> | ||
| Ligne 144 : | Ligne 144 : | ||
|Step_Picture_03=Montaje_P3steel_-_Tutorial_2_-_Eje_X_y_extrusor_mo.jpg | |Step_Picture_03=Montaje_P3steel_-_Tutorial_2_-_Eje_X_y_extrusor_mo.jpg | ||
}} | }} | ||
| − | {{ | + | {{Tuto Step |
|Step_Title=Montaje Z top - primer paso | |Step_Title=Montaje Z top - primer paso | ||
|Step_Content=<big>Componentes:</big> | |Step_Content=<big>Componentes:</big> | ||
| Ligne 161 : | Ligne 161 : | ||
|Step_Picture_01=Montaje_P3steel_-_Tutorial_2_-_Eje_X_y_extrusor_28._Ztop_iii.jpg | |Step_Picture_01=Montaje_P3steel_-_Tutorial_2_-_Eje_X_y_extrusor_28._Ztop_iii.jpg | ||
}} | }} | ||
| − | {{ | + | {{Tuto Step |
|Step_Title=Montaje Z top - segundo paso | |Step_Title=Montaje Z top - segundo paso | ||
|Step_Content=<big>Componentes:</big> | |Step_Content=<big>Componentes:</big> | ||
| Ligne 177 : | Ligne 177 : | ||
|Step_Picture_02=Montaje_P3steel_-_Tutorial_2_-_Eje_X_y_extrusor_20.jpg | |Step_Picture_02=Montaje_P3steel_-_Tutorial_2_-_Eje_X_y_extrusor_20.jpg | ||
}} | }} | ||
| − | {{ | + | {{Tuto Step |
|Step_Title=Colocación de la correa del eje X | |Step_Title=Colocación de la correa del eje X | ||
|Step_Content=<big>Componentes:</big> | |Step_Content=<big>Componentes:</big> | ||
| Ligne 199 : | Ligne 199 : | ||
|Step_Picture_05=Montaje_P3steel_-_Tutorial_2_-_Eje_X_y_extrusor_X-Eje-En-Estructura-01.jpg | |Step_Picture_05=Montaje_P3steel_-_Tutorial_2_-_Eje_X_y_extrusor_X-Eje-En-Estructura-01.jpg | ||
}} | }} | ||
| − | {{ | + | {{Tuto Step |
|Step_Title=Colocación extrusor en el carro | |Step_Title=Colocación extrusor en el carro | ||
|Step_Content=<big>Componentes:</big> | |Step_Content=<big>Componentes:</big> | ||
| Ligne 223 : | Ligne 223 : | ||
|Step_Picture_03=Montaje_P3steel_-_Tutorial_2_-_Eje_X_y_extrusor_extrusor-montado-1-1200.jpg | |Step_Picture_03=Montaje_P3steel_-_Tutorial_2_-_Eje_X_y_extrusor_extrusor-montado-1-1200.jpg | ||
}} | }} | ||
| − | {{ | + | {{Tuto Step |
|Step_Title=Colocación de ventilador de capa | |Step_Title=Colocación de ventilador de capa | ||
|Step_Content=<big>Componentes:</big> | |Step_Content=<big>Componentes:</big> | ||
| Ligne 238 : | Ligne 238 : | ||
|Step_Picture_02=Montaje_P3steel_-_Tutorial_2_-_Eje_X_y_extrusor_extrusor-montado-2-1200.jpg | |Step_Picture_02=Montaje_P3steel_-_Tutorial_2_-_Eje_X_y_extrusor_extrusor-montado-2-1200.jpg | ||
}} | }} | ||
| − | {{ | + | {{Tuto Step |
|Step_Title=Colocación de la cadena portacables | |Step_Title=Colocación de la cadena portacables | ||
|Step_Content=<big>Componentes:</big> | |Step_Content=<big>Componentes:</big> | ||
| Ligne 258 : | Ligne 258 : | ||
|Step_Picture_03=Montaje_P3steel_-_Tutorial_2_-_Eje_X_y_extrusor_cadenas.jpg | |Step_Picture_03=Montaje_P3steel_-_Tutorial_2_-_Eje_X_y_extrusor_cadenas.jpg | ||
}} | }} | ||
| − | {{ | + | {{Tuto Step |
|Step_Title=Ordenar cables | |Step_Title=Ordenar cables | ||
|Step_Content=<big>Componentes:</big> | |Step_Content=<big>Componentes:</big> | ||
| Ligne 274 : | Ligne 274 : | ||
|Step_Picture_03=Montaje_P3steel_-_Tutorial_2_-_Eje_X_y_extrusor_Marco-con-eje-X-1-1200.jpg | |Step_Picture_03=Montaje_P3steel_-_Tutorial_2_-_Eje_X_y_extrusor_Marco-con-eje-X-1-1200.jpg | ||
}} | }} | ||
| − | {{ | + | {{Notes |
|Notes= | |Notes= | ||
}} | }} | ||
| − | {{ | + | {{Tuto Status |
|Complete=Draft | |Complete=Draft | ||
}} | }} | ||
Version du 9 décembre 2019 à 12:44
Montaje 3DSteel - Tutorial 2 - Eje X, eje Z y extrusor


Difficulté
Facile
Durée
30 minute(s)
Catégories
Machines & Outils
Coût
450 EUR (€)
Sommaire
- 1 Introduction
- 2 Étape 1 - Preparación varillas en el carro del eje X
- 3 Étape 2 - Ensamblaje del eje X: X motor, carro, X idler y varillas
- 4 Étape 3 - Montaje del eje X en la estructura
- 5 Étape 4 - Montaje motores del eje Z
- 6 Étape 5 - Montaje Z top - primer paso
- 7 Étape 6 - Montaje Z top - segundo paso
- 8 Étape 7 - Colocación de la correa del eje X
- 9 Étape 8 - Colocación extrusor en el carro
- 10 Étape 9 - Colocación de ventilador de capa
- 11 Étape 10 - Colocación de la cadena portacables
- 12 Étape 11 - Ordenar cables
- 13 Commentaires
Introduction
En este segundo tutorial de la impresora 3DSteel, vamos a ensamblar el eje X, el eje Z y el extrusor.
Los siguientes tutoriales sonː
Puedes ver el artículo en nuestra webː

Matériaux
Tornillería:
- M3x8: 8 unidades
- M3x12: 7 unidades
- M4x25: 4 unidades
- Tuercas autoblocantes M3: 6 unidades
- Arandelas autoblocantes M3: 8 unidades
Conjuntoss:
- X motor premontado
- X ildler premontado
- X carro premontado
- Extrusor
Piezas impresas:
- Cadenas portacable
Piezas de la estructura:
- Marco principal ensamblado tras el Tutorial 1
- Parte superior del eje Z
- Varillas lisas D=8 L=375 mmː dos unidades
- Varillas lisas D=8 L=320 mmː dos unidades
Otros:
- Motores 17hs4401s con husillo integrado: 2 unidades
- Correa GT2: 1 metro aprox.
- Brida: 1 unidad
Outils
- Destornillador allen para M3
- Destornillador allen para M4
- Llave Allen para espárragos de la polea
- Tenacillas
- Tijeras o tenacillas de corte
Étape 1 - Preparación varillas en el carro del eje X
Componentes:
- Carro con rodamientos
- 2 varillas 375 mm
Montaje:
- Introducimos con cuidado las varillas a través de los rodamientos del carro.


Étape 2 - Ensamblaje del eje X: X motor, carro, X idler y varillas
Componentes:
- Conjunto anterior
- Conjunto del X motor
- Conjunto del X idler
Montaje:
- Introducimos las varillas por uno de los extremos a presión.
- Introducimos el otro extremo del eje.


Étape 3 - Montaje del eje X en la estructura
En este paso vamos a ensamblar el eje X con el eje Z.
Componentes:
- Estructura del Tutorial 1
- Conjunto del eje X
- 2 varillas 320 mm
Montaje:
- Introducimos las varillas por los rodamientos.
- Hacemos coincidir las varillas con los orificios del marco que las sujetarán (al no haber montado aún el motor, las varillas se deslizarán hacia abajo hasta el paso siguiente).


Étape 4 - Montaje motores del eje Z
Componentes:
- Estructura
- 2 motores paso a paso
- 8 tornillos Mx8
- 8 arandelas autoblocantes M3
Montaje:
- Colocamos los motores en su posición uno a uno.
- Al llegar a las tuercas de POM vamos girando el eje del motor para que entre en las mismas.
- Introducimos los tornillos por sus orificios, pasando una arandela entre el tornillo y la estructura.
- Atornillamos uno a uno los tornillos al motor.
- Repetimos estos paso para el otro motor del eje Z.


Étape 5 - Montaje Z top - primer paso
Componentes:
- Estructura del paso anterior
- 2 piezas metálicas para la parte superior de Z
- 4 tornillos M3x12
- 4 tuercas autoblocantes M3
Montaje:
- Empezando por uno de los laterales colocamos en la parte superior del eje Z la pieza metálica.
- Colocamos, una a una, las tuercas en su hueco en el marco y atornillamos.
- Repetimos estos paso para el otro motor del eje Z.


Étape 6 - Montaje Z top - segundo paso
Componentes:
- Estructura del paso anterior
- 2 tornillos M3x12
- 2 tuercas autoblocantes M3
Montaje:
- Colocamos la tuerca en su hueco en el marco y atornillamos.
- Repetimos estos paso para el otro lateral del eje Z.


Étape 7 - Colocación de la correa del eje X
Componentes:
- Estructura del paso anterior
- 1 metro aprox. de correa GT2
Montaje:
- Introducimos el extremo de la correa por uno de huecos del carro diseñado para sujetarla, utilizando el cilindro del carro para que las correas quedan sujetas sobre sí misma y a presión con el carro.
- Conducimos la correa hacia su extremo en el eje X y la pasamos a través de la polea.
- Conducimos la correa hacia el otro extremo en el eje X y la pasamos a través de la polea.
- Volvemos al carro y la fijamos a él conduciéndola por el cilidro y fijándola consigo misma y a presión, tensándola en la medida de lo posible.
- Cortamos el restante de correa, no al ras, pero corto de manera que no interfiera cuando esté en movimiento con la parte de la correa que queda abajo.
- Ahora podemos utilizar el tensor. Si atornillamos los tornillos hará que se aleje el tensor de la pieza y tense la correa.


Étape 8 - Colocación extrusor en el carro
Componentes:
- Estructura
- Conjunto del paso anterior
- 4 tornillos M4x25
Montaje:
- Sacamos los tornillos M4x25 presentados en el extrusor.
- Los introducimos en sus orificios en el carro.
- Hacemos coincidir los orifcios del carro con los orificios del extrusor.
- Introducimos los tornillos en el extrusor hasta las tuercas M4.


Étape 9 - Colocación de ventilador de capa
Componentes:
- Conjunto del paso anterior
- Estructura principal
- 2 tornillos M3x12
Montaje:
- Introducimos los tornillos M3x12 en sus correspondientes posiciones y fijamos para fijar el soporte del ventilador al carro.


Étape 10 - Colocación de la cadena portacables
Componentes:
- Estructura principal
- Piezas impresas de la cadena
Montaje:
- Colocamos cada eslabón formando la cadena.
- Pasamos los cables a través de ella.
- Pasamos los cables a través de las dos bridas que incluye la pieza impresa del motor de X.
- Colocamos la tapa de cada eslabón, de manera que quede cerrada con los cables ordeandos dentro.


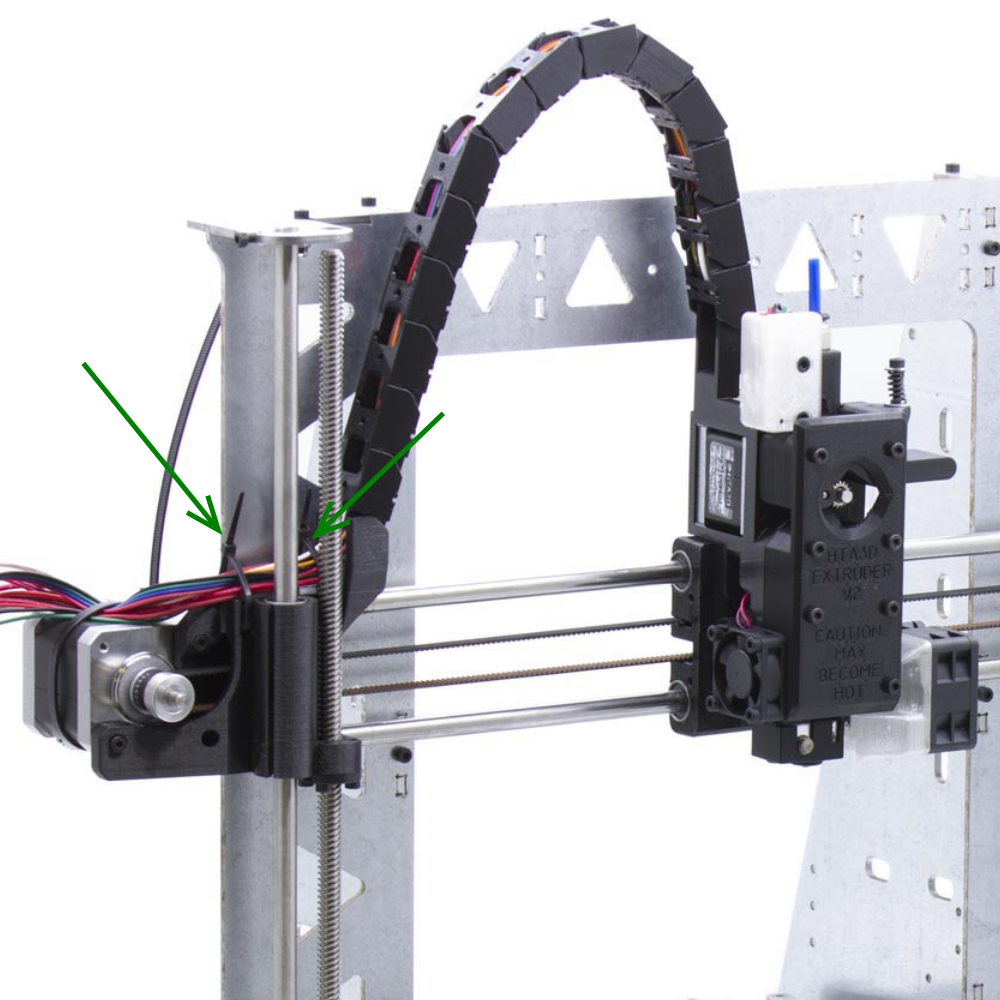

Étape 11 - Ordenar cables
Componentes:
- Estructura principal
- Brida
Montaje:
- Cerramos las bridas de la pieza impresa del motor de X.
- Colocamos una brida en el motor de X sujetando los cables de manera que queden ordenados.


Draft
 Français
 English
 Deutsch
 Español
 Italiano
 Português