(convert properties for internationnalized Wikifab) |
(update property name) |
||
| (4 révisions intermédiaires par 3 utilisateurs non affichées) | |||
| Ligne 1 : | Ligne 1 : | ||
| − | {{ | + | {{Tuto Details |
| − | |SourceLanguage= | + | |SourceLanguage=none |
|Language=en | |Language=en | ||
|IsTranslation=0 | |IsTranslation=0 | ||
|Type=Creation | |Type=Creation | ||
|Area=Clothing and Accessories | |Area=Clothing and Accessories | ||
| − | |Description=<translate>A simple collar made of a small copper tube</translate> | + | |Description=<translate><!--T:1--> A simple collar made of a small copper tube</translate> |
|Difficulty=Easy | |Difficulty=Easy | ||
|Cost=10 | |Cost=10 | ||
| Ligne 14 : | Ligne 14 : | ||
|Main_Picture=COL_Step01_01.jpg | |Main_Picture=COL_Step01_01.jpg | ||
}} | }} | ||
| − | {{ | + | {{Introduction|}} |
| − | {{ | + | {{Materials |
| − | |Material=<translate>* A white waxed cotton cord | + | |Material=<translate><!--T:2--> |
| + | * A white waxed cotton cord | ||
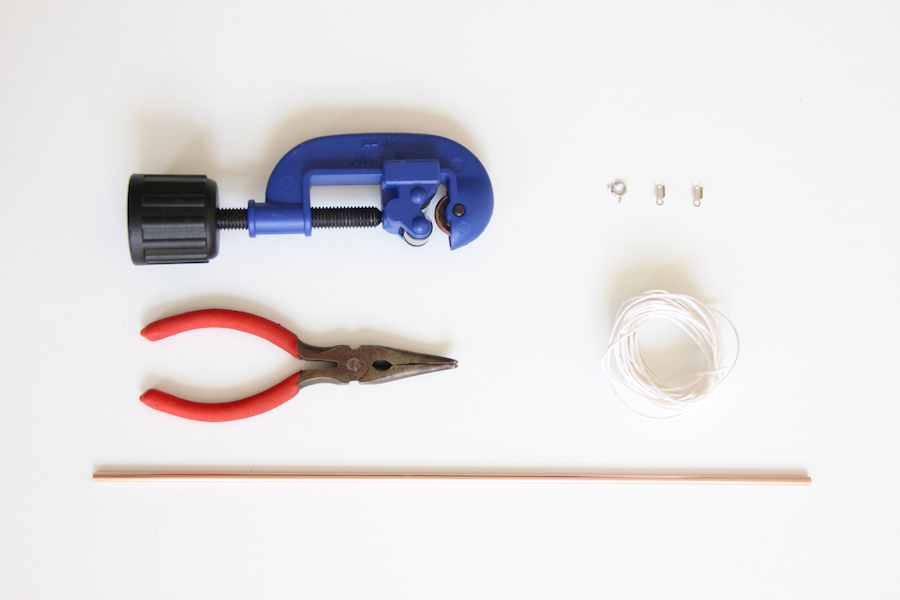
* A clasp and two cable wire ends 9 mm | * A clasp and two cable wire ends 9 mm | ||
* A 18 cm copper tube of 3 mm diameter</translate> | * A 18 cm copper tube of 3 mm diameter</translate> | ||
| Ligne 31 : | Ligne 32 : | ||
}} | }} | ||
{{Separator}} | {{Separator}} | ||
| − | {{ | + | {{Tuto Step |
| − | |Step_Title=<translate>Cut the small copper tubes</translate> | + | |Step_Title=<translate><!--T:3--> Cut the small copper tubes</translate> |
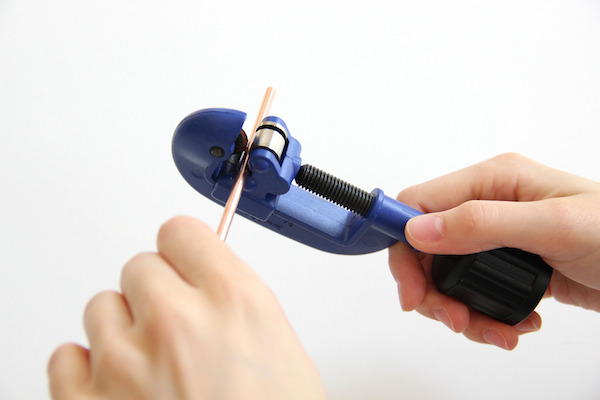
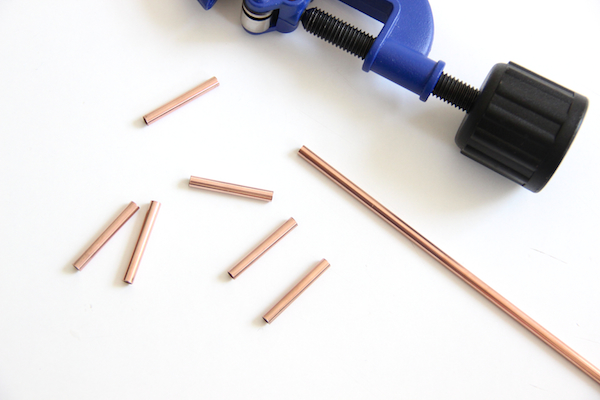
| − | |Step_Content=<translate>Cut the copper tube 3 cm in length with a pipe cutter pliers</translate> | + | |Step_Content=<translate><!--T:4--> Cut the copper tube 3 cm in length with a pipe cutter pliers</translate> |
|Step_Picture_00=COL_Step03_01.jpg | |Step_Picture_00=COL_Step03_01.jpg | ||
|Step_Picture_01=COL_Step04_01.jpg | |Step_Picture_01=COL_Step04_01.jpg | ||
| Ligne 41 : | Ligne 42 : | ||
|Step_Picture_05=No-image-yet.jpg | |Step_Picture_05=No-image-yet.jpg | ||
}} | }} | ||
| − | {{ | + | {{Tuto Step |
| − | |Step_Title=<translate>Cut the cord and slide in the tubes</translate> | + | |Step_Title=<translate><!--T:5--> Cut the cord and slide in the tubes</translate> |
| − | |Step_Content=<translate>Cut 80 cm white cord, inserting the first tube equidistant from each end of the cord. | + | |Step_Content=<translate><!--T:6--> |
| + | Cut 80 cm white cord, inserting the first tube equidistant from each end of the cord. | ||
| + | <!--T:7--> | ||
Insert the second tube on one side of the cord and thread the other end of the cord on the other side of the tube. Repeat with the other tubes.</translate> | Insert the second tube on one side of the cord and thread the other end of the cord on the other side of the tube. Repeat with the other tubes.</translate> | ||
|Step_Picture_00=COL_Step05_01.jpg | |Step_Picture_00=COL_Step05_01.jpg | ||
| Ligne 53 : | Ligne 56 : | ||
|Step_Picture_05=No-image-yet.jpg | |Step_Picture_05=No-image-yet.jpg | ||
}} | }} | ||
| − | {{ | + | {{Tuto Step |
| − | |Step_Title=<translate>Place the caps and clasp</translate> | + | |Step_Title=<translate><!--T:8--> Place the caps and clasp</translate> |
| − | |Step_Content=<translate>Place both greenhouse wire ferrules to the ends of the cord, the back a little on himself to give more thickness and squeeze him hard with the pliers. Open the clasp with the clamp and to slide one of two ferrules.</translate> | + | |Step_Content=<translate><!--T:9--> Place both greenhouse wire ferrules to the ends of the cord, the back a little on himself to give more thickness and squeeze him hard with the pliers. Open the clasp with the clamp and to slide one of two ferrules.</translate> |
|Step_Picture_00=COL_Step06_01.jpg | |Step_Picture_00=COL_Step06_01.jpg | ||
|Step_Picture_01=No-image-yet.jpg | |Step_Picture_01=No-image-yet.jpg | ||
| Ligne 63 : | Ligne 66 : | ||
|Step_Picture_05=No-image-yet.jpg | |Step_Picture_05=No-image-yet.jpg | ||
}} | }} | ||
| − | {{ | + | {{Tuto Step |
| − | |Step_Title=<translate>Ta Da!</translate> | + | |Step_Title=<translate><!--T:10--> Ta Da!</translate> |
| − | |Step_Content=<translate>Well done! Share pictures of your collar on Wikifab. We would love to see what you have make from that simple tutorial.</translate> | + | |Step_Content=<translate><!--T:11--> Well done! Share pictures of your collar on Wikifab. We would love to see what you have make from that simple tutorial.</translate> |
|Step_Picture_00=COL_Step07_01.jpg | |Step_Picture_00=COL_Step07_01.jpg | ||
|Step_Picture_01=No-image-yet.jpg | |Step_Picture_01=No-image-yet.jpg | ||
| Ligne 73 : | Ligne 76 : | ||
|Step_Picture_05=No-image-yet.jpg | |Step_Picture_05=No-image-yet.jpg | ||
}} | }} | ||
| − | {{ | + | {{Notes|}} |
{{Tuto_Status | {{Tuto_Status | ||
| − | |Complete= | + | |Complete=Published |
}} | }} | ||
{{Separator}} | {{Separator}} | ||
Version actuelle datée du 9 décembre 2019 à 11:29
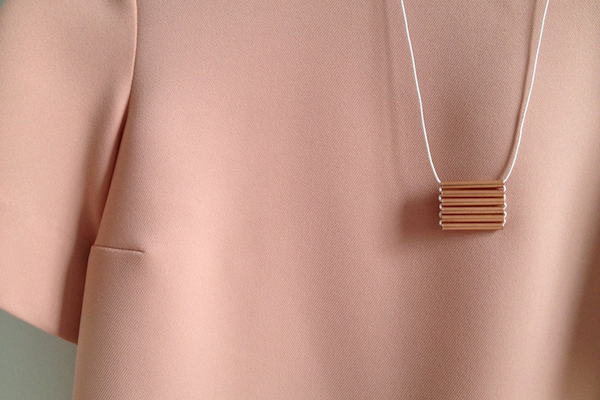
A simple collar made of a small copper tube
Difficulté
Facile
Durée
40 minute(s)
Catégories
Vêtement & Accessoire
Coût
10 EUR (€)
Étape 2 - Cut the cord and slide in the tubes
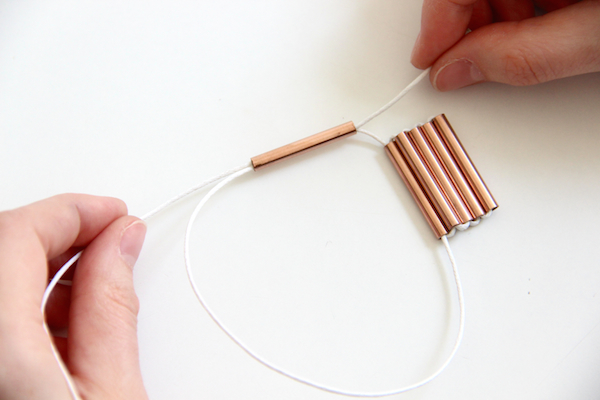
Cut 80 cm white cord, inserting the first tube equidistant from each end of the cord.
Insert the second tube on one side of the cord and thread the other end of the cord on the other side of the tube. Repeat with the other tubes.
Étape 3 - Place the caps and clasp
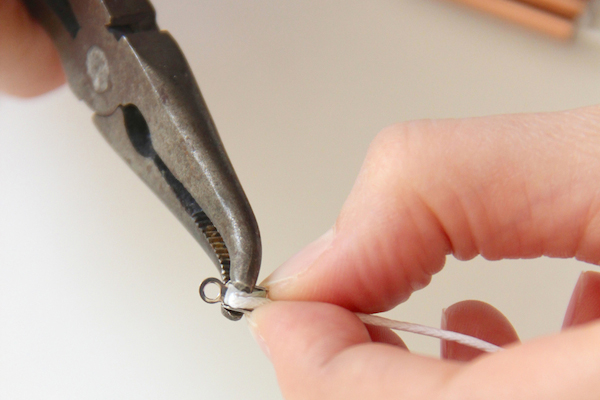
Place both greenhouse wire ferrules to the ends of the cord, the back a little on himself to give more thickness and squeeze him hard with the pliers. Open the clasp with the clamp and to slide one of two ferrules.
Étape 4 - Ta Da!
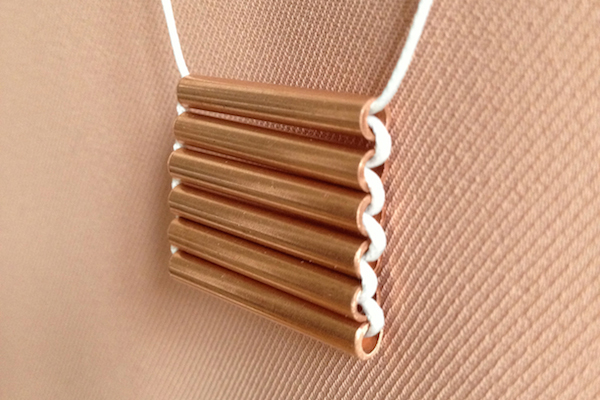
Well done! Share pictures of your collar on Wikifab. We would love to see what you have make from that simple tutorial.
Published

 Français
 English
 Deutsch
 Español
 Italiano
 Português