Will guide you to set static IP on ESP32.

Difficulté
Facile
Durée
2 heure(s)
Catégories
Électronique
Coût
20 USD ($)
Introduction
In this blog, I will show you how to set a static IP address on Xiao ESP32 S3 Sense, a tiny but powerful microcontroller board with Wi-Fi and Bluetooth capabilities. Setting a static IP address can be useful if you want to access your ESP32 web server or other network services using the same IP address, even after restarting the board.
Matériaux
Outils
Étape 1 - What is a Static IP Address?
An IP address is a unique identifier for a device on a network. It consists of four numbers separated by dots, such as 192.168.1.100. A static IP address is an IP address that does not change, unlike a dynamic IP address that is assigned by a router or a DHCP server.
Advantages
- Easier to remember and access.
- More reliable and stable connection
- Less prone to IP conflicts or errors
Disadvantages
- More difficult to configure and maintain.
- Less flexible and scalable
- More vulnerable to security risks
Therefore, you should only use a static IP address if you have a specific need for it, and if you are aware of the potential drawbacks.
Étape 2 - Get PCBs for Your Projects Manufactured
You must check out PCBWAY for ordering PCBs online for cheap!
You get 10 good-quality PCBs manufactured and shipped to your doorstep for cheap. You will also get a discount on shipping on your first order. Upload your Gerber files onto PCBWAY to get them manufactured with good quality and quick turnaround time. PCBWay now could provide a complete product solution, from design to enclosure production. Check out their online Gerber viewer function. With reward points, you can get free stuff from their gift shop. Also, check out this useful blog on PCBWay Plugin for KiCad from here. Using this plugin, you can directly order PCBs in just one click after completing your design in KiCad.

Étape 3 - How to Set a Static IP Address on Xiao ESP32 S3 Sense
To set a static IP address on Xiao ESP32 S3 Sense, you will need the following:
- A Xiao ESP32 S3 Sense board
- A micro-USB cable.
- A computer with Arduino IDE installed.
- A Wi-Fi network with internet access
The steps are as follows:
- Connect the Xiao ESP32 S3 Sense board to your computer using the micro-USB cable.
- Open the Arduino IDE and select the correct board and port from the Tools menu.
- Obtain the current network settings of your ESP32 board by uploading the following sketch. Before uploading, make sure to replace the ssid and password variables with your actual Wi-Fi network credentials.
#include <WiFi.h>

const char* ssid = "YourNetworkName";
const char* password = "YourPassword";

void setup() {
  Serial.begin(115200);
  Serial.print("Connecting to ");
  Serial.println(ssid);
  WiFi.begin(ssid, password);
  while (WiFi.status() != WL_CONNECTED) {
    delay(1000);
    Serial.print(".");
  }
  Serial.println("");
  Serial.println("Connected..!");
  Serial.print("Current ESP32 IP: ");
  Serial.println(WiFi.localIP());
  Serial.print("Gateway (router) IP: ");
  Serial.println(WiFi.gatewayIP());
  Serial.print("Subnet Mask: " );
  Serial.println(WiFi.subnetMask());
  Serial.print("Primary DNS: ");
  Serial.println(WiFi.dnsIP(0));
  Serial.print("Secondary DNS: ");
  Serial.println(WiFi.dnsIP(1));
}

void loop() {
}
Étape 4 - System Response
Open the Serial Monitor and set the baud rate to 115200. Then, press the EN button on the ESP32 board. It may take a few moments to connect to your network, after which it will print the current network settings of the ESP32 board to the serial monitor. Take note of these settings, especially the IP address, gateway, subnet mask, and DNS servers.
- Choose a static IP address for your ESP32 board that is within the same subnet as your router but does not conflict with any other devices on your network. For example, if your router’s IP address is 192.168.1.1 and your subnet mask is 255.255.255.0, you can choose any IP address from 192.168.1.2 to 192.168.1.254, as long as it is not already taken by another device. You can check the IP addresses of other devices on your network using tools such as Fing or Advanced IP Scanner.
- Modify the previous sketch by adding the following lines before the WiFi.begin() function. Replace the staticIP, gateway, subnet, primaryDNS, and secondaryDNS variables with your chosen static IP address and the network settings you obtained in step 4.
// Static IP configuration
IPAddress staticIP(192, 168, 1, 100); // ESP32 static IP
IPAddress gateway(192, 168, 1, 1); // IP Address of your network gateway (router)
IPAddress subnet(255, 255, 255, 0); // Subnet mask
IPAddress primaryDNS(192, 168, 1, 1); // Primary DNS (optional)
IPAddress secondaryDNS(0, 0, 0, 0); // Secondary DNS (optional)

// Configures static IP address
if (!WiFi.config(staticIP, gateway, subnet, primaryDNS, secondaryDNS)) {
  Serial.println("STA Failed to configure");
}
- Upload the modified sketch to your ESP32 board and open the Serial Monitor again. You should see that your ESP32 board has successfully connected to your network using the static IP address you specified.
- You can now access your ESP32 web server or other network services using the static IP address. For example, if you have uploaded the ESP32 Web Server example sketch, you can open a web browser and type the static IP address in the address bar. You should see the web page that allows you to control the GPIO pins of your ESP32 board.

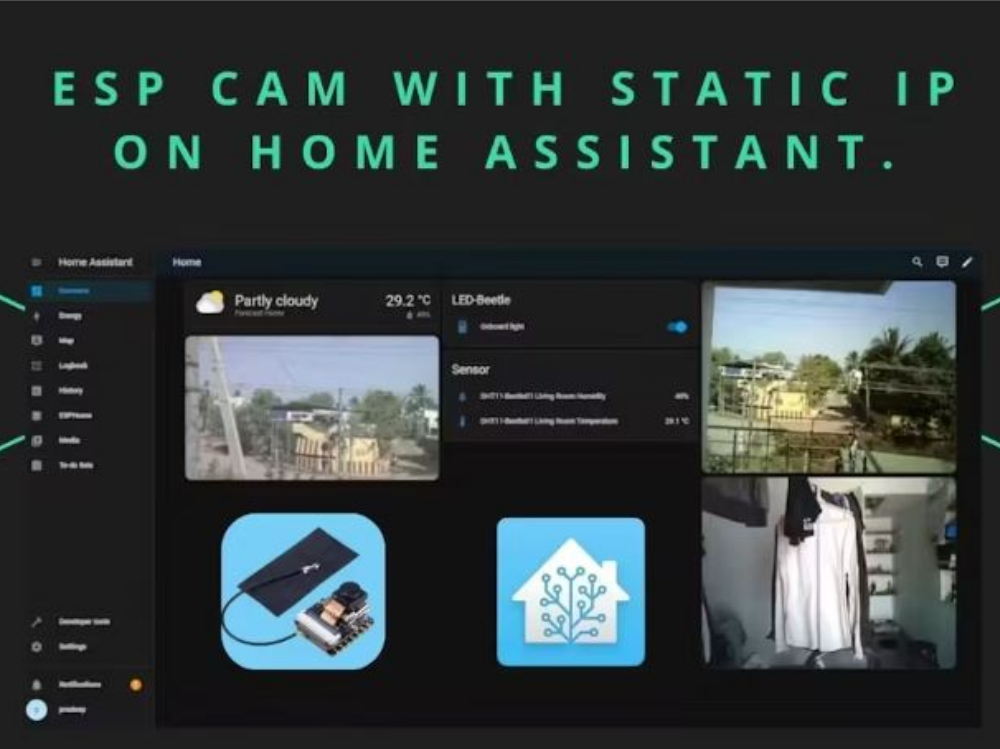
Étape 5 - Home Assistance with ESP32 Cam
Apart from controlling the LED's we can implement this on ESP32 Cam Webserver. Now you can use the static IP in the home assistance. Add you can stream your camera footage.#include "esp_camera.h"
#include <WiFi.h>
//
// WARNING!!! PSRAM IC required for UXGA resolution and high JPEG quality
// Ensure ESP32 Wrover Module or other board with PSRAM is selected
// Partial images will be transmitted if image exceeds buffer size
//
// You must select partition scheme from the board menu that has at least 3MB APP space.
// Face Recognition is DISABLED for ESP32 and ESP32-S2, because it takes up from 15
// seconds to process single frame. Face Detection is ENABLED if PSRAM is enabled as well
// ===================
// Select camera model
// ===================
//#define CAMERA_MODEL_WROVER_KIT // Has PSRAM
//#define CAMERA_MODEL_ESP_EYE // Has PSRAM
//#define CAMERA_MODEL_ESP32S3_EYE // Has PSRAM
//#define CAMERA_MODEL_M5STACK_PSRAM // Has PSRAM
//#define CAMERA_MODEL_M5STACK_V2_PSRAM // M5Camera version B Has PSRAM
//#define CAMERA_MODEL_M5STACK_WIDE // Has PSRAM
//#define CAMERA_MODEL_M5STACK_ESP32CAM // No PSRAM
//#define CAMERA_MODEL_M5STACK_UNITCAM // No PSRAM
//#define CAMERA_MODEL_AI_THINKER // Has PSRAM
//#define CAMERA_MODEL_TTGO_T_JOURNAL // No PSRAM
#define CAMERA_MODEL_XIAO_ESP32S3 // Has PSRAM
// ** Espressif Internal Boards **
//#define CAMERA_MODEL_ESP32_CAM_BOARD
//#define CAMERA_MODEL_ESP32S2_CAM_BOARD
//#define CAMERA_MODEL_ESP32S3_CAM_LCD
//#define CAMERA_MODEL_DFRobot_FireBeetle2_ESP32S3 // Has PSRAM
//#define CAMERA_MODEL_DFRobot_Romeo_ESP32S3 // Has PSRAM
#include "camera_pins.h"
// ===========================
// Enter your WiFi credentials
// ===========================
// Replace with your network credentials
const char* ssid = "xxxxxxx";
const char* password = "xxxxxxx";
// Set web server port number to 80
WiFiServer server(80);
// Variable to store the HTTP request
String header;
// Set your Static IP address
IPAddress local_IP(192, 168, 1, 162);
// Set your Gateway IP address
IPAddress gateway(192, 168, 1, 1);
IPAddress subnet(255, 255, 0, 0);
IPAddress primaryDNS(8, 8, 8, 8); //optional
IPAddress secondaryDNS(8, 8, 4, 4); //optional
void startCameraServer();
void setupLedFlash(int pin);
void setup() {
Serial.begin(115200);
Serial.setDebugOutput(true);
Serial.println();
camera_config_t config;
config.ledc_channel = LEDC_CHANNEL_0;
config.ledc_timer = LEDC_TIMER_0;
config.pin_d0 = Y2_GPIO_NUM;
config.pin_d1 = Y3_GPIO_NUM;
config.pin_d2 = Y4_GPIO_NUM;
config.pin_d3 = Y5_GPIO_NUM;
config.pin_d4 = Y6_GPIO_NUM;
config.pin_d5 = Y7_GPIO_NUM;
config.pin_d6 = Y8_GPIO_NUM;
config.pin_d7 = Y9_GPIO_NUM;
config.pin_xclk = XCLK_GPIO_NUM;
config.pin_pclk = PCLK_GPIO_NUM;
config.pin_vsync = VSYNC_GPIO_NUM;
config.pin_href = HREF_GPIO_NUM;
config.pin_sccb_sda = SIOD_GPIO_NUM;
config.pin_sccb_scl = SIOC_GPIO_NUM;
config.pin_pwdn = PWDN_GPIO_NUM;
config.pin_reset = RESET_GPIO_NUM;
config.xclk_freq_hz = 20000000;
config.frame_size = FRAMESIZE_UXGA;
config.pixel_format = PIXFORMAT_JPEG; // for streaming
//config.pixel_format = PIXFORMAT_RGB565; // for face detection/recognition
config.grab_mode = CAMERA_GRAB_WHEN_EMPTY;
config.fb_location = CAMERA_FB_IN_PSRAM;
config.jpeg_quality = 12;
config.fb_count = 1;
// if PSRAM IC present, init with UXGA resolution and higher JPEG quality
// for larger pre-allocated frame buffer.
if(config.pixel_format == PIXFORMAT_JPEG){
if(psramFound()){
config.jpeg_quality = 10;
config.fb_count = 2;
config.grab_mode = CAMERA_GRAB_LATEST;
} else {
// Limit the frame size when PSRAM is not available
config.frame_size = FRAMESIZE_SVGA;
config.fb_location = CAMERA_FB_IN_DRAM;
}
} else {
// Best option for face detection/recognition
config.frame_size = FRAMESIZE_240X240;
#if CONFIG_IDF_TARGET_ESP32S3
config.fb_count = 2;
#endif
}
#if defined(CAMERA_MODEL_ESP_EYE)
pinMode(13, INPUT_PULLUP);
pinMode(14, INPUT_PULLUP);
#endif
// camera init
esp_err_t err = esp_camera_init(&config);
if (err != ESP_OK) {
Serial.printf("Camera init failed with error 0x%x", err);
return;
}
sensor_t * s = esp_camera_sensor_get();
// initial sensors are flipped vertically and colors are a bit saturated
if (s->id.PID == OV3660_PID) {
s->set_vflip(s, 1); // flip it back
s->set_brightness(s, 1); // up the brightness just a bit
s->set_saturation(s, -2); // lower the saturation
}
// drop down frame size for higher initial frame rate
if(config.pixel_format == PIXFORMAT_JPEG){
s->set_framesize(s, FRAMESIZE_QVGA);
}
#if defined(CAMERA_MODEL_M5STACK_WIDE) || defined(CAMERA_MODEL_M5STACK_ESP32CAM)
s->set_vflip(s, 1);
s->set_hmirror(s, 1);
#endif
#if defined(CAMERA_MODEL_ESP32S3_EYE)
s->set_vflip(s, 1);
#endif
// Setup LED FLash if LED pin is defined in camera_pins.h
#if defined(LED_GPIO_NUM)
setupLedFlash(LED_GPIO_NUM);
#endif
// Configures static IP address
if (!WiFi.config(local_IP, gateway, subnet, primaryDNS, secondaryDNS)) {
Serial.println("STA Failed to configure");
}
// Connect to Wi-Fi network with SSID and password
Serial.print("Connecting to ");
Serial.println(ssid);
WiFi.begin(ssid, password);
while (WiFi.status() != WL_CONNECTED) {
delay(500);
Serial.print(".");
}
// Print local IP address and start web server
Serial.println("");
Serial.println("WiFi connected.");
Serial.println("IP address: ");
Serial.println(WiFi.localIP());
startCameraServer();
Serial.print("Camera Ready! Use 'http://");
Serial.print(WiFi.localIP());
Serial.println("' to connect");
}
void loop() {
// Do nothing. Everything is done in another task by the web server
delay(10000);
}

Étape 6 - Conclusion

Published
 Français
 English
 Deutsch
 Español
 Italiano
 Português