
| (25 révisions intermédiaires par le même utilisateur non affichées) | |||
| Ligne 1 : | Ligne 1 : | ||
{{Tuto Details | {{Tuto Details | ||
| + | |Main_Picture=Spaceship_Astrokick_Cover.jpeg | ||
| + | |Main_Picture_annotation={"version":"2.4.6","objects":[{"type":"image","version":"2.4.6","originX":"left","originY":"top","left":-93,"top":-71,"width":1600,"height":1142,"fill":"rgb(0,0,0)","stroke":null,"strokeWidth":0,"strokeDashArray":null,"strokeLineCap":"butt","strokeDashOffset":0,"strokeLineJoin":"miter","strokeMiterLimit":4,"scaleX":0.54,"scaleY":0.54,"angle":0,"flipX":false,"flipY":false,"opacity":1,"shadow":null,"visible":true,"clipTo":null,"backgroundColor":"","fillRule":"nonzero","paintFirst":"fill","globalCompositeOperation":"source-over","transformMatrix":null,"skewX":0,"skewY":0,"crossOrigin":"","cropX":0,"cropY":0,"src":"https://wikifab.org/images/7/74/Spaceship_Astrokick_Cover.jpeg","filters":[]}],"height":449.7153700189753,"width":600} | ||
|Description=<translate>Spaceship game for kids</translate> | |Description=<translate>Spaceship game for kids</translate> | ||
|Area=Play and Hobbies | |Area=Play and Hobbies | ||
| Ligne 6 : | Ligne 8 : | ||
|Duration=2 | |Duration=2 | ||
|Duration-type=hour(s) | |Duration-type=hour(s) | ||
| − | |Cost= | + | |Cost=25 |
|Currency=EUR (€) | |Currency=EUR (€) | ||
| − | |Tags=space, spaceship | + | |Tags=space, spaceship, Game maker, kids, astro |
}} | }} | ||
{{Introduction | {{Introduction | ||
|Introduction=<translate>Material | |Introduction=<translate>Material | ||
| − | 1 x aluminium tube | + | 1 x aluminium tube 20 mm x 2 mm x 1 meter (or 3/4 inch) the design makes it possible to use either one |
1 x universal cord | 1 x universal cord | ||
| Ligne 32 : | Ligne 34 : | ||
<br /></translate> | <br /></translate> | ||
}} | }} | ||
| − | {{Materials}} | + | {{Materials |
| + | |Tuto_Attachments={{Tuto Attachments | ||
| + | |Attachment=Spaceship_Astrokick_Bottom_part.stl | ||
| + | }}{{Tuto Attachments | ||
| + | |Attachment=Spaceship_Astrokick_Cockpit.stl | ||
| + | }}{{Tuto Attachments | ||
| + | |Attachment=Spaceship_Astrokick_Landing_gear.stl | ||
| + | }}{{Tuto Attachments | ||
| + | |Attachment=Spaceship_Astrokick_Top_part.stl | ||
| + | }} | ||
| + | }} | ||
{{Tuto Step | {{Tuto Step | ||
|Step_Title=<translate>Printing the spaceship</translate> | |Step_Title=<translate>Printing the spaceship</translate> | ||
| − | |Step_Content=<translate>3D-Print the several parts of the spaceship. This is going to take several hours per part. | + | |Step_Content=<translate>3D-Print the several parts of the spaceship. This is going to take several hours per part. If your 3D printer is not big enough to place all the part at once, you can do it in two prints. |
<br /> | <br /> | ||
| Ligne 42 : | Ligne 54 : | ||
*Bottom part: 10h | *Bottom part: 10h | ||
*Dome part: 1h</translate> | *Dome part: 1h</translate> | ||
| + | |Step_Picture_00=Spaceship_Printed.jpeg | ||
}} | }} | ||
{{Tuto Step | {{Tuto Step | ||
|Step_Title=<translate>Cut the aluminum</translate> | |Step_Title=<translate>Cut the aluminum</translate> | ||
| − | |Step_Content=<translate>While waiting for the spaceship parts to be printed, cut the aluminum bar into 5 parts (14 cm each | + | |Step_Content=<translate>While waiting for the spaceship parts to be printed, cut the aluminum bar into 5 parts (14 cm each). |
The first part will be used for the spaceship. The other parts will be used for the handles.</translate> | The first part will be used for the spaceship. The other parts will be used for the handles.</translate> | ||
| + | |Step_Picture_00=Spaceship_WhatsApp_Image_2020-01-09_at_4.01.35_PM_1_.jpeg | ||
| + | |Step_Picture_01=Spaceship_WhatsApp_Image_2020-01-09_at_4.01.35_PM.jpeg | ||
| + | |Step_Picture_02=Spaceship_saw.jpeg | ||
}} | }} | ||
{{Tuto Step | {{Tuto Step | ||
|Step_Title=<translate>Prepare the handles</translate> | |Step_Title=<translate>Prepare the handles</translate> | ||
| − | |Step_Content=<translate>Take two tubes and cut a piece of the cord (approx 2-3 meters) to create the 2 handles. Chamfer (sanding) the | + | |Step_Content=<translate>Take two tubes and cut a piece of the cord (approx 2-3 meters) to create the 2 handles. Chamfer (sanding) the edges of the cut aluminum tubes to avoid hand injuries (using the metal chamfer tool). It is preferable to use the semi-circle profile chamfer to sand both the outside and inside of the tube. Then do the same thing with sandpaper in order to have a smother finishing.</translate> |
| + | |Step_Picture_00=Spaceship_WhatsApp_Image_2020-01-09_at_3.49.21_PM.jpeg | ||
| + | |Step_Picture_01=Spaceship_WhatsApp_Image_2020-01-09_at_3.49.22_PM_1_.jpeg | ||
| + | |Step_Picture_02=Spaceship_Sandpaper.jpeg | ||
}} | }} | ||
{{Tuto Step | {{Tuto Step | ||
|Step_Title=<translate>Assemble the spaceship</translate> | |Step_Title=<translate>Assemble the spaceship</translate> | ||
| − | |Step_Content=<translate>After the 3D printing is complete, take the bottom part and put the aluminium bar inside the concave. Then place the top part over the aluminium bar. Turn the spaceship around and screw the 4 screws inside the body in order to fix the pieces together.</translate> | + | |Step_Content=<translate>After the 3D printing is complete, take the bottom part and put the aluminium bar inside the concave. Then place the top part over the aluminium bar. Turn the spaceship around and screw the 4 screws inside the body in order to fix the pieces together. |
| + | |||
| + | <br /></translate> | ||
| + | |Step_Picture_00=Spaceship_Assembly.jpeg | ||
| + | |Step_Picture_01=Spaceship_tube.jpeg | ||
| + | |Step_Picture_02=Spaceship_assembly2.jpeg | ||
| + | |Step_Picture_03=Spaceship_screwing.jpeg | ||
| + | |Step_Picture_04=Spaceship_screwing2.jpeg | ||
}} | }} | ||
{{Tuto Step | {{Tuto Step | ||
|Step_Title=<translate>Finishing up</translate> | |Step_Title=<translate>Finishing up</translate> | ||
| − | |Step_Content=<translate> | + | |Step_Content=<translate>Burn the ends of the cords off and pass them through the tubes and make some rigid knots for the handles. Then pass the two cords through the spaceship and create the same knots with the two other tubes for the handles.</translate> |
| + | |Step_Picture_00=Spaceship_burn.jpeg | ||
| + | |Step_Picture_01=Spaceship_burn2.jpeg | ||
| + | |Step_Picture_02=Spaceship_passing_the_cords.jpeg | ||
| + | |Step_Picture_03=Spaceship_pass_through_tube.jpeg | ||
| + | |Step_Picture_04=Spaceship_knot.jpeg | ||
}} | }} | ||
{{Tuto Step | {{Tuto Step | ||
|Step_Title=<translate>Play!</translate> | |Step_Title=<translate>Play!</translate> | ||
| − | |Step_Content=<translate>Two people take the handles and start making the spaceship move from one person to the other as shown in the video. Make sure the cords are crossed so the spaceship can move properly.</translate> | + | |Step_Content=<translate>Two people take the handles and start making the spaceship move from one person to the other by opening and closing the arms at the right time as shown in the video. Make sure the cords are crossed so the spaceship can move properly.</translate> |
| + | |Step_Picture_00=Spaceship_Astrokick_play_.mp4 | ||
| + | }} | ||
| + | {{Tuto Step | ||
| + | |Step_Title=<translate>Options</translate> | ||
| + | |Step_Content=<translate>You can add some landing gears if you feel like your spaceship needs to be presented nicely before and after playing with it. You can screw it on to the ship or just use it as a base. | ||
| + | |||
| + | On the top of the spaceship you can use a 2-by-4 Lego plate to fix the lego figure by placing the plate inside the slot. Then screw the cage to fix it.</translate> | ||
| + | |Step_Picture_00=Spaceship_Astrokick_base.jpeg | ||
| + | |Step_Picture_01=Spaceship_Astrokick_base2.jpeg | ||
| + | |Step_Picture_02=Spaceship_Astrokick_lego-plate-2-x-4-3020-30-80025.jpg | ||
| + | |Step_Picture_03=Spaceship_Astrokick_Lego_part.jpeg | ||
| + | |Step_Picture_04=Spaceship_Astrokick_Cockpit2.jpeg | ||
}} | }} | ||
{{Notes | {{Notes | ||
| Ligne 74 : | Ligne 117 : | ||
}} | }} | ||
{{Tuto Status | {{Tuto Status | ||
| − | |Complete= | + | |Complete=Published |
}} | }} | ||
Version actuelle datée du 3 février 2020 à 12:31
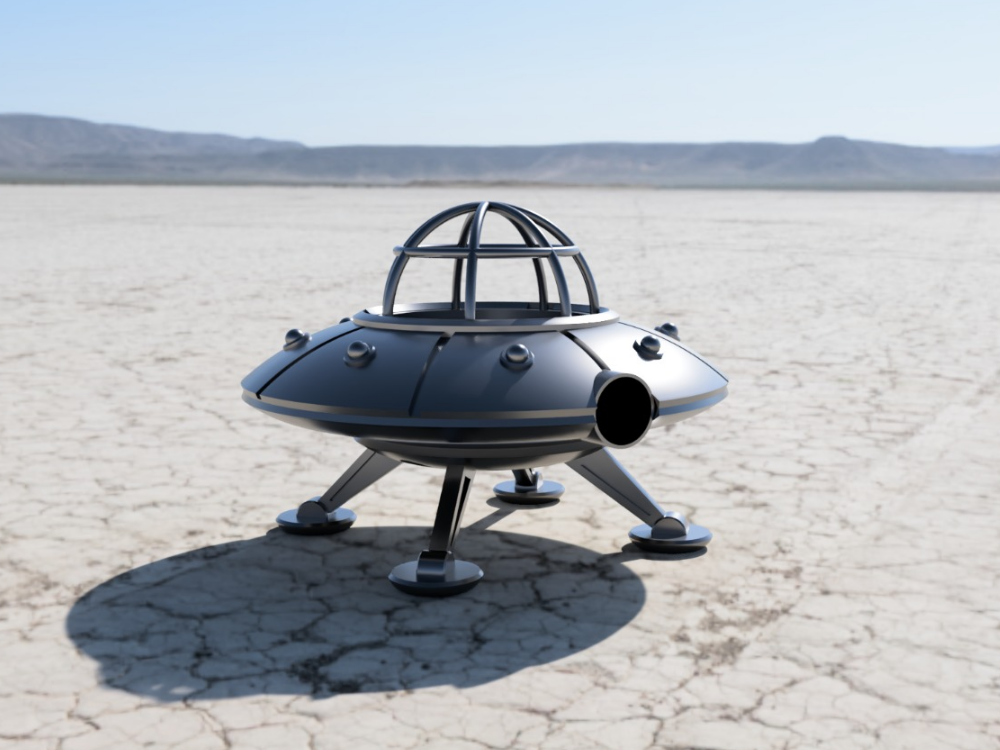
Spaceship game for kids

Difficulté
Facile
Durée
2 heure(s)
Catégories
Jeux & Loisirs
Coût
25 EUR (€)
Introduction
Material
1 x aluminium tube 20 mm x 2 mm x 1 meter (or 3/4 inch) the design makes it possible to use either one
1 x universal cord
1 x Lego mini-figure
4 x screws (standard wood screws)
Machines and tools:
3D printer to print the spaceship
Metal saw to cut the aluminium tube
Metal Chamfer Tool to sand edges of cut aluminum
Étape 1 - Printing the spaceship
3D-Print the several parts of the spaceship. This is going to take several hours per part. If your 3D printer is not big enough to place all the part at once, you can do it in two prints.
- Top part: 10h
- Bottom part: 10h
- Dome part: 1h

Étape 2 - Cut the aluminum
While waiting for the spaceship parts to be printed, cut the aluminum bar into 5 parts (14 cm each).
The first part will be used for the spaceship. The other parts will be used for the handles.


Étape 3 - Prepare the handles
Take two tubes and cut a piece of the cord (approx 2-3 meters) to create the 2 handles. Chamfer (sanding) the edges of the cut aluminum tubes to avoid hand injuries (using the metal chamfer tool). It is preferable to use the semi-circle profile chamfer to sand both the outside and inside of the tube. Then do the same thing with sandpaper in order to have a smother finishing.


Étape 4 - Assemble the spaceship
After the 3D printing is complete, take the bottom part and put the aluminium bar inside the concave. Then place the top part over the aluminium bar. Turn the spaceship around and screw the 4 screws inside the body in order to fix the pieces together.


Étape 5 - Finishing up
Burn the ends of the cords off and pass them through the tubes and make some rigid knots for the handles. Then pass the two cords through the spaceship and create the same knots with the two other tubes for the handles.


Étape 6 - Play!
Two people take the handles and start making the spaceship move from one person to the other by opening and closing the arms at the right time as shown in the video. Make sure the cords are crossed so the spaceship can move properly.
Étape 7 - Options
You can add some landing gears if you feel like your spaceship needs to be presented nicely before and after playing with it. You can screw it on to the ship or just use it as a base.
On the top of the spaceship you can use a 2-by-4 Lego plate to fix the lego figure by placing the plate inside the slot. Then screw the cage to fix it.


Published
 Français
 English
 Deutsch
 Español
 Italiano
 Português