| Ligne 374 : | Ligne 374 : | ||
====Steps==== | ====Steps==== | ||
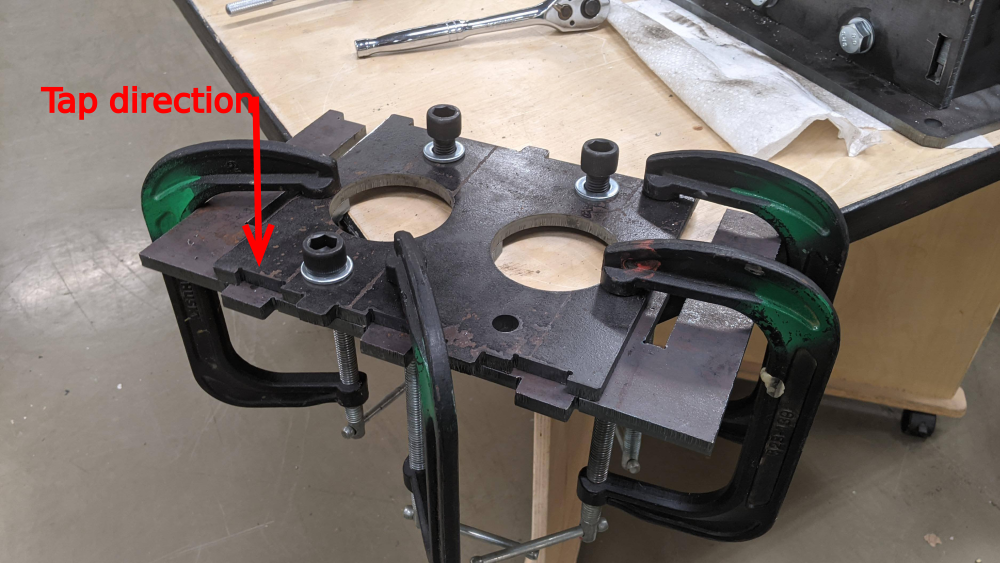
| − | #If not already perfectly aligned, ensure that the bearing holes on parts 1110.08/.09 are perfectly aligned. This will ensure the tapping process goes smoothly and the parts are in a straight line. | + | #If not already perfectly aligned, ensure that the bearing holes on parts 1110.08/.09 are perfectly aligned. This will ensure the tapping process goes smoothly and the parts are in a straight line. |
| − | #Tightly secure parts 1110.08/.09 with C-clamps while they are still inside the shredder box. | + | #Tightly secure parts 1110.08/.09 with C-clamps while they are still inside the shredder box. |
| − | #Lift the two plates out with the clamps. | + | #Lift the two plates out with the clamps. |
#Repeat the tapping procedure as before, ensuring that you begin the tap on the face of part 1110.09. Tap all 4 holes. | #Repeat the tapping procedure as before, ensuring that you begin the tap on the face of part 1110.09. Tap all 4 holes. | ||
#Add bolts to the top two holes. | #Add bolts to the top two holes. | ||
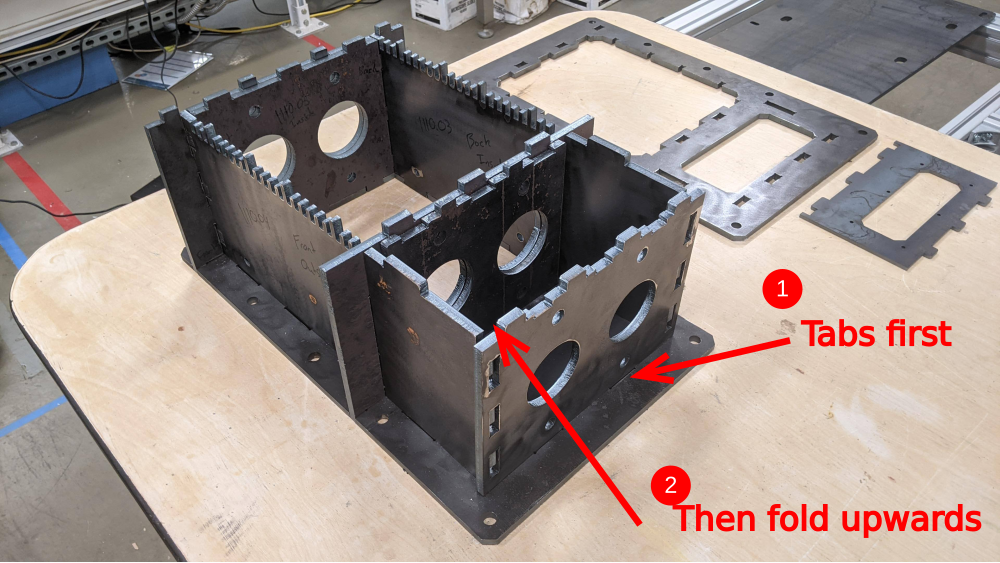
| − | #[image 4] Breakout piece 1110.07 from the shredder box. Align it with the clamped assembly, ensuring that the circle openings are perfectly matched. | + | #[image 4] Breakout piece 1110.07 from the shredder box. Align it with the clamped assembly, ensuring that the circle openings are perfectly matched. |
#Clamp piece 1110.07 to the newly tapped assembly. [image 5] | #Clamp piece 1110.07 to the newly tapped assembly. [image 5] | ||
#Continuing from the pre-tapped holes of piece 1110.09, tap into piece 1110.07. | #Continuing from the pre-tapped holes of piece 1110.09, tap into piece 1110.07. | ||
| Ligne 391 : | Ligne 391 : | ||
|Step_Picture_04_annotation={"version":"2.4.6","objects":[{"type":"image","version":"2.4.6","originX":"left","originY":"top","left":0,"top":0,"width":3840,"height":2160,"fill":"rgb(0,0,0)","stroke":null,"strokeWidth":0,"strokeDashArray":null,"strokeLineCap":"butt","strokeDashOffset":0,"strokeLineJoin":"miter","strokeMiterLimit":4,"scaleX":0.16,"scaleY":0.16,"angle":0,"flipX":false,"flipY":false,"opacity":1,"shadow":null,"visible":true,"clipTo":null,"backgroundColor":"","fillRule":"nonzero","paintFirst":"fill","globalCompositeOperation":"source-over","transformMatrix":null,"skewX":0,"skewY":0,"crossOrigin":"","cropX":0,"cropY":0,"src":"https://wikifab.org/images/9/95/PP_Shredder_Pro_PXL_20211020_234708187.jpg","filters":[]}],"height":338,"width":600} | |Step_Picture_04_annotation={"version":"2.4.6","objects":[{"type":"image","version":"2.4.6","originX":"left","originY":"top","left":0,"top":0,"width":3840,"height":2160,"fill":"rgb(0,0,0)","stroke":null,"strokeWidth":0,"strokeDashArray":null,"strokeLineCap":"butt","strokeDashOffset":0,"strokeLineJoin":"miter","strokeMiterLimit":4,"scaleX":0.16,"scaleY":0.16,"angle":0,"flipX":false,"flipY":false,"opacity":1,"shadow":null,"visible":true,"clipTo":null,"backgroundColor":"","fillRule":"nonzero","paintFirst":"fill","globalCompositeOperation":"source-over","transformMatrix":null,"skewX":0,"skewY":0,"crossOrigin":"","cropX":0,"cropY":0,"src":"https://wikifab.org/images/9/95/PP_Shredder_Pro_PXL_20211020_234708187.jpg","filters":[]}],"height":338,"width":600} | ||
|Step_Picture_05=PP_Shredder_Pro_PXL_20211020_235327278.MP.jpg | |Step_Picture_05=PP_Shredder_Pro_PXL_20211020_235327278.MP.jpg | ||
| + | }} | ||
| + | {{Tuto Step | ||
| + | |Step_Title=<translate>Tapping bearing holes 3</translate> | ||
| + | |Step_Content=<translate>====Tools==== | ||
| + | M16 x 2 Tap | ||
| + | |||
| + | Tapping oil(optional but recommended) | ||
| + | |||
| + | 2 large bar clamps | ||
| + | ====Parts==== | ||
| + | 4 M16 x 30mm Socket head cap bolts | ||
| + | |||
| + | 4 M16 washers | ||
| + | |||
| + | Shredder box assembly | ||
| + | ====Steps==== | ||
| + | |||
| + | #Secure plate 1110.10. (This can be done in place, or by removing it and attaching it to the table) | ||
| + | #Tap all 4 holes. | ||
| + | ##In the photo, we used hex heads as opposed to button cap sockets.</translate> | ||
| + | |Step_Picture_00=PP_Shredder_Pro_PXL_20211020_231020123.jpg | ||
| + | }} | ||
| + | {{Tuto Step | ||
| + | |Step_Title=<translate>Shaft Assembly Preparation</translate> | ||
| + | |Step_Content=<translate>====Tools==== | ||
| + | Industrial Band Saw (roll-in, horizontal band, etc.) | ||
| + | |||
| + | Metal files | ||
| + | ====Parts==== | ||
| + | ???? Nuts | ||
| + | |||
| + | Shaft 1: | ||
| + | |||
| + | 23x 1130.01 13-Teeth Blade | ||
| + | |||
| + | 23x 1/4" spacer | ||
| + | |||
| + | 23x ???? thin spacers | ||
| + | |||
| + | |||
| + | Shaft 2: | ||
| + | |||
| + | 2x 1120.01 6-Teeth Blade 1 | ||
| + | |||
| + | 2x 1120.02 6-Teeth Blade 2 | ||
| + | |||
| + | 2x 1120.03 6-Teeth Blade 3 | ||
| + | |||
| + | 2x 1120.04 6-Teeth Blade 4 | ||
| + | |||
| + | 2x 1120.05 6-Teeth Blade 5 | ||
| + | |||
| + | 2x 1120.06 6-Teeth Blade 6 | ||
| + | |||
| + | 2x 1120.07 6-Teeth Blade 7 | ||
| + | |||
| + | 2x 1120.08 6-Teeth Blade 8 | ||
| + | |||
| + | 2x 1120.09 6-Teeth Blade 9 | ||
| + | |||
| + | 2x 1120.010 6-Teeth Blade 10 | ||
| + | |||
| + | 2x 1120.011 6-Teeth Blade 11 | ||
| + | |||
| + | 2x 1120.011 6-Teeth Blade 12 | ||
| + | |||
| + | 23x 1/4" spacer | ||
| + | |||
| + | 23x ???? thin spacers | ||
| + | <br /> | ||
| + | ====Steps==== | ||
| + | |||
| + | #Split the nut in half with whichever can :) | ||
| + | ##we used a roll-in saw, but a horizontal band saw, or a hand saw could be used. | ||
| + | #layout your parts according to the pictures</translate> | ||
| + | |Step_Picture_00=PP_Shredder_Pro_PXL_20211019_173910146.jpg | ||
| + | |Step_Picture_01=PP_Shredder_Pro_PXL_20211019_174434498.jpg | ||
}} | }} | ||
{{Notes | {{Notes | ||
Version du 29 octobre 2021 à 18:32
This tutorial documents the build process of Precious Plastic Pro Shredder, as supplied by Citizen Scientific for the North American context.

Difficulté
Difficile
Durée
5 jour(s)
Catégories
Machines & Outils, Recyclage & Upcycling, Robotique
Coût
5000 USD ($)
Sommaire
- 1 Introduction
- 2 Étape 1 - Tools
- 3 Étape 2 - Table Parts
- 4 Étape 3 - Table Construction - Legs
- 5 Étape 4 - Table Construction - Side Joints
- 6 Étape 5 - Table Construction - Side Braces
- 7 Étape 6 - Table Construction - Center Struts
- 8 Étape 7 - Shredder Box Layout 1
- 9 Étape 8 - Shredder Box Layout 2
- 10 Étape 9 - Tapping bearing holes 1
- 11 Étape 10 - Tapping bearing holes 2
- 12 Étape 11 - Tapping bearing holes 3
- 13 Étape 12 - Shaft Assembly Preparation
- 14 Commentaires
Introduction
Required skills:
Basic tools
Steel tapping
Matériaux
Outils
Étape 1 - Tools
Hammer
(punch) for knocking out leftover metal slugs
Files
Mallet
Socket wrench( 2x)
Tape measure
Screwdriver (directing the slide nuts)
Marker
Étape 2 - Table Parts
Parts Needed:
Aluminum Extrusion
| Profile | Length (mm) | Quantity |
|---|---|---|
| 8080 | 520 | 4 |
| 8080 | 600 | 4 |
| 8080 | 1200 | 2 |
| 4080 | 520 | 1 |
| 4080 | 455 | 1 |
| data-sheets-value="{"1":2,"2":"Corner Plates"}"
Étape 3 - Table Construction - LegsToolsXX Socket Wrench Screwdriver Parts4x 8080*600mm 2x 8080*1200mm 4x Side Plates 32x T nuts 32x Washers 32x M8x16mm Bolts Steps
You now have a staple shape. Repeat.
   
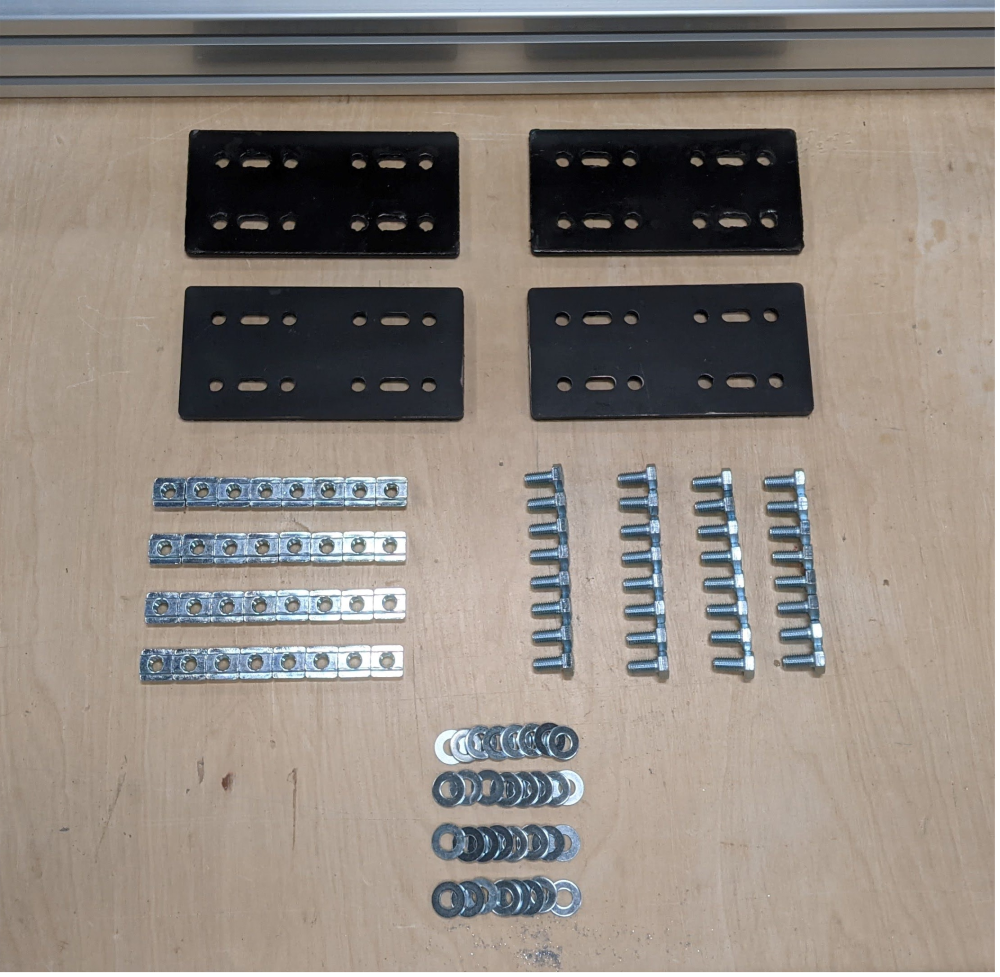
Étape 4 - Table Construction - Side JointsToolsXX Socket Wrench Screwdriver Parts2x 8080*520mm 4x Corner Plates 44x T nuts 32x Washers 32x M8x16mm Bolts Steps
You should now have a very solid table base! 

 
Étape 5 - Table Construction - Side BracesToolsXX Socket Wrench Screwdriver Parts2x 8080*520mm 8x Brackets 16x T nuts 16x Washers 16x M8x20mm Bolts
Steps
     
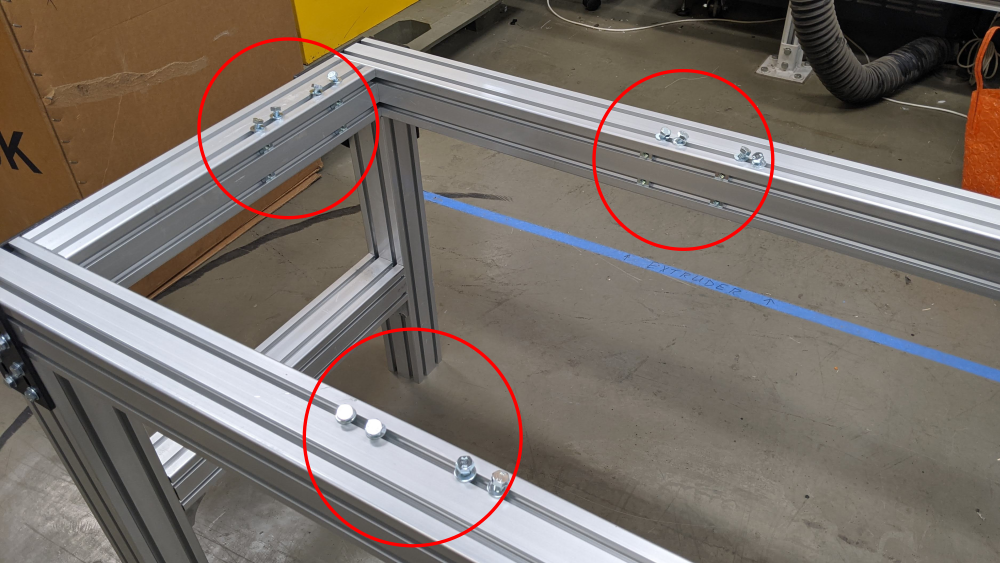
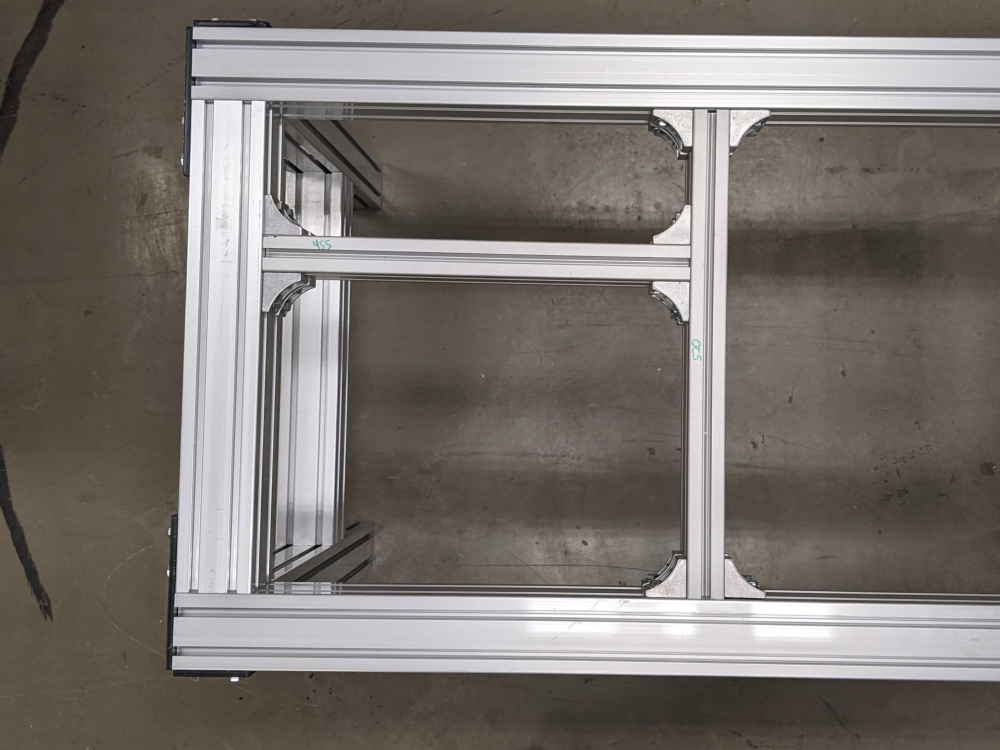
Étape 6 - Table Construction - Center StrutsToolsXX Socket Wrench Screwdriver Parts1x 4080*520mm 1x 4080*455mm 16 Brackets
32x Washers 32x M8x16mm Bolts
Steps
   
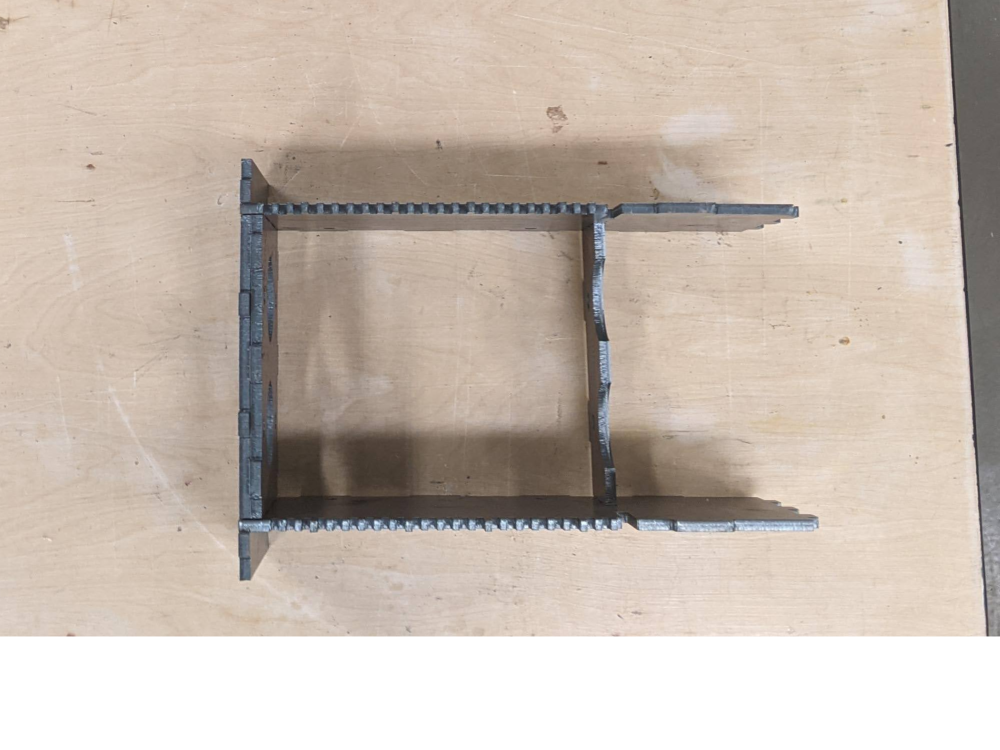
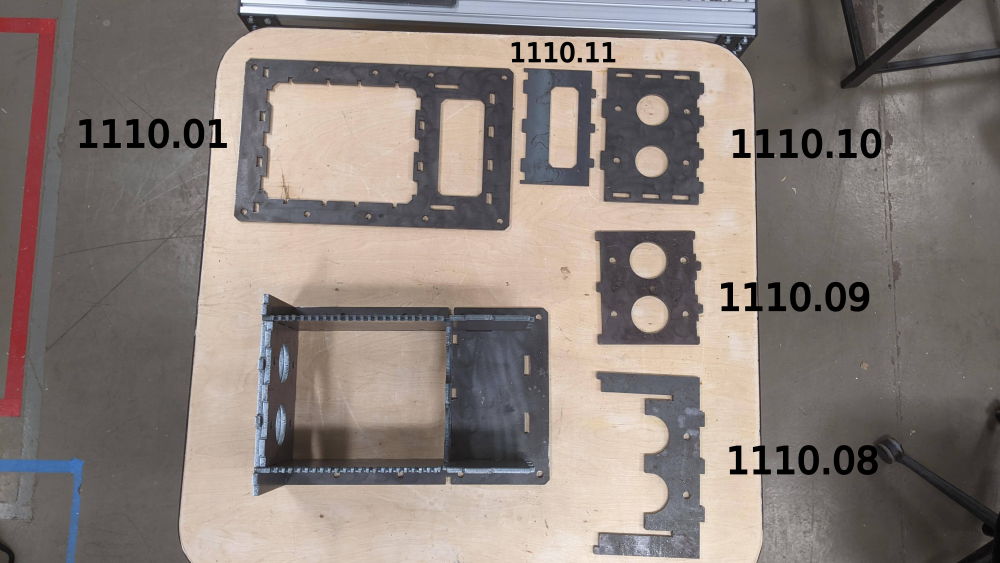
Étape 7 - Shredder Box Layout 1Toolsnone Parts1110.02 - Bottom Plate Box 1110.03 - Fixed Blades plate 1 1110.04 - Fixed Blades plate 2 1110.05 - Bearing Side Plate 1 1110.06 - Bearing Side Plate 2 1110.07 - Bearing Side Plate 3
Steps

 
Étape 8 - Shredder Box Layout 2Toolsnone Parts1110.08 - Bearing Side Plate 4 1110.09 - Bearing Side Plate 5 1110.10 - Bearing Side Plate 6 1110.11 - Gear Plate 1110.01 - Top Plate Steps
*Note - in the next steps, you will dismantle these last few steps, but it is important to understand how the box comes together.
 
Étape 9 - Tapping bearing holes 1ToolsM16 x 2 Tap Tapping oil(optional but recommended) 2 medium/large clamps Parts4 M16 x 40mm Socket head cap bolts 4 M16 washers Shredder box assembly
Steps
     
Étape 10 - Tapping bearing holes 2ToolsM16 x 2 Tap Tapping oil(optional but recommended) 2 medium/large clamps Parts4 M16 x 40mm Socket head cap bolts 4 M16 washers Shredder box assembly Steps


Étape 11 - Tapping bearing holes 3ToolsM16 x 2 Tap Tapping oil(optional but recommended) 2 large bar clamps Parts4 M16 x 30mm Socket head cap bolts 4 M16 washers Shredder box assembly Steps

Étape 12 - Shaft Assembly PreparationToolsIndustrial Band Saw (roll-in, horizontal band, etc.) Metal files Parts???? Nuts Shaft 1: 23x 1130.01 13-Teeth Blade 23x 1/4" spacer 23x ???? thin spacers
2x 1120.01 6-Teeth Blade 1 2x 1120.02 6-Teeth Blade 2 2x 1120.03 6-Teeth Blade 3 2x 1120.04 6-Teeth Blade 4 2x 1120.05 6-Teeth Blade 5 2x 1120.06 6-Teeth Blade 6 2x 1120.07 6-Teeth Blade 7 2x 1120.08 6-Teeth Blade 8 2x 1120.09 6-Teeth Blade 9 2x 1120.010 6-Teeth Blade 10 2x 1120.011 6-Teeth Blade 11 2x 1120.011 6-Teeth Blade 12 23x 1/4" spacer 23x ???? thin spacers
Steps
 
Published |


 Français
 English
 Deutsch
 Español
 Italiano
 Português