| Ligne 33 : | Ligne 33 : | ||
}} | }} | ||
{{Tuto Step | {{Tuto Step | ||
| − | |Step_Title=<translate> | + | |Step_Title=<translate>Attach the Bearings to the side plates</translate> |
|Step_Content=<translate>Parts Needed: | |Step_Content=<translate>Parts Needed: | ||
| Ligne 69 : | Ligne 69 : | ||
|Step_Picture_04=PP_Shredder_Basic_PXL_20211001_174731132.MP.jpg | |Step_Picture_04=PP_Shredder_Basic_PXL_20211001_174731132.MP.jpg | ||
|Step_Picture_04_annotation={"version":"2.4.6","objects":[{"type":"image","version":"2.4.6","originX":"left","originY":"top","left":-120,"top":-19,"width":800,"height":450,"fill":"rgb(0,0,0)","stroke":null,"strokeWidth":0,"strokeDashArray":null,"strokeLineCap":"butt","strokeDashOffset":0,"strokeLineJoin":"miter","strokeMiterLimit":4,"scaleX":1.1,"scaleY":1.1,"angle":0,"flipX":false,"flipY":false,"opacity":1,"shadow":null,"visible":true,"clipTo":null,"backgroundColor":"","fillRule":"nonzero","paintFirst":"fill","globalCompositeOperation":"source-over","transformMatrix":null,"skewX":0,"skewY":0,"crossOrigin":"","cropX":0,"cropY":0,"src":"https://wikifab.org/images/thumb/3/32/PP_Shredder_Basic_PXL_20211001_174731132.MP.jpg/800px-PP_Shredder_Basic_PXL_20211001_174731132.MP.jpg","filters":[]}],"height":450,"width":600} | |Step_Picture_04_annotation={"version":"2.4.6","objects":[{"type":"image","version":"2.4.6","originX":"left","originY":"top","left":-120,"top":-19,"width":800,"height":450,"fill":"rgb(0,0,0)","stroke":null,"strokeWidth":0,"strokeDashArray":null,"strokeLineCap":"butt","strokeDashOffset":0,"strokeLineJoin":"miter","strokeMiterLimit":4,"scaleX":1.1,"scaleY":1.1,"angle":0,"flipX":false,"flipY":false,"opacity":1,"shadow":null,"visible":true,"clipTo":null,"backgroundColor":"","fillRule":"nonzero","paintFirst":"fill","globalCompositeOperation":"source-over","transformMatrix":null,"skewX":0,"skewY":0,"crossOrigin":"","cropX":0,"cropY":0,"src":"https://wikifab.org/images/thumb/3/32/PP_Shredder_Basic_PXL_20211001_174731132.MP.jpg/800px-PP_Shredder_Basic_PXL_20211001_174731132.MP.jpg","filters":[]}],"height":450,"width":600} | ||
| + | }} | ||
| + | {{Tuto Step | ||
| + | |Step_Title=<translate>Build the blade shaft</translate> | ||
| + | |Step_Content=<translate>Parts Needed: | ||
| + | |||
| + | 5x 01.04.03 Knife 1 | ||
| + | |||
| + | 5x 01.04.04 Knife 2 | ||
| + | |||
| + | 4x 01.04.05 Knife 3 | ||
| + | |||
| + | 1x Shaft | ||
| + | |||
| + | 2x 01.04.02 6mm Bearing Spacer | ||
| + | |||
| + | 2x 01.04.09 3mm Bearing Spacer | ||
| + | |||
| + | 13x Knife Spacer | ||
| + | |||
| + | |||
| + | Tools Needed: | ||
| + | |||
| + | (optional) vice grip/locking pliers | ||
| + | |||
| + | |||
| + | Orient the shaft so the longer blank section is facing up. | ||
| + | |||
| + | Number the faces 1-6(it doesnt matter where you start, as long as it reads left to right). | ||
| + | |||
| + | |||
| + | Slide Knife 1( knife with only 1 notch) onto the shaft so the notch is on the edge between faces 1 and 2. Ensure that the blade point, points towards face 2. | ||
| + | |||
| + | |||
| + | Add a Spacer | ||
| + | |||
| + | |||
| + | Slide Knife 2(knife with 2 notches) onto the shaft so that the first notch is between faces 1 and 2 , and the 2nd notch is between faces 2 and 3. | ||
| + | |||
| + | |||
| + | Add a Spacer | ||
| + | |||
| + | |||
| + | Slide Knife 3(knife with 3 notches) onto the shaft so that the first notch is between faces 1 and 2, and the 2nd notch is between faces 2 and 3. and the 3rd notch is between faces 3 and 4. | ||
| + | |||
| + | |||
| + | Add a spacer | ||
| + | |||
| + | |||
| + | <nowiki>*</nowiki>This completes 1 SET of knives. | ||
| + | |||
| + | |||
| + | Repeat for the next set, but begin by placing the notch of Knife 1 between faces 6 and 1. | ||
| + | |||
| + | |||
| + | <nowiki>*</nowiki>This completes 2 SET of knives. | ||
| + | |||
| + | |||
| + | Repeat for the next set, but begin by placing the notch of Knife 1 between faces 5 and 6. | ||
| + | |||
| + | |||
| + | <nowiki>*</nowiki>This completes 3 SETs of knives. | ||
| + | |||
| + | |||
| + | Repeat for the next set, but begin by placing the notch of Knife 1 between faces 4 and 5. | ||
| + | |||
| + | |||
| + | <nowiki>*</nowiki>This completes 4 SET of knives. | ||
| + | |||
| + | |||
| + | Repeat for the next set, but begin by placing the notch of Knife 1 between faces 3 and 4. This Set will only use 2 blades. | ||
| + | |||
| + | |||
| + | Add 3mm spacer to shaft. Add 6mm Spacer to shaft. | ||
| + | |||
| + | Repeat on other end. | ||
| + | |||
| + | <br /></translate> | ||
}} | }} | ||
{{Notes | {{Notes | ||
Version du 1 octobre 2021 à 20:30
This tutorial documents the build process of Precious Plastic Pro Shredder, as supplied by Citizen Scientific for the North American context.

Difficulté
Moyen
Durée
2 jour(s)
Catégories
Machines & Outils, Recyclage & Upcycling
Coût
6000 USD ($)
Matériaux
Outils
Étape 1 - Required Tools
1/2" Socket wrench
11/16" Socket"
6mm Allen/Hex Wrench
Locking Pliers
Adjustable pliers
Metal File
Screwdriver
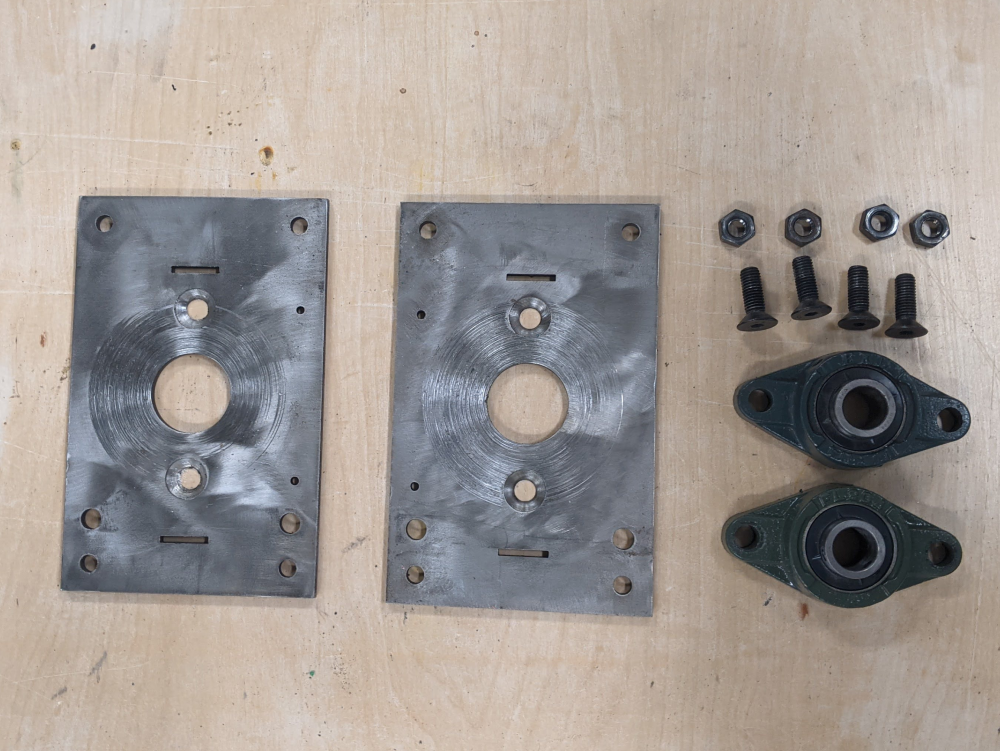
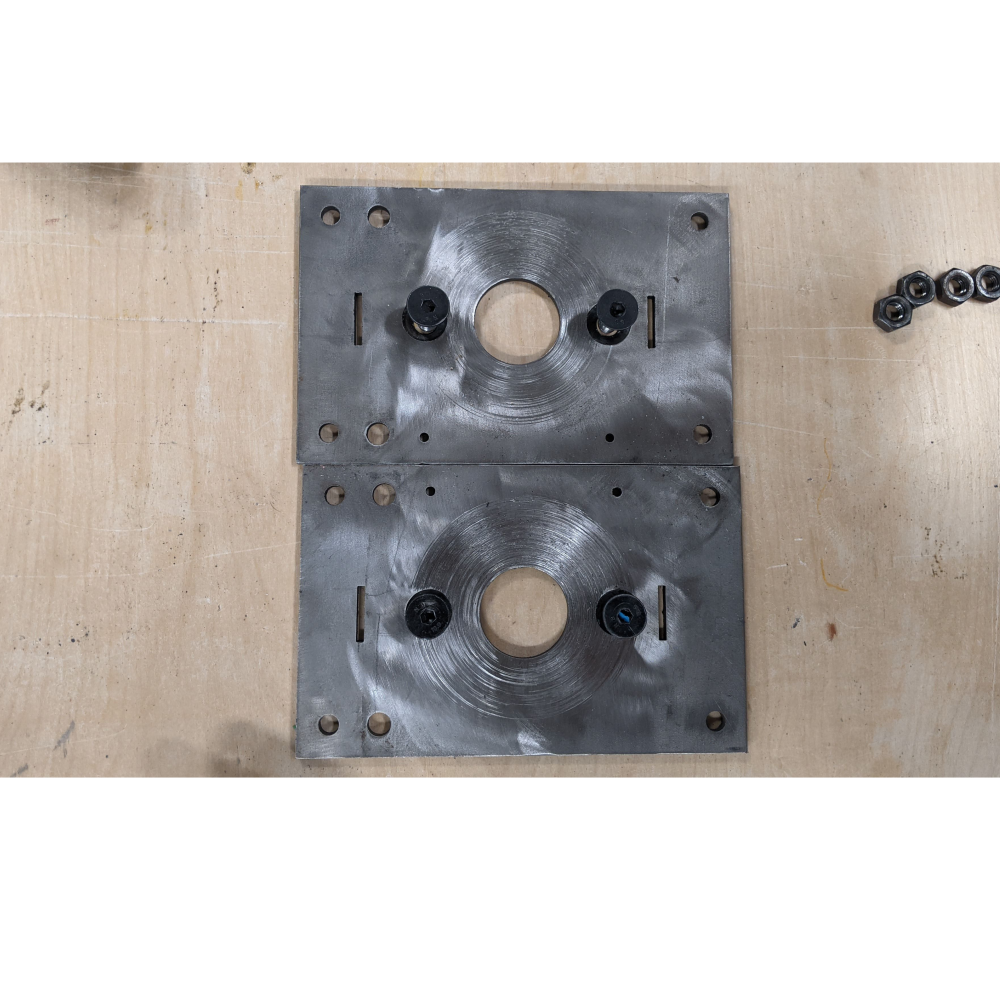
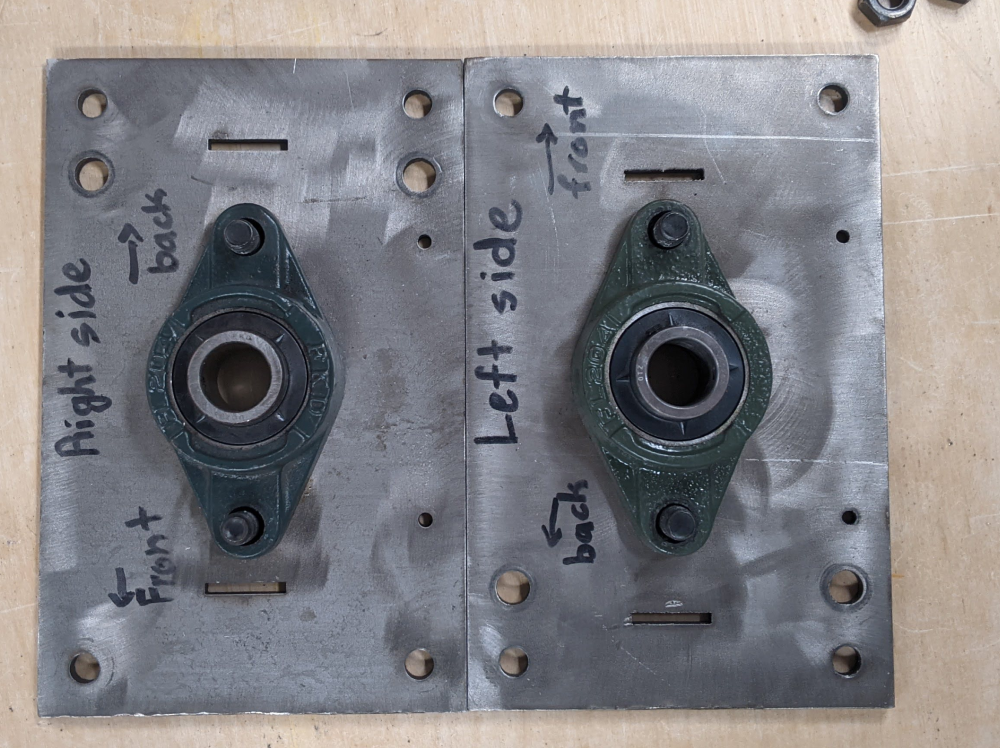
Étape 2 - Attach the Bearings to the side plates
Parts Needed:
2x 6mm 01.04.01 Side plate
2X bearings
4X Countersunk Hexagon Bolts (M10 x 30)
4X Nuts (M10)
Tools Needed
6mm allen
11/16" wrench
Put the bolts through indented side of the side plate and into the bearing holes.
Secure with nuts


Étape 3 - Build the blade shaft
Parts Needed:
5x 01.04.03 Knife 1
5x 01.04.04 Knife 2
4x 01.04.05 Knife 3
1x Shaft
2x 01.04.02 6mm Bearing Spacer
2x 01.04.09 3mm Bearing Spacer
13x Knife Spacer
Tools Needed:
(optional) vice grip/locking pliers
Orient the shaft so the longer blank section is facing up.
Number the faces 1-6(it doesnt matter where you start, as long as it reads left to right).
Slide Knife 1( knife with only 1 notch) onto the shaft so the notch is on the edge between faces 1 and 2. Ensure that the blade point, points towards face 2.
Add a Spacer
Slide Knife 2(knife with 2 notches) onto the shaft so that the first notch is between faces 1 and 2 , and the 2nd notch is between faces 2 and 3.
Add a Spacer
Slide Knife 3(knife with 3 notches) onto the shaft so that the first notch is between faces 1 and 2, and the 2nd notch is between faces 2 and 3. and the 3rd notch is between faces 3 and 4.
Add a spacer
*This completes 1 SET of knives.
Repeat for the next set, but begin by placing the notch of Knife 1 between faces 6 and 1.
*This completes 2 SET of knives.
Repeat for the next set, but begin by placing the notch of Knife 1 between faces 5 and 6.
*This completes 3 SETs of knives.
Repeat for the next set, but begin by placing the notch of Knife 1 between faces 4 and 5.
*This completes 4 SET of knives.
Repeat for the next set, but begin by placing the notch of Knife 1 between faces 3 and 4. This Set will only use 2 blades.
Add 3mm spacer to shaft. Add 6mm Spacer to shaft.
Repeat on other end.
Published
 Français
 English
 Deutsch
 Español
 Italiano
 Português