(Page créée avec « {{Tuto Details |Main_Picture=Arduino_to_ThingSpeak_via_SIM800_No_Wi-Fi_1.PNG |Main_Picture_annotation={"version":"2.4.6","objects":[{"type":"image","version":"2.4.6","orig... ») |
|||
| Ligne 1 : | Ligne 1 : | ||
{{Tuto Details | {{Tuto Details | ||
| − | |Main_Picture=Arduino_to_ThingSpeak_via_SIM800_No_Wi- | + | |Main_Picture=Arduino_to_ThingSpeak_via_SIM800_No_Wi-Fi_121.PNG |
| − | |Main_Picture_annotation={"version":"2.4.6","objects":[{"type":"image","version":"2.4.6","originX":"left","originY":"top","left":- | + | |Main_Picture_annotation={"version":"2.4.6","objects":[{"type":"image","version":"2.4.6","originX":"left","originY":"top","left":-1,"top":-2,"width":762,"height":574,"fill":"rgb(0,0,0)","stroke":null,"strokeWidth":0,"strokeDashArray":null,"strokeLineCap":"butt","strokeDashOffset":0,"strokeLineJoin":"miter","strokeMiterLimit":4,"scaleX":0.79,"scaleY":0.79,"angle":0,"flipX":false,"flipY":false,"opacity":1,"shadow":null,"visible":true,"clipTo":null,"backgroundColor":"","fillRule":"nonzero","paintFirst":"fill","globalCompositeOperation":"source-over","transformMatrix":null,"skewX":0,"skewY":0,"crossOrigin":"","cropX":0,"cropY":0,"src":"https://wikifab.org/images/6/6c/Arduino_to_ThingSpeak_via_SIM800_No_Wi-Fi_121.PNG","filters":[]}],"height":450,"width":600} |
|Description=<translate>sending data from an Arduino microcontroller to the ThingSpeak platform using a GPRS module, specifically the SIM800.</translate> | |Description=<translate>sending data from an Arduino microcontroller to the ThingSpeak platform using a GPRS module, specifically the SIM800.</translate> | ||
|Area=Electronics | |Area=Electronics | ||
| Ligne 179 : | Ligne 179 : | ||
}} | }} | ||
{{PageLang | {{PageLang | ||
| + | |Language=en | ||
|SourceLanguage=none | |SourceLanguage=none | ||
|IsTranslation=0 | |IsTranslation=0 | ||
| − | |||
}} | }} | ||
{{Tuto Status | {{Tuto Status | ||
|Complete=Published | |Complete=Published | ||
}} | }} | ||
Version actuelle datée du 29 octobre 2023 à 17:45
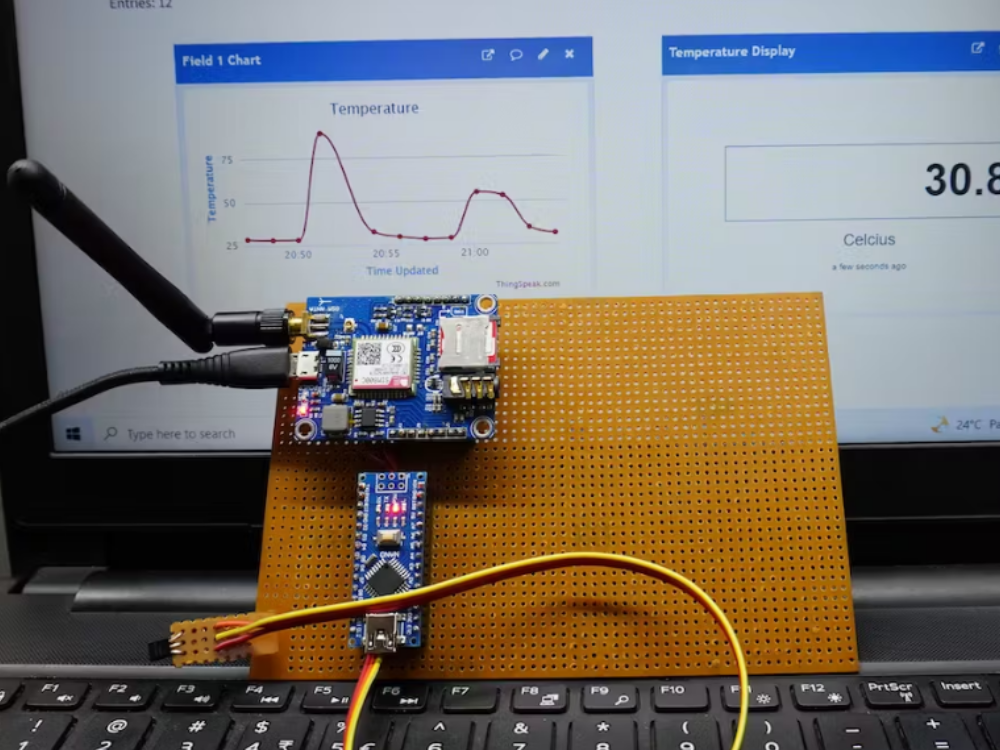
sending data from an Arduino microcontroller to the ThingSpeak platform using a GPRS module, specifically the SIM800.

Difficulté
Facile
Durée
6 heure(s)
Catégories
Électronique
Coût
20 USD ($)
Sommaire
- 1 Introduction
- 2 Étape 1 - About the Project
- 3 Étape 2 - Get PCBs For Your Projects Manufactured
- 4 Étape 3 - Networking testing
- 5 Étape 4 - TCP/IP Communication
- 6 Étape 5 - Client communication in non-transparent mode
- 7 Étape 6 - Client communication in transparent transmission mode
- 8 Étape 7 - HTTP Communication
- 9 Étape 8 - Establishing Communication Between Arduino Nano, SIM800, and ThingSpeak (Serial Monitor Data Captured During Project Execution).
- 10 Commentaires
Introduction
Sending data from an Arduino microcontroller to the ThingSpeak platform using a GPRS module is not a novel project concept. While it may appear outdated in numerous regions, owing to the rapid evolution of communication technologies such as 2G, 3G, 4G, 5G, and the potential for 6G, this is not the case in my country. In India, 2G technologies remain prevalent, and major network operators have confirmed their intent to sustain 2G services.
Matériaux
Outils
Étape 1 - About the Project
The legacy project documents that were originally designed with the SIM800 module may necessitate slight adjustments. This project will prove invaluable to those who continue to rely on 2G and GPRS technology. It offers essential support and guidance for individuals who intend to persist with these communication methods.
Sending data from an Arduino microcontroller to the ThingSpeak platform using a GPRS module, specifically the SIM800, is a fundamental concept. The crucial aspect is that this communication method operates independently of Wi-Fi, constituting an IoT connectivity solution that relies on GPRS for data transmission.
1 / 2
In this project, LM35 temperature sensor data is being transmitted to the ThingSpeak platform through an Arduino Nano and a SIM800 module. The SIM800 module is leveraged to establish a GPRS connection, facilitating the transmission of data to ThingSpeak at specified intervals.
To ensure a reliable connection between ThingSpeak and the hardware, users must configure the SIM800 module to establish a connection with their mobile network. This configuration encompasses setting the Access Point Name (APN) specific to their mobile carrier. It's important to note that the specific AT commands for this configuration may vary based on the user's chosen mobile network provider.
For this project, I utilized the services of the network provider Airtel to establish the connection.
Communication between the hardware components, specifically the SIM800 module, Arduino Nano, and ThingSpeak platform, relies entirely on AT commands. To ensure successful project implementation and effectively troubleshoot any issues that may arise, users must possess a basic understanding of SIM800 AT commands. This knowledge is crucial for configuring, managing, and diagnosing the communication process and resolving potential challenges during the project.

Étape 2 - Get PCBs For Your Projects Manufactured
You must check out PCBWAY for ordering PCBs online for cheap!
You get 10 good-quality PCBs manufactured and shipped to your doorstep for cheap. You will also get a discount on shipping on your first order. Upload your Gerber files onto PCBWAY to get them manufactured with good quality and quick turnaround time. PCBWay now could provide a complete product solution, from design to enclosure production. Check out their online Gerber viewer function. With reward points, you can get free stuff from their gift shop. Also, check out this useful blog on PCBWay Plugin for KiCad from here. Using this plugin, you can directly order PCBs in just one click after completing your design in KiCad.

Étape 3 - Networking testing
The table provided below lists several common AT commands that serve to swiftly and effectively verify the proper functioning of the SIM800C's AT serial communication and network connection. Before proceeding with the steps outlined for the network communication demonstration, it is advisable to conduct a straightforward network test. This preliminary test ensures that the intended network connection is in working order and fully operational.


Étape 4 - TCP/IP Communication
The SIM800 serial module's TCP/IP application offers two connection modes, selectable through the AT command `AT CIPMUX=<n>`.
- When `AT CIPMUX` is set to 0 (`AT+CIPMUX=0`), it operates in single-link mode.
- When `AT CIPMUX` is set to 1 (`AT+CIPMUX=1`), it operates in multi-link mode.
By default, the module is configured in single-link mode.
In single-link mode, the SIM800 serial module can function in both transparent and non-transparent transmission modes. In both of these modes, the module can be configured as either a TCP/UDP client or a TCP server.
In multi-link mode, the SIM800 serial module operates solely in non-transparent mode. In this mode, it can serve as a TCP/UDP client, allowing for the establishment of a maximum of 6 connections. It can also be configured as a TCP server, with support for 5 TCP/UDP clients. SIM800C TCP/IP operates with a multi-client architecture by default, enabling up to five sockets for TCP or UDP connections.
In the upcoming demonstrations, our focus will be on the client communication capabilities of the SIM800C module. Specifically, we will explore its operation in single-link non-transparent mode and transparent mode.

Étape 5 - Client communication in non-transparent mode
Client communication in non-transparent mode refers to the way the SIM800C module interacts with remote servers or devices when it acts as a client, transmitting data using a specific protocol such as TCP or UDP. In non-transparent mode, the module sends and receives data through AT commands and does not directly pass data between the microcontroller and the remote server.
This mode provides control over the data transmission process, allowing you to send and receive data, manage connections, and configure communication settings using AT commands. It is suitable for applications where you need fine-grained control over the communication process and want to ensure data integrity.
To use the SIM800C in client communication in non-transparent mode, you will typically configure the module using appropriate AT commands and establish connections with remote servers or devices for data exchange.


Étape 6 - Client communication in transparent transmission mode
Client communication in transparent transmission mode refers to the SIM800C module's ability to act as a client while allowing data to flow directly between the microcontroller (e.g., an Arduino) and a remote server or device. In this mode, the SIM800C module operates as a transparent bridge, forwarding data between the microcontroller and the remote server without the need for explicit AT commands to send or receive each piece of data.
This mode simplifies data transfer by treating the SIM800C module as a transparent conduit. Data sent by the microcontroller is transmitted to the remote server without manual packetization, and data received from the server is forwarded to the microcontroller without manual processing.
Using the SIM800C in transparent transmission mode is advantageous when you want to streamline data transfer and reduce the complexity of managing data packets and AT commands for each communication task. It's particularly useful for applications where data throughput and efficiency are essential.


Étape 7 - HTTP Communication
This chapter provides an overview of the HTTP communication capabilities of the SIM800C module, focusing on HTTP GET and HTTP POST methods. For in-depth information about HTTP and FTP (File Transfer Protocol) communication with the SIM800C module, please refer to the "SIM800C Series_IP_Application_Note." This additional resource will provide comprehensive details and guidelines for utilizing these communication functions effectively.


Étape 8 - Establishing Communication Between Arduino Nano, SIM800, and ThingSpeak (Serial Monitor Data Captured During Project Execution).
AT+CSTT="airtelgprs.com"<CR>
OK
AT+CIICR<CR>
OK
AT+CIFSR<CR>
100.78.215.26
AT+CIPSPRT=0<CR>
OK
AT+CIPSTART="TCP","api.thingspeak.com","80"<CR>
OK

CONNECT OK<CR>AT+CIPSEND<CR>GET https://api.thingspeak.com/update?api_key=5XC1TCVONJVK1PNN&field1=20.00&field2=10.00
GET https://api.thingspeak.com/update?api_key=5XC1TCVONJVK1PNN&<SUB>

SEND OK
6
CLOSED
<CR>AT+CIPSHUT<CR>Temperature = 20.00 °C
Humidity = 10.00 %

SHUT OK
AT<CR>
OK
AT+CPIN?<CR>
+CPIN: READY

OK
AT+CREG?<CR>
+CAT+CSTT="airtelgprs.com"<CR>
OK
AT+CIICR<CR>
OK
AT+CIFSR<CR>
100.90.199.122
AT+CIPSPRT=0<CR>
OK
AT+CIPSTART="TCP","api.thingspeak.com","80"<CR>
OK

CONNECT OK<CR>AT+CIPSEND<CR>GET https://api.thingspeak.com/update?api_key=5XC1TCVONJVK1PNN&field1=20.00&field2=10.00
GET https://api.thingspeak.com/update?api_key=5XC1TCVONJVK1PNN&<SUB>

SEND OK
7
CLOSED
<CR>AT+CIPSHUT<CR>Temperature = 20.00 °C
Humidity = 10.00 %

SHUT OK
AT<CR>
OK
AT+CPIN?<CR>
+CPIN: READY

OK
AT+CREG?<CR>
+CAT+CSTT="airtelgprs.com"<CR>
OK
AT+CIICR<CR>
OK
AT+CIFSR<CR>
100.102.108.63
AT+CIPSPRT=0<CR>
OK
AT+CIPSTART="TCP","api.thingspeak.com","80"<CR>
OK

CONNECT OK<CR>AT+CIPSEND<CR>GET https://api.thingspeak.com/update?api_key=5XC1TCVONJVK1PNN&field1=20.00&field2=10.00
GET https://api.thingspeak.com/update?api_key=5XC1TCVONJVK1PNN&<SUB>
SEND OK
8
CLOSED
Published
 Français
 English
 Deutsch
 Español
 Italiano
 Português