Introduction
Matériaux
Outils
Étape 1 - Getting Started
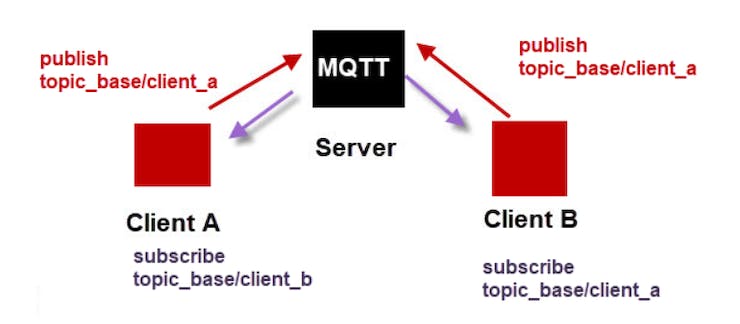
Here, there are 2 sections - Publish and Subscribe. And then there is a middleman - Broker. Let us see in depth
- IoT Devices play the role to collect sensor data and send to the cloud (broker). While PC / Server / Mobile devices play the role to monitor and receive the sensor data to be viewed - Here, IoT Device is a Publisher, and PC Devices are Subscriber.
[EXAMPLE] When a user1 publishes an image on social media, then only the user2 subscribed to user1 can view/receive the image. Here, the user1 is the PUBLISHER, user2 is the SUBSCRIBER, and the user1's account is the BROKER.
- According to the above analogy, the image that is published is the data, that was transferred from user1 to user2 📤. And that is the exact scenario in an MQTT Pub/Sub model.
- We have a more secure layer 🔒 to make sure the data is shared through a specific path, we call that 'topic', When user1 publishes data on topic, the subscriber automatically receives if already connected to the broker. Hence, the LOW latency.
Étape 2 - MQTT Broker
Whenever there is a pub-sub model used as a message communication protocol, we require a broker that can transfer the information in the required device. This can be done by sending the message under correct topic.
Let us understand this -
- A Broker is a runtime server (continuously running service), which can have 2 types of clients - Publisher (seller) & Subscriber (buyer)
- For instance, when a seller sells a product through a broker to a buyer, then it is using the Broker's service to reach & find a secured buyer.
- Similarly, when publisher publishes a piece of information, the data reaches to the subscriber through the Broker.
- The broker is responsible for having specific storage space where it can expect data from the publisher to store temporarily and then send to the subscriber.
- In the pub-sub MQTT, clients talk to each other through an MQTT broker.
- There are many MQTT Brokers in the market. It is even possible to create our own broker, or use an open-source broker 'paho'.
- For the current project, we shall first understand the mechanism and then watch a trial movement of data on Mosquitto MQTT Broker.
Étape 3 - Mosquitto Platform
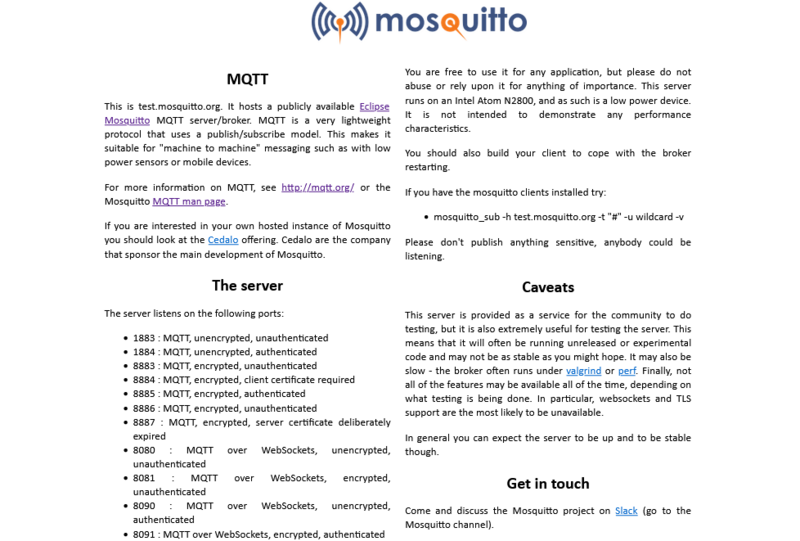
Now that we understand how MQTT works, let us use a cloud MQTT service and send data across the internet. In this article, we'll be using Mosquitto MQTT - test.mosquitto.org
Under the Server section, we can see different ports provide feature-separated servers. These servers act like channels for sharing data over the cloud. Let us understand it first -
- MQTT Broker Port (default: 1883): This is the standard port used for MQTT communication. MQTT clients use i to connect to the Mosquitto broker and publish/subscribe to topics. It operates over TCP.
- MQTT Broker SSL/TLS Port (default: 8883): This is the secure version of the MQTT broker port. It uses SSL/TLS encryption to provide secure communication between MQTT clients and the Mosquitto broker. Clients connect to this port to establish a secure connection.
- WebSocket Port (default: 9001): Mosquitto also supports MQTT over WebSockets, allowing MQTT clients to connect to the broker using the WebSocket protocol. The WebSocket port is used for WebSocket-based MQTT communication.
- WebSocket SSL/TLS Port (default: 9443): This is the secure WebSocket port used for encrypted WebSocket-based MQTT communication. It provides a secure connection using SSL/TLS encryption.
We shall be using 1883 port to send data and monitor. As we know, MQTT has 3 services - Publisher, Broker, and Subscriber. In this case, mosquito MQTT Cloud is already playing the role of a broker.
Now, we'd be using ESP32 Dev Board, which has a wifi chip and is able to connect to the Internet, playing the role of a Publisher for sharing its temperature and humidity data from the sensor.
On the other hand, we shall use the PC to view this data as a Subscriber. This will enable us to fully understand the working principle of the MQTT protocol used in IoT Communication between devices.
Draft


 Français
 English
 Deutsch
 Español
 Italiano
 Português