(Mise à jour pour être en accord avec la nouvelle version de la source de la page) |
(Mise à jour pour être en accord avec la nouvelle version de la source de la page) |
||
| Ligne 21 : | Ligne 21 : | ||
}} | }} | ||
{{ {{tntn|Materials}} | {{ {{tntn|Materials}} | ||
| + | |Step_Picture_00=Piccolo_cnc_drawing_robot_Erasmus_logo.jpg | ||
|Material=Instructions on how to create a replica of the piccolo robot, including a list of parts, are available [http://www.piccolo.cc/#Build-Your-Own <u>here</u>]. | |Material=Instructions on how to create a replica of the piccolo robot, including a list of parts, are available [http://www.piccolo.cc/#Build-Your-Own <u>here</u>]. | ||
|Tools=laser cutter, general purpose DIY tools, computer | |Tools=laser cutter, general purpose DIY tools, computer | ||
Version du 6 décembre 2019 à 09:00
Introduction
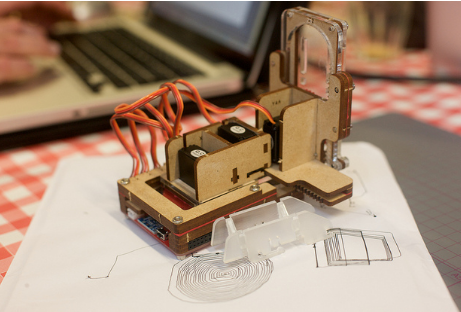
Piccolo is a mini cnc robot that allows you to draw on flat surfaces. The robot can be programmed via Arduino or via a visual coding software such as mBlock.
Une version française de ce tutoriel est disponible ici.
Matériaux
Instructions on how to create a replica of the piccolo robot, including a list of parts, are available here.
Outils
laser cutter, general purpose DIY tools, computer
Étape 1 - Create your own piccolo robot
Instructions on how to create a replica of the piccolo robot are available here.
The robot is functional even without the z-axis. Assembling the z-axis is in fact quite complex, and the result is not a lot different than a piccolo robot with only x and y axis.
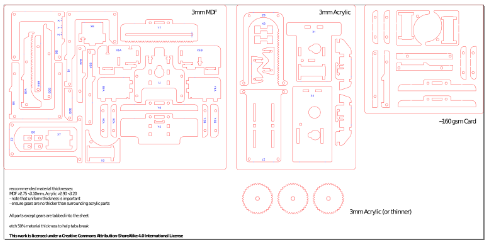
The design of the piccolo parts is availablehere in .svg format, which we believe is the most convenient of all.
Finally, note that, for the laser cutting of the piccolo robot, you may use mdf or another type of wood exclusively. Acrylic is in fact a lot more expensive than wood, and the robot works well even with all parts being made out of mdf or similar material.
Étape 2 - Program the piccolo robot
You can program the piccolo robot to have it draw simple shapes (squares, rectangles) or text.
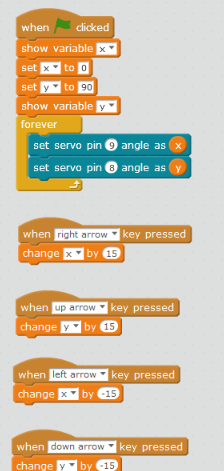
To program the piccolo robot you may use mBlock. Download mBlock here.
On mBlock, the code to control piccolo may look something like this:
Notes et références
This tutorial was produced as part of the FabEdu project, co-financed by the Erasmus + Programme of the European Union.
Project number: 2017-1-FR02-KA205-012767
The content of this publication does not reflect the official opinion of the European Union. Responsibility for the information and views expressed therein lies entirely with the author(s).
Published


 Français
 English
 Deutsch
 Español
 Italiano
 Português