| Ligne 16 : | Ligne 16 : | ||
}} | }} | ||
{{Materials | {{Materials | ||
| − | |Material=<translate></translate> | + | |Material=<translate>Boîte articulée : |
| − | |Tools=<translate></translate> | + | |
| + | - Plaque de plexiglass ou plaque de contreplaqué de 50x50 cm | ||
| + | |||
| + | |||
| + | Impression 3D : | ||
| + | |||
| + | - Bobine de PLA | ||
| + | |||
| + | |||
| + | Électronique : | ||
| + | |||
| + | - Un kit IR pour arduino : <nowiki>https://www.dfrobot.com/product-366.html?search=IR%20kit&description=true</nowiki> | ||
| + | |||
| + | - Un module MP3 V3.0 Grove : <nowiki>https://www.gotronic.fr/art-module-mp3-v3-0-grove-107020069-31161.htm</nowiki> | ||
| + | |||
| + | - Écran de matrice Led RGB 8x16 : <nowiki>https://www.dfrobot.com/product-1725.html?search=8x16%20RGB&description=true</nowiki> | ||
| + | |||
| + | - Haut-Parleur : <nowiki>https://www.amazon.fr/Haut-Parleur-Complète-Portable-Longueur-JST-PH2-0mm-2/dp/B07FT9CFY4/ref=sr_1_2?__mk_fr_FR=%C3%85M%C3%85%C5%BD%C3%95%C3%91&keywords=enceinte+interne&qid=1579797803&sr=8-2</nowiki> | ||
| + | |||
| + | - Une micro SD</translate> | ||
| + | |Tools=<translate>Logiciels : | ||
| + | |||
| + | - Illustrator, Inkscape ou autre | ||
| + | |||
| + | - LaserCad | ||
| + | |||
| + | - Fusion 360, Sketchup, Tinkercad ou autre | ||
| + | |||
| + | - Cura Ultimaker | ||
| + | |||
| + | - Arduino</translate> | ||
}} | }} | ||
{{Tuto Step | {{Tuto Step | ||
|Step_Title=<translate>Prérequis</translate> | |Step_Title=<translate>Prérequis</translate> | ||
| − | |Step_Content=<translate></translate> | + | |Step_Content=<translate>Assembler les composants Arduino. |
| + | |||
| + | Programmer le code Arduino pour interactions des différents éléments (relevés paramètres météo, affichage sur écran, animation du ring-Leds,...). | ||
| + | |||
| + | Monter les 3 premiers niveaux "génériques" de la Bentolux.</translate> | ||
|Step_Picture_00=Bentolux_-_ShrekBox_guide_montage_bentoluxV3.pdf | |Step_Picture_00=Bentolux_-_ShrekBox_guide_montage_bentoluxV3.pdf | ||
|Step_Picture_01=Bentolux_-_ShrekBox_montage_bentolux_base.jpg | |Step_Picture_01=Bentolux_-_ShrekBox_montage_bentolux_base.jpg | ||
| + | |Step_Picture_02=Bentolux_-_ShrekBox_bentolux_mont_e.jpg | ||
}} | }} | ||
{{Notes | {{Notes | ||
Version du 2 mars 2020 à 16:31
Sommaire
Matériaux
Boîte articulée :
- Plaque de plexiglass ou plaque de contreplaqué de 50x50 cm
Impression 3D :
- Bobine de PLA
Électronique :
- Un kit IR pour arduino : https://www.dfrobot.com/product-366.html?search=IR%20kit&description=true
- Un module MP3 V3.0 Grove : https://www.gotronic.fr/art-module-mp3-v3-0-grove-107020069-31161.htm
- Écran de matrice Led RGB 8x16 : https://www.dfrobot.com/product-1725.html?search=8x16%20RGB&description=true
- Haut-Parleur : https://www.amazon.fr/Haut-Parleur-Complète-Portable-Longueur-JST-PH2-0mm-2/dp/B07FT9CFY4/ref=sr_1_2?__mk_fr_FR=%C3%85M%C3%85%C5%BD%C3%95%C3%91&keywords=enceinte+interne&qid=1579797803&sr=8-2
- Une micro SD
Outils
Logiciels :
- Illustrator, Inkscape ou autre
- LaserCad
- Fusion 360, Sketchup, Tinkercad ou autre
- Cura Ultimaker
- Arduino
Étape 1 - Prérequis
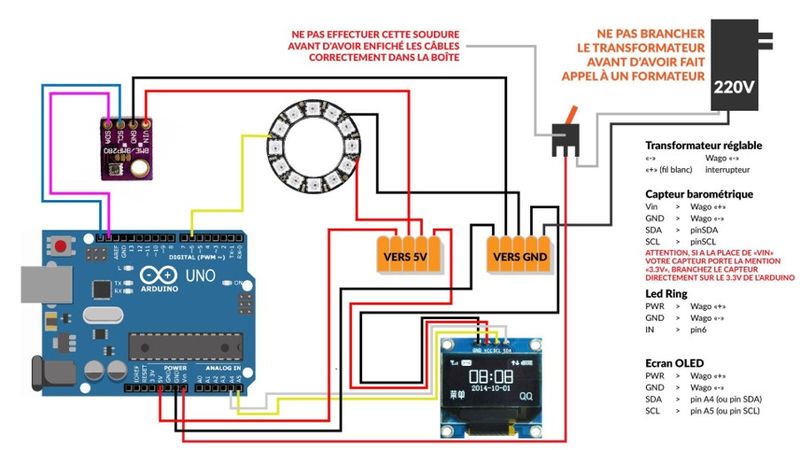
Assembler les composants Arduino.
Programmer le code Arduino pour interactions des différents éléments (relevés paramètres météo, affichage sur écran, animation du ring-Leds,...).
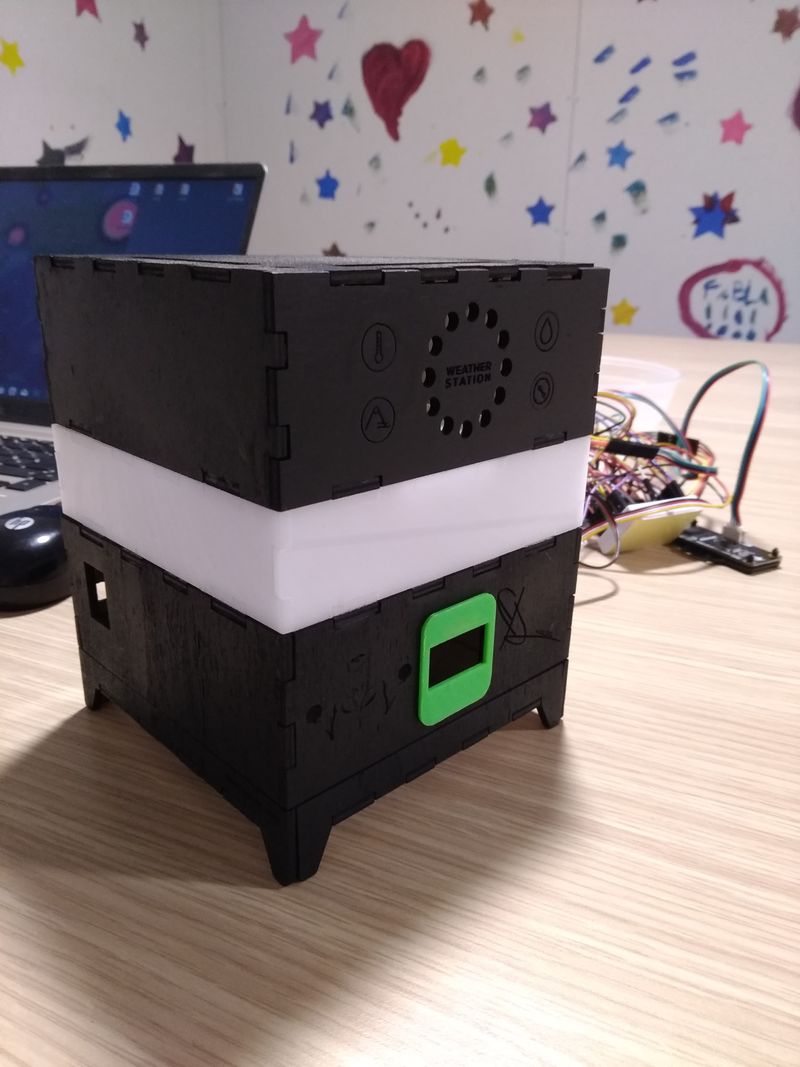
Monter les 3 premiers niveaux "génériques" de la Bentolux.
Draft


 Français
 English
 Deutsch
 Español
 Italiano
 Português