(Mise à jour pour être en accord avec la nouvelle version de la source de la page) |
(update property name) |
||
| Ligne 1 : | Ligne 1 : | ||
| − | {{ | + | {{Tuto Details |
|Main_Picture=Conductive_paint_+_Makey_Makey_5.PNG | |Main_Picture=Conductive_paint_+_Makey_Makey_5.PNG | ||
|Licences=Attribution (CC BY) | |Licences=Attribution (CC BY) | ||
| Ligne 14 : | Ligne 14 : | ||
|IsTranslation=1 | |IsTranslation=1 | ||
}} | }} | ||
| − | {{ | + | {{Introduction |
|Introduction=Watch [https://www.youtube.com/watch?v=neclwlkgPKQ&feature=youtu.be this] video to understand how the product works. | |Introduction=Watch [https://www.youtube.com/watch?v=neclwlkgPKQ&feature=youtu.be this] video to understand how the product works. | ||
Une version de ce tutoriel en français est disponible [https://drive.google.com/file/d/1IyhmzCep2_Zlks29S6l7mZBCPLmlonC3/view?usp=sharing ici] | Une version de ce tutoriel en français est disponible [https://drive.google.com/file/d/1IyhmzCep2_Zlks29S6l7mZBCPLmlonC3/view?usp=sharing ici] | ||
}} | }} | ||
| − | {{ | + | {{Materials |
|Material=- graphite [https://www.amazon.com/Generals-Powdered-Graphite-6-oz/dp/B00TCLCO7A powder] | |Material=- graphite [https://www.amazon.com/Generals-Powdered-Graphite-6-oz/dp/B00TCLCO7A powder] | ||
| Ligne 25 : | Ligne 25 : | ||
|Tools=- makey makey or [[DIY Makey Makey with Arduino Leonardo|DIY makey makey with Arduino Leonardo]] | |Tools=- makey makey or [[DIY Makey Makey with Arduino Leonardo|DIY makey makey with Arduino Leonardo]] | ||
}} | }} | ||
| − | {{ | + | {{Separator}} |
| − | {{ | + | {{Tuto Step |
|Step_Title=Make the conductive paint | |Step_Title=Make the conductive paint | ||
|Step_Content=Simply mix the glue with the graphite powder in equal parts. You can add more glue than graphite powder if you believe you don’t have enough powder. When done, add water as needed to reach the desired consistency. Your mixture needs to have roughly the same consistency as real paint. | |Step_Content=Simply mix the glue with the graphite powder in equal parts. You can add more glue than graphite powder if you believe you don’t have enough powder. When done, add water as needed to reach the desired consistency. Your mixture needs to have roughly the same consistency as real paint. | ||
| Ligne 33 : | Ligne 33 : | ||
|Step_Picture_00=Conductive_paint_+_Makey_Makey_1.PNG | |Step_Picture_00=Conductive_paint_+_Makey_Makey_1.PNG | ||
}} | }} | ||
| − | {{ | + | {{Tuto Step |
|Step_Title=Test the conductive paint | |Step_Title=Test the conductive paint | ||
|Step_Content=To check whether your conductive paint is indeed conductive, we can run a test with the aid of a voltmeter. | |Step_Content=To check whether your conductive paint is indeed conductive, we can run a test with the aid of a voltmeter. | ||
| Ligne 40 : | Ligne 40 : | ||
|Step_Picture_00=Conductive_paint_+_Makey_Makey_2.PNG | |Step_Picture_00=Conductive_paint_+_Makey_Makey_2.PNG | ||
}} | }} | ||
| − | {{ | + | {{Tuto Step |
|Step_Title=Draw your own circuits | |Step_Title=Draw your own circuits | ||
|Step_Content=You are now ready to combine the conductive paint with makey makey. You can choose to draw musical instruments like in the video available in this tutorial, or create video game controllers on paper, or anything else you can think of. | |Step_Content=You are now ready to combine the conductive paint with makey makey. You can choose to draw musical instruments like in the video available in this tutorial, or create video game controllers on paper, or anything else you can think of. | ||
| Ligne 51 : | Ligne 51 : | ||
|Step_Picture_01=Conductive_paint_+_Makey_Makey_3.PNG | |Step_Picture_01=Conductive_paint_+_Makey_Makey_3.PNG | ||
}} | }} | ||
| − | {{ | + | {{Tuto Step |
|Step_Title=Play | |Step_Title=Play | ||
|Step_Content=Connect the alligator clips deriving from the jumper wires that ultimately connects to Analog Pins into the Arduino Leonardo to the conductive paint. Use the alligator clip connected to GND to trigger actions on your computer. You would need of course to program these actions beforehand, for example via a software like Scratch or Soundplant. | |Step_Content=Connect the alligator clips deriving from the jumper wires that ultimately connects to Analog Pins into the Arduino Leonardo to the conductive paint. Use the alligator clip connected to GND to trigger actions on your computer. You would need of course to program these actions beforehand, for example via a software like Scratch or Soundplant. | ||
| Ligne 58 : | Ligne 58 : | ||
|Step_Picture_00=Conductive_paint_+_Makey_Makey_5.PNG | |Step_Picture_00=Conductive_paint_+_Makey_Makey_5.PNG | ||
}} | }} | ||
| − | {{ | + | {{Tuto Step |
|Step_Title= | |Step_Title= | ||
|Step_Content= | |Step_Content= | ||
|Step_Picture_00=Musical_e-textile_bag_eu_flag_co_funded_pos_rgb_right.jpg | |Step_Picture_00=Musical_e-textile_bag_eu_flag_co_funded_pos_rgb_right.jpg | ||
}} | }} | ||
| − | {{ | + | {{Notes |
|Notes=This tutorial has been developed as part of the [http://www.digijeunes.com/projets/itech/ i Tech] project, co-financed by the Erasmus + Programme of the European Union. | |Notes=This tutorial has been developed as part of the [http://www.digijeunes.com/projets/itech/ i Tech] project, co-financed by the Erasmus + Programme of the European Union. | ||
| Ligne 72 : | Ligne 72 : | ||
For more details, contact info@digijeunes.com | For more details, contact info@digijeunes.com | ||
}} | }} | ||
| − | {{ | + | {{Tuto Status |
|Complete=Published | |Complete=Published | ||
}} | }} | ||
Version actuelle datée du 9 décembre 2019 à 11:29
Introduction
Watch this video to understand how the product works.
Une version de ce tutoriel en français est disponible ici
Outils
- makey makey or DIY makey makey with Arduino Leonardo
Étape 1 - Make the conductive paint
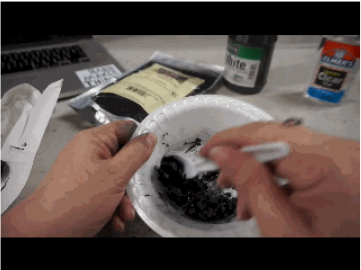
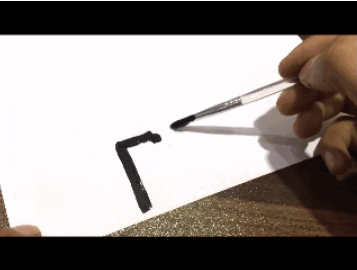
Simply mix the glue with the graphite powder in equal parts. You can add more glue than graphite powder if you believe you don’t have enough powder. When done, add water as needed to reach the desired consistency. Your mixture needs to have roughly the same consistency as real paint.
Watch this video for extra help.
Étape 2 - Test the conductive paint
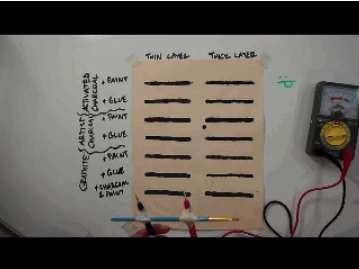
To check whether your conductive paint is indeed conductive, we can run a test with the aid of a voltmeter.
Paint a straight line on a sheet of paper. Then place the two ends of the voltmeter (the red one and the black one) each at one end of the line. Place the cursor of the voltmeter in a position to read the value of resistance and a number should display on your voltmeter.
Étape 3 - Draw your own circuits
You are now ready to combine the conductive paint with makey makey. You can choose to draw musical instruments like in the video available in this tutorial, or create video game controllers on paper, or anything else you can think of.
Some useful tips to draw circuits:
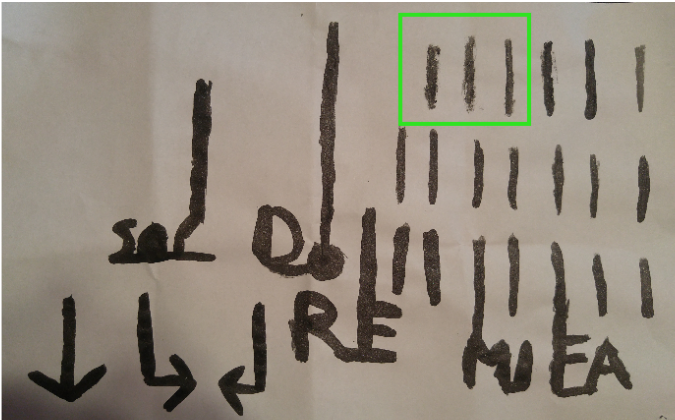
- the traits you draw need to be firm, there don’t need to be any white spots left without paint. In the image below, the 3 traits within the green box are not filled in enough with paint.
- Do not draw too long traits, ideally your traits will need to be 5-6 cm long max. In the image below, the straight trait for “DO” is too long. The ones for “SOL”, “RE”, “MI” and “FA” are fine. The arrows also work really well.
- circles filled in with paint work really well. in the image below, the letter “O” in “SOL”, works really well.
Étape 4 - Play
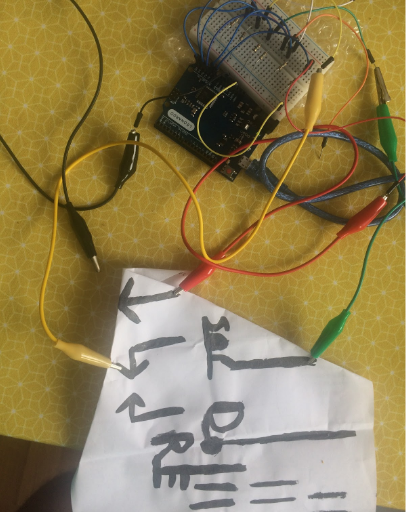
Connect the alligator clips deriving from the jumper wires that ultimately connects to Analog Pins into the Arduino Leonardo to the conductive paint. Use the alligator clip connected to GND to trigger actions on your computer. You would need of course to program these actions beforehand, for example via a software like Scratch or Soundplant.
Watch this video for extra help.
Notes et références
This tutorial has been developed as part of the i Tech project, co-financed by the Erasmus + Programme of the European Union.
Project number: 2017-1-FR02-KA205-012764
EU disclaimer: The content of this publication does not reflect the official opinion of the European Union. Responsibility for the information and views expressed in the therein lies entirely with the author(s).
For more details, contact info@digijeunes.com
Published

 Français
 English
 Deutsch
 Español
 Italiano
 Português