(update property name) |
|||
| (2 révisions intermédiaires par un autre utilisateur non affichées) | |||
| Ligne 1 : | Ligne 1 : | ||
| − | {{ | + | {{Tuto Details |
|Main_Picture=Financial_literacy_with_Makey_Makey_1.PNG | |Main_Picture=Financial_literacy_with_Makey_Makey_1.PNG | ||
|Licences=Attribution (CC BY) | |Licences=Attribution (CC BY) | ||
| Ligne 15 : | Ligne 15 : | ||
|IsTranslation=0 | |IsTranslation=0 | ||
}} | }} | ||
| − | {{ | + | {{Introduction |
|Introduction=In this tutorial you will learn how to set up an activity on coding based on Scratch and simple financial literacy for kids. | |Introduction=In this tutorial you will learn how to set up an activity on coding based on Scratch and simple financial literacy for kids. | ||
| + | |||
| + | Une version de ce tutoriel en français est disponible [https://drive.google.com/file/d/1zhL5W7wfmY8wYTla4nGsp3aAogCVPDbn/view?usp=sharing en ligne] / A French version of this tutorial is available [https://drive.google.com/file/d/1zhL5W7wfmY8wYTla4nGsp3aAogCVPDbn/view?usp=sharing here]. | ||
| + | |||
| + | A Bulgarian version of this tutorial is available [https://docs.google.com/document/d/1QwPyfYZUtX3AT8h9SG3C_PZ8venr8zbum6oJivUQtIg/edit?usp=sharing here]. | ||
}} | }} | ||
| − | {{ | + | {{Materials |
|Material=1 x DIY makey makey (see [[DIY Makey Makey with Arduino Leonardo|this]] tutorial), or original makey makey | |Material=1 x DIY makey makey (see [[DIY Makey Makey with Arduino Leonardo|this]] tutorial), or original makey makey | ||
| Ligne 26 : | Ligne 30 : | ||
|Tools=1 computer with Scratch (Offline or on-line) | |Tools=1 computer with Scratch (Offline or on-line) | ||
}} | }} | ||
| − | {{ | + | {{Separator}} |
| − | {{ | + | {{Tuto Step |
|Step_Title=Connecting the Makey Makey to the computer | |Step_Title=Connecting the Makey Makey to the computer | ||
|Step_Content=If it’s your first installation of Makey makey or Arduino Leonardo on Windows or MacOS, just plug the board to your computer and wait for the automatic installation. | |Step_Content=If it’s your first installation of Makey makey or Arduino Leonardo on Windows or MacOS, just plug the board to your computer and wait for the automatic installation. | ||
| Ligne 37 : | Ligne 41 : | ||
|Step_Picture_01=Financial_literacy_with_Makey_Makey_2.PNG | |Step_Picture_01=Financial_literacy_with_Makey_Makey_2.PNG | ||
}} | }} | ||
| − | {{ | + | {{Tuto Step |
|Step_Title=Coding on Scratch: Declaring variables | |Step_Title=Coding on Scratch: Declaring variables | ||
|Step_Content=Let’s get started with the coding. | |Step_Content=Let’s get started with the coding. | ||
| Ligne 48 : | Ligne 52 : | ||
|Step_Picture_00=Financial_literacy_with_Makey_Makey_3.PNG | |Step_Picture_00=Financial_literacy_with_Makey_Makey_3.PNG | ||
}} | }} | ||
| − | {{ | + | {{Tuto Step |
|Step_Title=Coding: Conditional statements | |Step_Title=Coding: Conditional statements | ||
|Step_Content=In a “forever” loop (available under CONTROL), pick the condition of you first key. | |Step_Content=In a “forever” loop (available under CONTROL), pick the condition of you first key. | ||
| Ligne 66 : | Ligne 70 : | ||
|Step_Picture_01=Financial_literacy_with_Makey_Makey_5.PNG | |Step_Picture_01=Financial_literacy_with_Makey_Makey_5.PNG | ||
}} | }} | ||
| − | {{ | + | {{Tuto Step |
|Step_Title=Coding: finalizing the code | |Step_Title=Coding: finalizing the code | ||
|Step_Content=Important! to avoid problems you need to add an end to your code. In this example, when the bucket value will be equal to the price, that will mark the end of the code. | |Step_Content=Important! to avoid problems you need to add an end to your code. In this example, when the bucket value will be equal to the price, that will mark the end of the code. | ||
| Ligne 73 : | Ligne 77 : | ||
|Step_Picture_00=Financial_literacy_with_Makey_Makey_6.PNG | |Step_Picture_00=Financial_literacy_with_Makey_Makey_6.PNG | ||
}} | }} | ||
| − | {{ | + | {{Tuto Step |
|Step_Title=The final result | |Step_Title=The final result | ||
|Step_Content=The final code should look like this (see image below). | |Step_Content=The final code should look like this (see image below). | ||
|Step_Picture_00=Financial_literacy_with_Makey_Makey_7.PNG | |Step_Picture_00=Financial_literacy_with_Makey_Makey_7.PNG | ||
}} | }} | ||
| − | {{ | + | {{Notes |
|Notes=This tutorial has been developed as part of the [http://www.digijeunes.com/projets/itech/ I TECH] project, co-financed by the Erasmus + Program of the European Commission. To contact us: info@digijeunes.com | |Notes=This tutorial has been developed as part of the [http://www.digijeunes.com/projets/itech/ I TECH] project, co-financed by the Erasmus + Program of the European Commission. To contact us: info@digijeunes.com | ||
}} | }} | ||
| − | {{ | + | {{Tuto Status |
|Complete=Draft | |Complete=Draft | ||
}} | }} | ||
Version actuelle datée du 9 décembre 2019 à 11:33
Introduction
In this tutorial you will learn how to set up an activity on coding based on Scratch and simple financial literacy for kids.
Une version de ce tutoriel en français est disponible en ligne / A French version of this tutorial is available here.
A Bulgarian version of this tutorial is available here.
Matériaux
1 x DIY makey makey (see this tutorial), or original makey makey
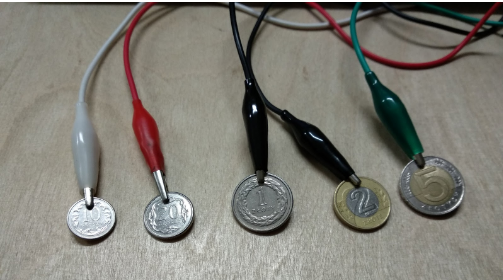
Different coins (10 cents, 20 cents, 50 cents, 1 cent, etc.)
A bunch of alligator clips
Outils
1 computer with Scratch (Offline or on-line)
Étape 1 - Connecting the Makey Makey to the computer
If it’s your first installation of Makey makey or Arduino Leonardo on Windows or MacOS, just plug the board to your computer and wait for the automatic installation.
(2 minutes maximum).
Next, plug some alligator clips into the board.
Étape 2 - Coding on Scratch: Declaring variables
Let’s get started with the coding.
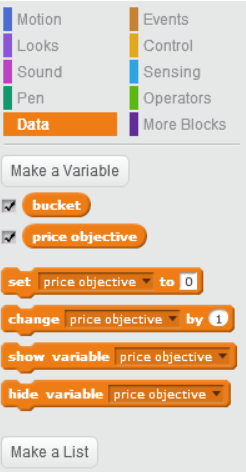
To declare a variable go to DATA (orange), and click on ‘make a variable’ and give a name to the value. For this exercise you will need two values : 1. ‘price asked’ and 2. ‘bucket’.
Next, pick up two blocks of the type ‘set …. to 0’ add one block per each value (one for bucket and one for price objective) to the code. For the value ‘price asked’ add a block ‘change …. by 1’ and go in OPERATOR (Light green), and replace the 1 in change by one by the block ‘pick random 1 to 50’.
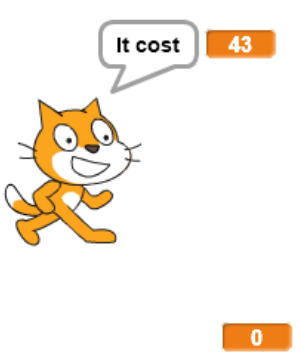
At this stage you should have a price and an empty bucket.
Étape 3 - Coding: Conditional statements
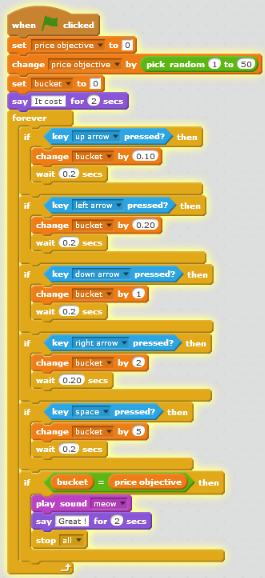
In a “forever” loop (available under CONTROL), pick the condition of you first key.
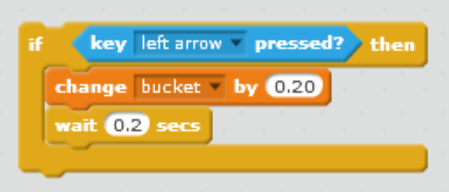
IF ... pressed THEN
In our example the key will be represented by a coin, so we will use this value to define the extent to which the ‘bucket’ value will increase.
For 1 euro choose the value 1 and for 10 cents of euro (0.10euro) set to 0.1.
To change the value go to Data (orange) and choose ‘change … by 1’, and modify it to have ‘change bucket by (the value of coin)’.
To improve the code add a ‘wait 0.20 seconds’ in each conditional statement.
Repeat the operation for each coin.
Étape 4 - Coding: finalizing the code
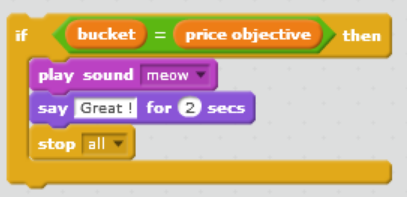
Important! to avoid problems you need to add an end to your code. In this example, when the bucket value will be equal to the price, that will mark the end of the code.
We need to add an IF (yellow) and use the Operator (light green) ‘... = ....’ in our case we will add our variables (bucket from Data (orange).
Notes et références
This tutorial has been developed as part of the I TECH project, co-financed by the Erasmus + Program of the European Commission. To contact us: info@digijeunes.com
Draft

 Français
 English
 Deutsch
 Español
 Italiano
 Português