(update property name) |
|||
| (Une révision intermédiaire par un autre utilisateur non affichée) | |||
| Ligne 1 : | Ligne 1 : | ||
| − | {{ | + | {{Tuto Details |
|Main_Picture=DIY_Makey_Makey_with_Arduino_Leonardo_makey_intro.PNG | |Main_Picture=DIY_Makey_Makey_with_Arduino_Leonardo_makey_intro.PNG | ||
|Licences=Attribution (CC BY) | |Licences=Attribution (CC BY) | ||
| Ligne 15 : | Ligne 15 : | ||
|IsTranslation=0 | |IsTranslation=0 | ||
}} | }} | ||
| − | {{ | + | {{Introduction |
|Introduction=In this tutorial you will learn how to create a makey makey-like device with an Arduino Leonardo. | |Introduction=In this tutorial you will learn how to create a makey makey-like device with an Arduino Leonardo. | ||
| + | |||
| + | Une version de ce tutoriel en français est également disponible [https://drive.google.com/open?id=149LWWJqn7LK6Sg5pkabr0ulBB65MXo73 en ligne.] | ||
}} | }} | ||
| − | {{ | + | {{Materials |
| − | |||
| − | |||
| − | |||
| − | |||
|Material=1 x Arduino Leonardo + USB cable | |Material=1 x Arduino Leonardo + USB cable | ||
| Ligne 34 : | Ligne 32 : | ||
|Tools=Computer with Arduino IDE software installed | |Tools=Computer with Arduino IDE software installed | ||
}} | }} | ||
| − | {{ | + | {{Separator}} |
| − | {{ | + | {{Tuto Step |
|Step_Title=Wiring | |Step_Title=Wiring | ||
|Step_Content=The image below shows the wiring that is needed for one key of your makey-makey-like device. In order to obtain 6 functional keys, you will need to repeat this wiring 6 times overall, each time using a different analog pin on your arduino leonardo. | |Step_Content=The image below shows the wiring that is needed for one key of your makey-makey-like device. In order to obtain 6 functional keys, you will need to repeat this wiring 6 times overall, each time using a different analog pin on your arduino leonardo. | ||
| Ligne 43 : | Ligne 41 : | ||
|Step_Picture_03=DIY_Makey_Makey_with_Arduino_Leonardo_makey_wiring4.PNG | |Step_Picture_03=DIY_Makey_Makey_with_Arduino_Leonardo_makey_wiring4.PNG | ||
}} | }} | ||
| − | {{ | + | {{Tuto Step |
|Step_Title=Program the Makey Makey-like device | |Step_Title=Program the Makey Makey-like device | ||
|Step_Content=In order for your makey-makey-like device to function like a classical makey makey, you will need to program the Arduino board, so that whenever a circuit is shut, the computer will react as if a certain key (ex. “a”, “backspace”, “space”) were pressed. | |Step_Content=In order for your makey-makey-like device to function like a classical makey makey, you will need to program the Arduino board, so that whenever a circuit is shut, the computer will react as if a certain key (ex. “a”, “backspace”, “space”) were pressed. | ||
| Ligne 64 : | Ligne 62 : | ||
|Step_Picture_00=DIY_Makey_Makey_with_Arduino_Leonardo_makey_program.PNG | |Step_Picture_00=DIY_Makey_Makey_with_Arduino_Leonardo_makey_program.PNG | ||
}} | }} | ||
| − | {{ | + | {{Tuto Step |
|Step_Title=Play | |Step_Title=Play | ||
|Step_Content=Just like you do with a real makey makey, it is convenient to attach alligator clips to the jumper wires, and connect the alligator clips themselves to whichever conductive object you d like. | |Step_Content=Just like you do with a real makey makey, it is convenient to attach alligator clips to the jumper wires, and connect the alligator clips themselves to whichever conductive object you d like. | ||
| Ligne 73 : | Ligne 71 : | ||
|Step_Picture_00=DIY_Makey_Makey_with_Arduino_Leonardo_makey_play.PNG | |Step_Picture_00=DIY_Makey_Makey_with_Arduino_Leonardo_makey_play.PNG | ||
}} | }} | ||
| − | {{ | + | {{Notes |
|Notes=This tutorial has been developed as part of the [http://www.digijeunes.com/projets/itech/ I TECH] project, co-financed by the Erasmus + Program of the European Commission. | |Notes=This tutorial has been developed as part of the [http://www.digijeunes.com/projets/itech/ I TECH] project, co-financed by the Erasmus + Program of the European Commission. | ||
}} | }} | ||
| − | {{ | + | {{Tuto Status |
|Complete=Draft | |Complete=Draft | ||
}} | }} | ||
Version actuelle datée du 9 décembre 2019 à 11:30
Introduction
In this tutorial you will learn how to create a makey makey-like device with an Arduino Leonardo.
Une version de ce tutoriel en français est également disponible en ligne.
Matériaux
1 x Arduino Leonardo + USB cable
6 x 1Mohm resistors
1x large breadboard
14 x jumper wires
7 x alligator clips
Outils
Computer with Arduino IDE software installed
Étape 1 - Wiring
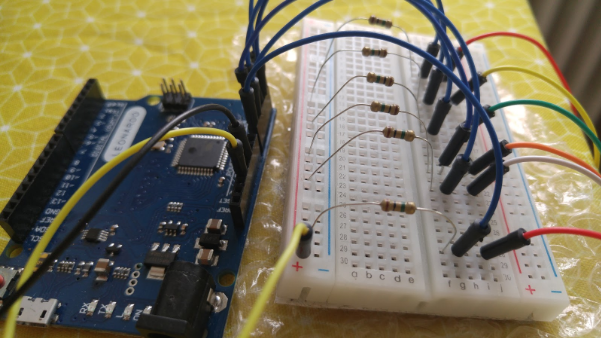
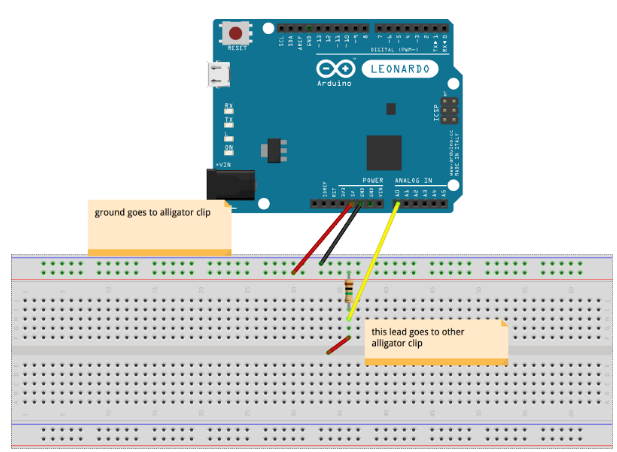
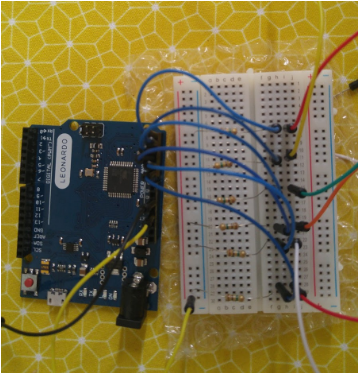
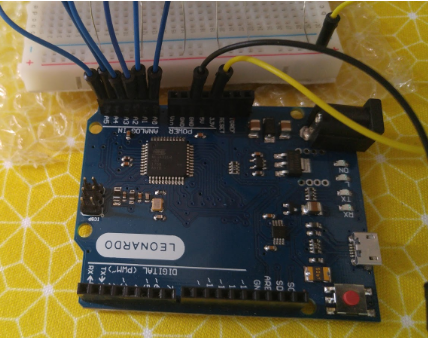
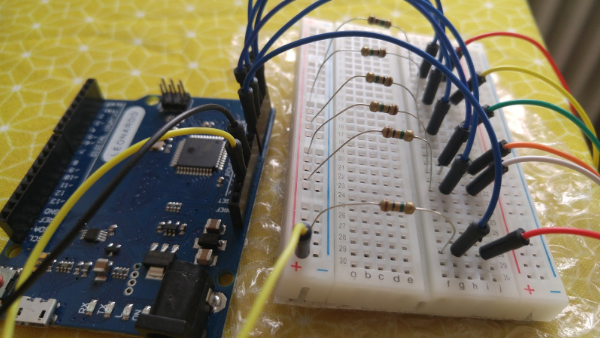
The image below shows the wiring that is needed for one key of your makey-makey-like device. In order to obtain 6 functional keys, you will need to repeat this wiring 6 times overall, each time using a different analog pin on your arduino leonardo.
Étape 2 - Program the Makey Makey-like device
In order for your makey-makey-like device to function like a classical makey makey, you will need to program the Arduino board, so that whenever a circuit is shut, the computer will react as if a certain key (ex. “a”, “backspace”, “space”) were pressed.
You will need to use Arduino IDE to code and upload the firmware onto your Arduino Leonardo board.
Download the software by visiting Arduino IDE > Scroll down until you see the “Download the Arduino IDE” section and choose the version based upon your operating system (e.g. If you have Windows 7, choose “Windows Installer” / if you have Windows 10, choose “Windows app”) > On the next page choose “Just download” and run the installation files.
Here you can download the code to upload on your Arduino board.
You then need to run the .ino file with Arduino IDE and make sure you install the movingAvg library from “Sketch” menu > Include Library > Manage Libraries… > Search for “movingavg” > Install.
Afterwards, select the correct board from Tools > Board: Arduino Leonardo and then the correct Port from Tools > Port.
Finally, upload the code by using the right arrow (→) button at the top right corner of the window, by choosing Sketch > Upload or by pressing Ctrl+U on the keyboard.
Note that we’ve mapped the analog pins so that A0 maps to letter “d”, A1 to letter “s”, etc.
You can modify the mapping by changing the letters “d”, “s”, etc.
Étape 3 - Play
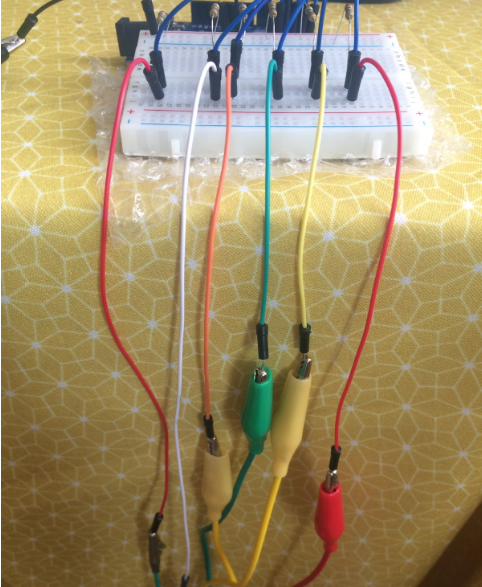
Just like you do with a real makey makey, it is convenient to attach alligator clips to the jumper wires, and connect the alligator clips themselves to whichever conductive object you d like.
Whenever you will connect the alligator clip connected to GND on the board with one the alligator clips connected to one analog pin, thus shutting down a circuit, you will trigger a response on your computer (ex. letter “a”).
If you plug one end of the alligator clip connected to one analog pin onto a fruit (fruits are conductive) and you hold the alligator clip deriving from ground on your hand (ex. your left hand), whenever you will touch the fruit with your right hand, it will be as if you were connecting GND to the analog pin, thus shutting a circuit, and triggering a response from your computer (ex. letter “a”).
Notes et références
This tutorial has been developed as part of the I TECH project, co-financed by the Erasmus + Program of the European Commission.
Draft

 Français
 English
 Deutsch
 Español
 Italiano
 Português