| Ligne 66 : | Ligne 66 : | ||
- (7) Wrench | - (7) Wrench | ||
| + | |||
| + | - (8) Pencil and paper | ||
| + | |||
| + | - (9) Yard stick | ||
<br /></translate> | <br /></translate> | ||
| Ligne 84 : | Ligne 88 : | ||
Step 1 includes: | Step 1 includes: | ||
| − | * | + | *Sketching the size |
| − | * | + | *Collecting materials |
| − | * | + | *Measuring all parts |
| − | * | + | *Cutting the materials to size |
| − | * | + | *Bending the tubes |
| + | |||
| + | Necessary tools: | ||
| + | |||
| + | * Paper and pencil | ||
| + | * Yard stick | ||
| + | * Angle grinder | ||
| + | * Tube bender</translate> | ||
|Step_Picture_00=COREMO_TRAILER_-_Community_Repair_Mobile_photo_54_2024-04-18_13-47-11.jpg | |Step_Picture_00=COREMO_TRAILER_-_Community_Repair_Mobile_photo_54_2024-04-18_13-47-11.jpg | ||
}} | }} | ||
{{Tuto Step | {{Tuto Step | ||
|Step_Title=<translate>Preparing the parts</translate> | |Step_Title=<translate>Preparing the parts</translate> | ||
| − | |Step_Content=<translate>Step 2 includes:</translate> | + | |Step_Content=<translate>Step 2 includes: |
| + | |||
| + | * Cutting the metal to the necessary sizes | ||
| + | * .. | ||
| + | * .. | ||
| + | |||
| + | Necessary tools: | ||
| + | |||
| + | * File | ||
| + | * Drill | ||
| + | * Hammer | ||
| + | * Wrench</translate> | ||
|Step_Picture_00=COREMO_TRAILER_-_Community_Repair_Mobile_photo_56_2024-04-18_13-47-11.jpg | |Step_Picture_00=COREMO_TRAILER_-_Community_Repair_Mobile_photo_56_2024-04-18_13-47-11.jpg | ||
|Step_Picture_00_annotation={"version":"3.5.0","objects":[{"type":"image","version":"3.5.0","originX":"left","originY":"top","left":-11,"top":-367,"width":960,"height":1280,"fill":"rgb(0,0,0)","stroke":null,"strokeWidth":0,"strokeDashArray":null,"strokeLineCap":"butt","strokeDashOffset":0,"strokeLineJoin":"miter","strokeMiterLimit":4,"scaleX":0.65,"scaleY":0.65,"angle":0,"flipX":false,"flipY":false,"opacity":1,"shadow":null,"visible":true,"clipTo":null,"backgroundColor":"","fillRule":"nonzero","paintFirst":"fill","globalCompositeOperation":"source-over","transformMatrix":null,"skewX":0,"skewY":0,"crossOrigin":"","cropX":0,"cropY":0,"src":"https://wikifab.org/images/3/35/COREMO_TRAILER_-_Community_Repair_Mobile_photo_56_2024-04-18_13-47-11.jpg","filters":[]}],"height":449.7391304347826,"width":600} | |Step_Picture_00_annotation={"version":"3.5.0","objects":[{"type":"image","version":"3.5.0","originX":"left","originY":"top","left":-11,"top":-367,"width":960,"height":1280,"fill":"rgb(0,0,0)","stroke":null,"strokeWidth":0,"strokeDashArray":null,"strokeLineCap":"butt","strokeDashOffset":0,"strokeLineJoin":"miter","strokeMiterLimit":4,"scaleX":0.65,"scaleY":0.65,"angle":0,"flipX":false,"flipY":false,"opacity":1,"shadow":null,"visible":true,"clipTo":null,"backgroundColor":"","fillRule":"nonzero","paintFirst":"fill","globalCompositeOperation":"source-over","transformMatrix":null,"skewX":0,"skewY":0,"crossOrigin":"","cropX":0,"cropY":0,"src":"https://wikifab.org/images/3/35/COREMO_TRAILER_-_Community_Repair_Mobile_photo_56_2024-04-18_13-47-11.jpg","filters":[]}],"height":449.7391304347826,"width":600} | ||
| Ligne 102 : | Ligne 124 : | ||
{{Tuto Step | {{Tuto Step | ||
|Step_Title=<translate>Welding the metal frame</translate> | |Step_Title=<translate>Welding the metal frame</translate> | ||
| − | |Step_Content=<translate></translate> | + | |Step_Content=<translate>Step 3 includes: |
| + | |||
| + | * Welding together the different parts of the metal frame | ||
| + | |||
| + | Necessary tools: | ||
| + | |||
| + | * Welding machine</translate> | ||
|Step_Picture_00=COREMO_TRAILER_-_Community_Repair_Mobile_photo_64_2024-04-18_13-47-11.jpg | |Step_Picture_00=COREMO_TRAILER_-_Community_Repair_Mobile_photo_64_2024-04-18_13-47-11.jpg | ||
}} | }} | ||
| Ligne 116 : | Ligne 144 : | ||
}} | }} | ||
{{Tuto Step | {{Tuto Step | ||
| − | |Step_Title=<translate> | + | |Step_Title=<translate>Cutting the wooden side panels</translate> |
|Step_Content=<translate></translate> | |Step_Content=<translate></translate> | ||
|Step_Picture_00=COREMO_TRAILER_-_Community_Repair_Mobile_photo_38_2024-04-18_13-47-11.jpg | |Step_Picture_00=COREMO_TRAILER_-_Community_Repair_Mobile_photo_38_2024-04-18_13-47-11.jpg | ||
Version du 19 avril 2024 à 15:53
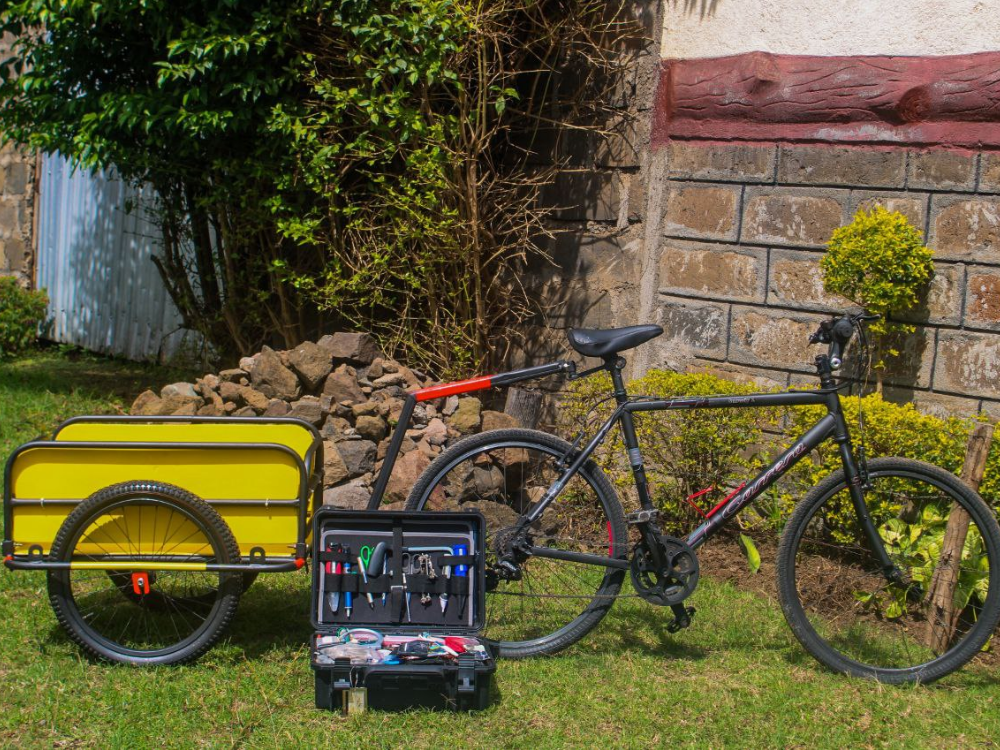
First Prototype of a Community Repair Mobile (COREMO) Trailer designed to provide repair services by means of #ASKotec (Access to Skills and Knowledge - open tech emergency case) and other mobile makerspaces in remote areas with difficult road access. (Currently developed in Kenya)

Difficulté
Difficile
Durée
7 jour(s)
Catégories
Machines & Outils, Recyclage & Upcycling, Transport
Coût
500 USD ($)
Sommaire
- 1 Introduction
- 2 Étape 1 - Drafting the metal frame
- 3 Étape 2 - Preparing the parts
- 4 Étape 3 - Welding the metal frame
- 5 Étape 4 - Detail: Building the Coupling
- 6 Étape 5 - Building the Side Frames
- 7 Étape 6 - Cutting the wooden side panels
- 8 Étape 7 - Detail: All connectors for wheels and frames
- 9 Étape 8 - Painting the Frame
- 10 Étape 9 - Assembling the Frame
- 11 Étape 10 - Finishing the Side Panels
- 12 Étape 11 - Assebling the final Trailer
- 13 Commentaires
Introduction
This step-by-step tutorial serves as an Open Source set of instructions for the prototype of a Community Repair Mobile - COREMO (Trailer Edition) intended for remote areas. COREMO Trailer will provide remote communities with access to repair services through the use of the #ASKotec (Access to Skills and Knowledge - open tech emergency case) and other mobile makerspaces/tool-kits.
COREMO is currently developed in Kenya by Adam Abdumalik with support from international makerspace community members.
COREMO Trailer serves as a first stage solution for future additional variations, modules and adaptations that will include:
- Use of Solar Power (Soldering, Charging, etc.) through the addition of solar panels
- Solar electric mobility
- Scaling production, decentralised and Open Source implementation


Matériaux
- Steel (Tubes, Plates)
- Wooden Plates
- Wheels
- Bicycle
- Toolkit (any)
- Screws
- Zip Ties
- Paint
Outils
- (1) Welding machine
- (2) Tube Bender
- (3) Angle Grinder
- (4)File
- (5) Drill
- (6) Hammer
- (7) Wrench
- (8) Pencil and paper
- (9) Yard stick
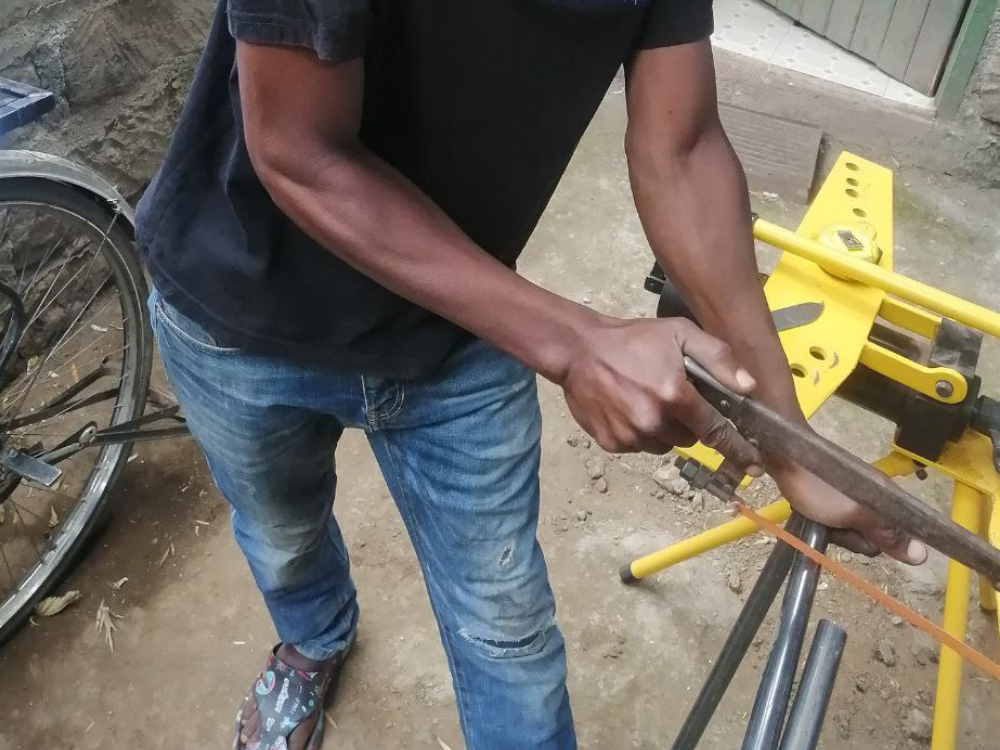
Étape 1 - Drafting the metal frame
In order to fit the bicycle selected, the frame should match typical sizes of bikes.
Step 1 includes:
- Sketching the size
- Collecting materials
- Measuring all parts
- Cutting the materials to size
- Bending the tubes
Necessary tools:
- Paper and pencil
- Yard stick
- Angle grinder
- Tube bender

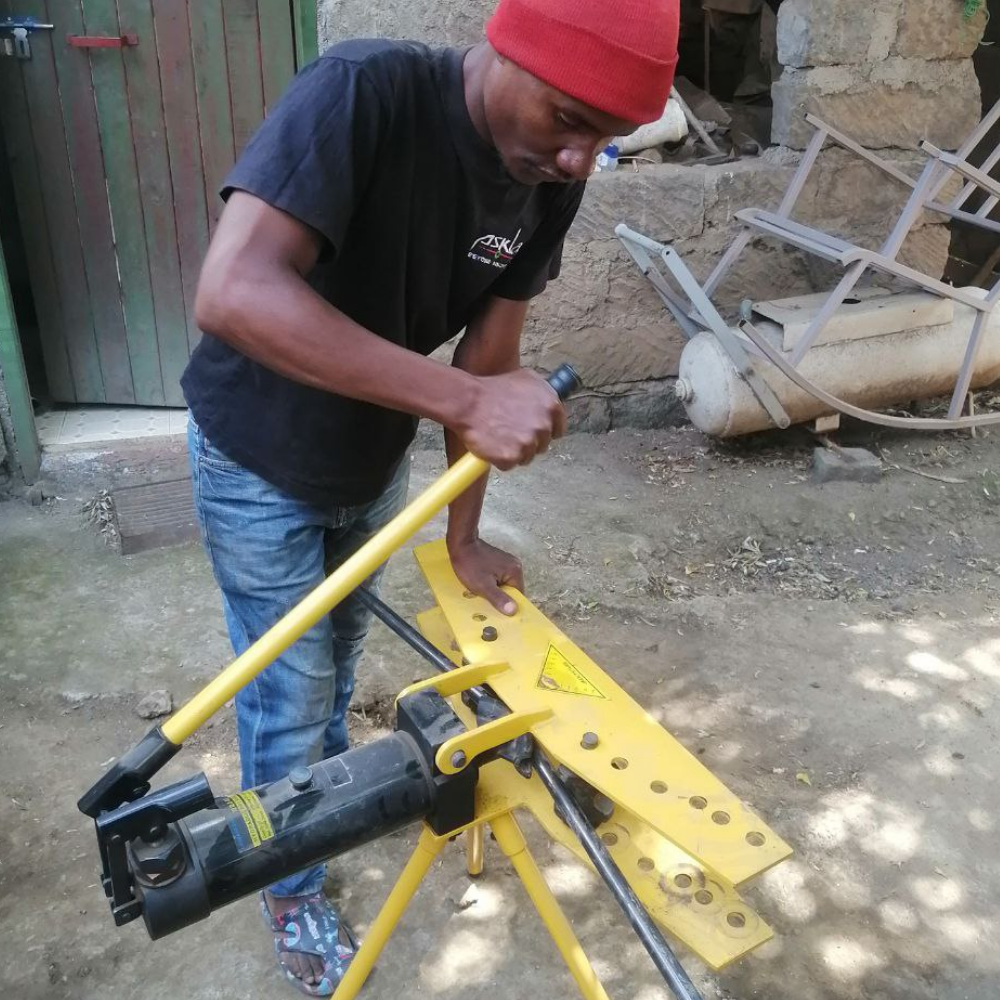
Étape 2 - Preparing the parts
Step 2 includes:
- Cutting the metal to the necessary sizes
- ..
- ..
Necessary tools:
- File
- Drill
- Hammer
- Wrench

Étape 3 - Welding the metal frame
Step 3 includes:
- Welding together the different parts of the metal frame
Necessary tools:
- Welding machine

Étape 4 - Detail: Building the Coupling
- connection between the bicycle and the trailer

Étape 5 - Building the Side Frames

Étape 6 - Cutting the wooden side panels

Étape 7 - Detail: All connectors for wheels and frames
- For Side Frames
- For Wheels
- For Strap-Connectors

Étape 8 - Painting the Frame

Étape 9 - Assembling the Frame
- All Walls and Panels and Wheels for test fitting and preparing for panel painting


Étape 10 - Finishing the Side Panels
- Paint the side panels to give it some character
- Fix the panels with Zip Ties
- add your first tools (e.g. an #ASKotec)
- final touches to the Frame/Trailer

Étape 11 - Assebling the final Trailer
- Attach the Coupling
- Make a test ride
- enjoy :)


Published
 Français
 English
 Deutsch
 Español
 Italiano
 Português