(Page créée avec « {{ {{tntn|Tuto Details}} |SourceLanguage=none |Language=en |IsTranslation=0 |Main_Picture=Build_an_Easy_ISS_Notifier_1.png |Licences=Attribution (CC BY) |Description=<tran... ») |
(Cette version a été marquée pour être traduite) |
||
| Ligne 5 : | Ligne 5 : | ||
|Main_Picture=Build_an_Easy_ISS_Notifier_1.png | |Main_Picture=Build_an_Easy_ISS_Notifier_1.png | ||
|Licences=Attribution (CC BY) | |Licences=Attribution (CC BY) | ||
| − | |Description=<translate>You can easily create a hardware notifier that lifts UP a paper astronaut to alert you each time the International Space Station passes over your location. Way more fun than a text!</translate> | + | |Description=<translate><!--T:1--> You can easily create a hardware notifier that lifts UP a paper astronaut to alert you each time the International Space Station passes over your location. Way more fun than a text!</translate> |
|Area=Electronics, Machines and Tools, Robotics | |Area=Electronics, Machines and Tools, Robotics | ||
|Type=Creation | |Type=Creation | ||
| Ligne 16 : | Ligne 16 : | ||
}} | }} | ||
{{ {{tntn|Introduction}} | {{ {{tntn|Introduction}} | ||
| − | |Introduction=<translate>Tokymaker is a microcomputer from TokyLabs that lets you create inventions in 5 minutes by mixing electronics, programming, and IoT — with no prior engineering knowledge. Electronic modules connect without soldering, and everything is open source. It’s programmed from a website, which sends code over Wi-Fi — no cables, software, or plugins. Using the graphical language Google Blockly, even non-programmers can easily create code.</translate> | + | |Introduction=<translate><!--T:2--> Tokymaker is a microcomputer from TokyLabs that lets you create inventions in 5 minutes by mixing electronics, programming, and IoT — with no prior engineering knowledge. Electronic modules connect without soldering, and everything is open source. It’s programmed from a website, which sends code over Wi-Fi — no cables, software, or plugins. Using the graphical language Google Blockly, even non-programmers can easily create code.</translate> |
}} | }} | ||
{{ {{tntn|Materials}} | {{ {{tntn|Materials}} | ||
| − | |Material=<translate>1 Tokymaker microcomputer: $50 from tokylabs.com/tokymaker | + | |Material=<translate><!--T:3--> |
| + | 1 Tokymaker microcomputer: $50 from tokylabs.com/tokymaker | ||
| + | <!--T:4--> | ||
1 Hobby servomotor | 1 Hobby servomotor | ||
| + | <!--T:5--> | ||
3 Batteries AA | 3 Batteries AA | ||
| + | <!--T:6--> | ||
Wooden craft sticks or chopsticks | Wooden craft sticks or chopsticks | ||
| + | <!--T:7--> | ||
Paper printouts of space station and astronaut images</translate> | Paper printouts of space station and astronaut images</translate> | ||
| − | |Tools=<translate>Tape | + | |Tools=<translate><!--T:8--> |
| + | Tape | ||
| + | <!--T:9--> | ||
Hot glue gun | Hot glue gun | ||
| + | <!--T:10--> | ||
Box cutter or hobby knife | Box cutter or hobby knife | ||
| + | <!--T:11--> | ||
Computer with internet access</translate> | Computer with internet access</translate> | ||
|ExternalAttachmentsLinks={{ {{tntn|ExternalAttachmentsLinks}} | |ExternalAttachmentsLinks={{ {{tntn|ExternalAttachmentsLinks}} | ||
| Ligne 41 : | Ligne 50 : | ||
{{ {{tntn|Separator}}}} | {{ {{tntn|Separator}}}} | ||
{{ {{tntn|Tuto Step}} | {{ {{tntn|Tuto Step}} | ||
| − | |Step_Title=<translate>Set up Adafruit IO feed</translate> | + | |Step_Title=<translate><!--T:12--> Set up Adafruit IO feed</translate> |
| − | |Step_Content=<translate>Create a cloud account at io.adafruit.com. Then click on Feeds→Actions→Create a New Feed. Name it “ISS.” Click the View AIO Key button, then copy your unique '''''key''''' somewhere safe — you’ll need it later to link your Tokymaker to your Adafruit IO feed.</translate> | + | |Step_Content=<translate><!--T:13--> Create a cloud account at io.adafruit.com. Then click on Feeds→Actions→Create a New Feed. Name it “ISS.” Click the View AIO Key button, then copy your unique '''''key''''' somewhere safe — you’ll need it later to link your Tokymaker to your Adafruit IO feed.</translate> |
}} | }} | ||
{{ {{tntn|Tuto Step}} | {{ {{tntn|Tuto Step}} | ||
| − | |Step_Title=<translate>Set up IFTTT action</translate> | + | |Step_Title=<translate><!--T:14--> Set up IFTTT action</translate> |
| − | |Step_Content=<translate>Create an account at ifttt.com. This site links Internet services in a very simple way. In our case: ''If'' the ISS passes over a specific address, ''then'' send the number 100 to your Adafruit ISS feed. | + | |Step_Content=<translate><!--T:15--> |
| + | Create an account at ifttt.com. This site links Internet services in a very simple way. In our case: ''If'' the ISS passes over a specific address, ''then'' send the number 100 to your Adafruit ISS feed. | ||
| + | <!--T:16--> | ||
First you’ll choose the '''''trigger'''''. Select New Applet, then click on “+ this” and type “Space” in the search bar. Click the Space icon, then choose “ISS passes over a specific location,” then type your address and click on “Create trigger”. | First you’ll choose the '''''trigger'''''. Select New Applet, then click on “+ this” and type “Space” in the search bar. Click the Space icon, then choose “ISS passes over a specific location,” then type your address and click on “Create trigger”. | ||
| + | <!--T:17--> | ||
Next, create the '''''action''''': sending the number 100 to the Adafruit IO feed. Click on “+ that” and choose Adafruit. Click the Connect button and complete the fields in the popup window. Then, click on “Create action.” The cloud setup is done!</translate> | Next, create the '''''action''''': sending the number 100 to the Adafruit IO feed. Click on “+ that” and choose Adafruit. Click the Connect button and complete the fields in the popup window. Then, click on “Create action.” The cloud setup is done!</translate> | ||
|Step_Picture_00=ISS.png | |Step_Picture_00=ISS.png | ||
}} | }} | ||
{{ {{tntn|Tuto Step}} | {{ {{tntn|Tuto Step}} | ||
| − | |Step_Title=<translate>Program the Tokymaker</translate> | + | |Step_Title=<translate><!--T:18--> Program the Tokymaker</translate> |
| − | |Step_Content=<translate>Now for the physical part: Every time the number 100 is in the Adafruit IO feed, your Tokymaker will run a program to turn on a light, move a motor, whatever you want. Go to tokylabs.com/ISS and download the basic ISS Notifier code to your Tokymaker. (Or make it yourself at create.tokylabs.com!)</translate> | + | |Step_Content=<translate><!--T:19--> Now for the physical part: Every time the number 100 is in the Adafruit IO feed, your Tokymaker will run a program to turn on a light, move a motor, whatever you want. Go to tokylabs.com/ISS and download the basic ISS Notifier code to your Tokymaker. (Or make it yourself at create.tokylabs.com!)</translate> |
|Step_Picture_00=Build_an_Easy_ISS_Notifier_3.png | |Step_Picture_00=Build_an_Easy_ISS_Notifier_3.png | ||
}} | }} | ||
{{ {{tntn|Tuto Step}} | {{ {{tntn|Tuto Step}} | ||
| − | |Step_Title=<translate>Build your ISS Notifier</translate> | + | |Step_Title=<translate><!--T:20--> Build your ISS Notifier</translate> |
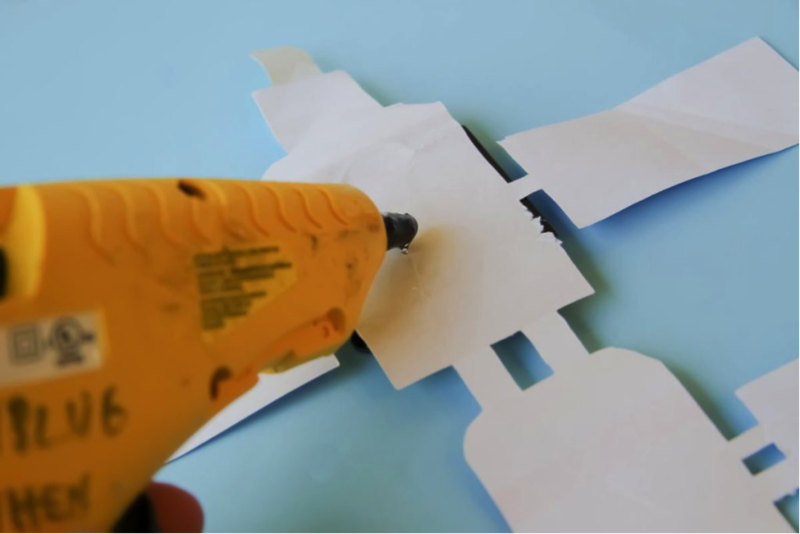
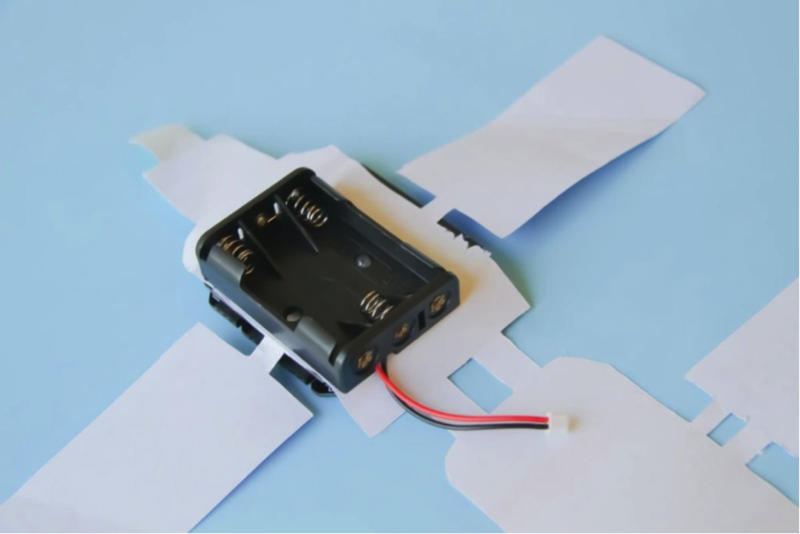
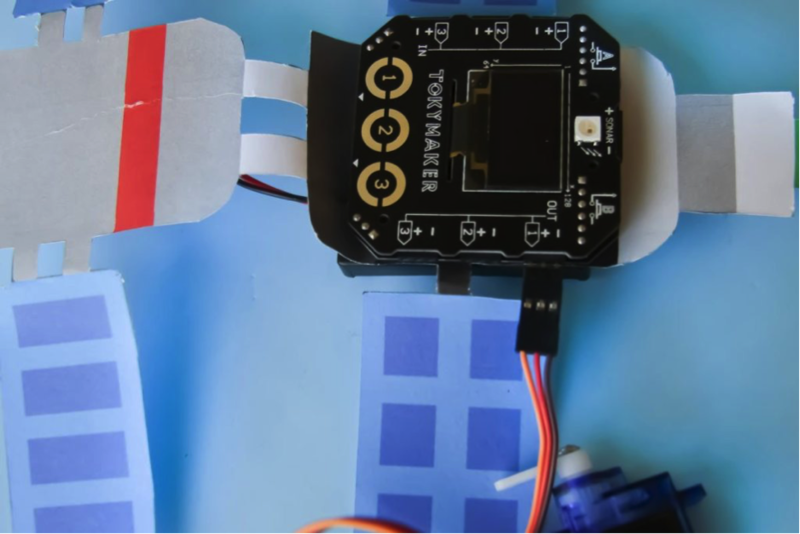
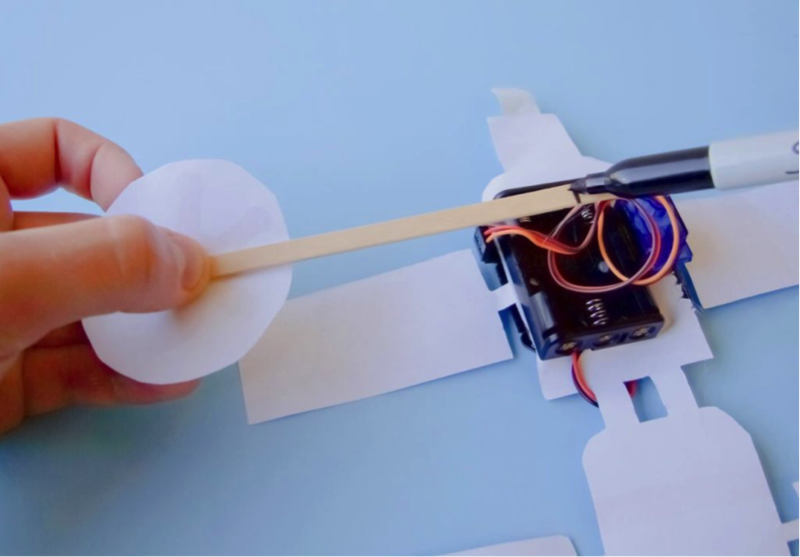
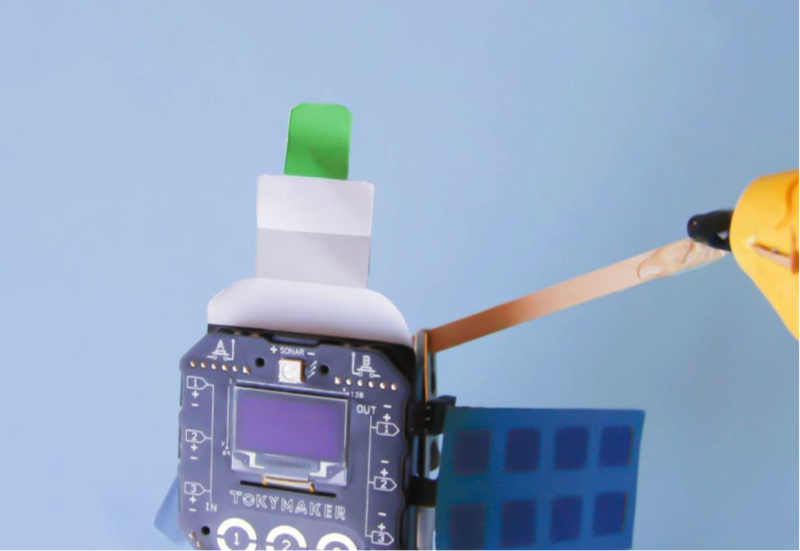
| − | |Step_Content=<translate>Find or make your own image of the space station, cut it out, and tape the Tokymaker onto the front. Glue the battery pack on the back. Plug the servomotor into Output 1, wrap its cable around, and glue the servo on the back so it’s standing up. Find our create your own astronaut image and tape the printed astronaut to one end of the stick. Cut the stick to size, then glue the other end to the servo arm so the astronaut faces the front.</translate> | + | |Step_Content=<translate><!--T:21--> Find or make your own image of the space station, cut it out, and tape the Tokymaker onto the front. Glue the battery pack on the back. Plug the servomotor into Output 1, wrap its cable around, and glue the servo on the back so it’s standing up. Find our create your own astronaut image and tape the printed astronaut to one end of the stick. Cut the stick to size, then glue the other end to the servo arm so the astronaut faces the front.</translate> |
|Step_Picture_00=Build_an_Easy_ISS_Notifier_4.png | |Step_Picture_00=Build_an_Easy_ISS_Notifier_4.png | ||
|Step_Picture_01=Build_an_Easy_ISS_Notifier_5.png | |Step_Picture_01=Build_an_Easy_ISS_Notifier_5.png | ||
| Ligne 71 : | Ligne 83 : | ||
}} | }} | ||
{{ {{tntn|Tuto Step}} | {{ {{tntn|Tuto Step}} | ||
| − | |Step_Title=<translate>Spacewalk!</translate> | + | |Step_Title=<translate><!--T:22--> Spacewalk!</translate> |
| − | |Step_Content=<translate>Now whenever the ISS passes over your location, your Tokymaker will move the servo to raise the astronaut, light up an LED, and show a message on the OLED screen with the number of orbits that day!</translate> | + | |Step_Content=<translate><!--T:23--> Now whenever the ISS passes over your location, your Tokymaker will move the servo to raise the astronaut, light up an LED, and show a message on the OLED screen with the number of orbits that day!</translate> |
}} | }} | ||
{{ {{tntn|Tuto Step}} | {{ {{tntn|Tuto Step}} | ||
| − | |Step_Title=<translate>Program the Tokymaker</translate> | + | |Step_Title=<translate><!--T:24--> Program the Tokymaker</translate> |
| − | |Step_Content=<translate>Now for the physical part: Every time the number 100 is in the Adafruit IO feed, your Tokymaker will run a program to turn on a light, move a motor, whatever you want. Go to tokylabs.com/ISS and download the basic ISS Notifier code to your Tokymaker. (Or make it yourself at create.tokylabs.com!)</translate> | + | |Step_Content=<translate><!--T:25--> Now for the physical part: Every time the number 100 is in the Adafruit IO feed, your Tokymaker will run a program to turn on a light, move a motor, whatever you want. Go to tokylabs.com/ISS and download the basic ISS Notifier code to your Tokymaker. (Or make it yourself at create.tokylabs.com!)</translate> |
|Step_Picture_00=Build_an_Easy_ISS_Notifier_3.png | |Step_Picture_00=Build_an_Easy_ISS_Notifier_3.png | ||
}} | }} | ||
{{ {{tntn|Tuto Step}} | {{ {{tntn|Tuto Step}} | ||
| − | |Step_Title=<translate>Build your ISS Notifier</translate> | + | |Step_Title=<translate><!--T:26--> Build your ISS Notifier</translate> |
| − | |Step_Content=<translate>Find or make your own image of the space station, cut it out, and tape the Tokymaker onto the front. Glue the battery pack on the back. Plug the servomotor into Output 1, wrap its cable around, and glue the servo on the back so it’s standing up. Find our create your own astronaut image and tape the printed astronaut to one end of the stick. Cut the stick to size, then glue the other end to the servo arm so the astronaut faces the front.</translate> | + | |Step_Content=<translate><!--T:27--> Find or make your own image of the space station, cut it out, and tape the Tokymaker onto the front. Glue the battery pack on the back. Plug the servomotor into Output 1, wrap its cable around, and glue the servo on the back so it’s standing up. Find our create your own astronaut image and tape the printed astronaut to one end of the stick. Cut the stick to size, then glue the other end to the servo arm so the astronaut faces the front.</translate> |
|Step_Picture_00=Build_an_Easy_ISS_Notifier_4.png | |Step_Picture_00=Build_an_Easy_ISS_Notifier_4.png | ||
|Step_Picture_01=Build_an_Easy_ISS_Notifier_5.png | |Step_Picture_01=Build_an_Easy_ISS_Notifier_5.png | ||
| Ligne 90 : | Ligne 102 : | ||
}} | }} | ||
{{ {{tntn|Tuto Step}} | {{ {{tntn|Tuto Step}} | ||
| − | |Step_Title=<translate>Spacewalk!</translate> | + | |Step_Title=<translate><!--T:28--> Spacewalk!</translate> |
| − | |Step_Content=<translate>Now whenever the ISS passes over your location, your Tokymaker will move the servo to raise the astronaut, light up an LED, and show a message on the OLED screen with the number of orbits that day!</translate> | + | |Step_Content=<translate><!--T:29--> Now whenever the ISS passes over your location, your Tokymaker will move the servo to raise the astronaut, light up an LED, and show a message on the OLED screen with the number of orbits that day!</translate> |
}} | }} | ||
{{ {{tntn|Notes}} | {{ {{tntn|Notes}} | ||
| − | |Notes=<translate>[https://makezine.com/author/tokylabs TokyLabs] | + | |Notes=<translate><!--T:30--> |
| + | [https://makezine.com/author/tokylabs TokyLabs] | ||
| + | <!--T:31--> | ||
Based in Shanghai and Barcelona, TokyLabs envisions technology not as a final objective but as a tool to achieve creative goals.</translate> | Based in Shanghai and Barcelona, TokyLabs envisions technology not as a final objective but as a tool to achieve creative goals.</translate> | ||
}} | }} | ||
Version du 19 juillet 2019 à 05:29
Sommaire
- 1 Introduction
- 2 Étape 1 - Set up Adafruit IO feed
- 3 Étape 2 - Set up IFTTT action
- 4 Étape 3 - Program the Tokymaker
- 5 Étape 4 - Build your ISS Notifier
- 6 Étape 5 - Spacewalk!
- 7 Étape 6 - Program the Tokymaker
- 8 Étape 7 - Build your ISS Notifier
- 9 Étape 8 - Spacewalk!
- 10 Notes et références
- 11 Commentaires
Introduction
Matériaux
1 Tokymaker microcomputer: $50 from tokylabs.com/tokymaker
1 Hobby servomotor
3 Batteries AA
Wooden craft sticks or chopsticks
Paper printouts of space station and astronaut images
Outils
Tape
Hot glue gun
Box cutter or hobby knife
Computer with internet access
Étape 1 - Set up Adafruit IO feed
Create a cloud account at io.adafruit.com. Then click on Feeds→Actions→Create a New Feed. Name it “ISS.” Click the View AIO Key button, then copy your unique key somewhere safe — you’ll need it later to link your Tokymaker to your Adafruit IO feed.
Étape 2 - Set up IFTTT action
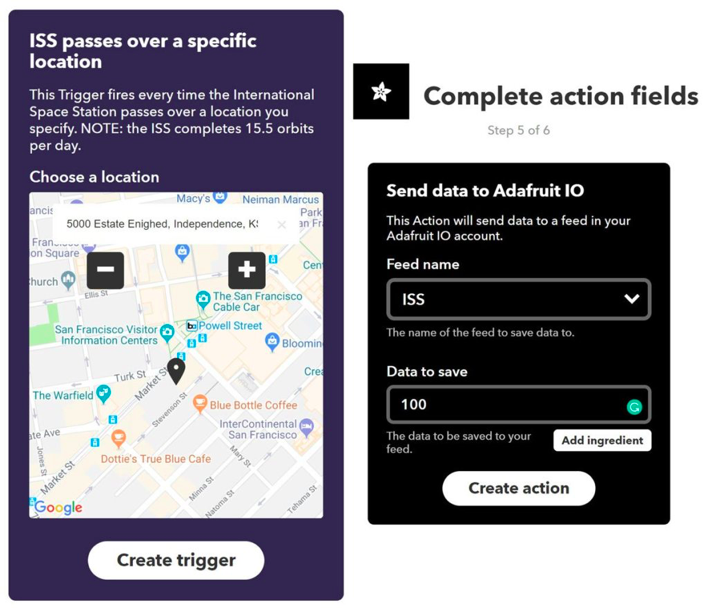
Create an account at ifttt.com. This site links Internet services in a very simple way. In our case: If the ISS passes over a specific address, then send the number 100 to your Adafruit ISS feed.
First you’ll choose the trigger. Select New Applet, then click on “+ this” and type “Space” in the search bar. Click the Space icon, then choose “ISS passes over a specific location,” then type your address and click on “Create trigger”.
Next, create the action: sending the number 100 to the Adafruit IO feed. Click on “+ that” and choose Adafruit. Click the Connect button and complete the fields in the popup window. Then, click on “Create action.” The cloud setup is done!
Étape 3 - Program the Tokymaker
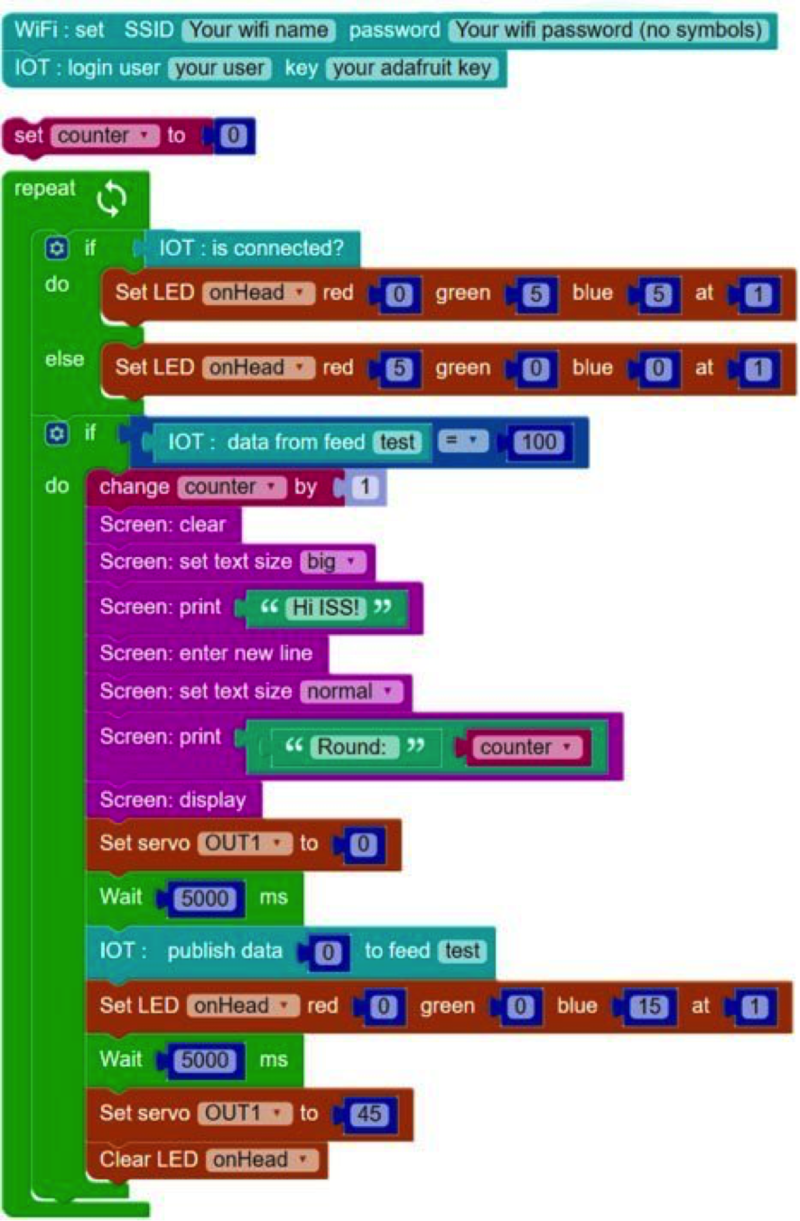
Now for the physical part: Every time the number 100 is in the Adafruit IO feed, your Tokymaker will run a program to turn on a light, move a motor, whatever you want. Go to tokylabs.com/ISS and download the basic ISS Notifier code to your Tokymaker. (Or make it yourself at create.tokylabs.com!)
Étape 4 - Build your ISS Notifier
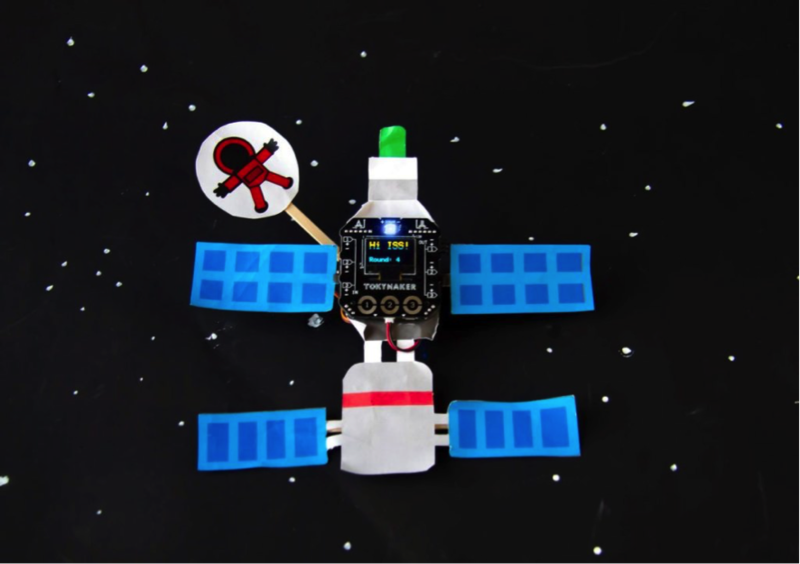
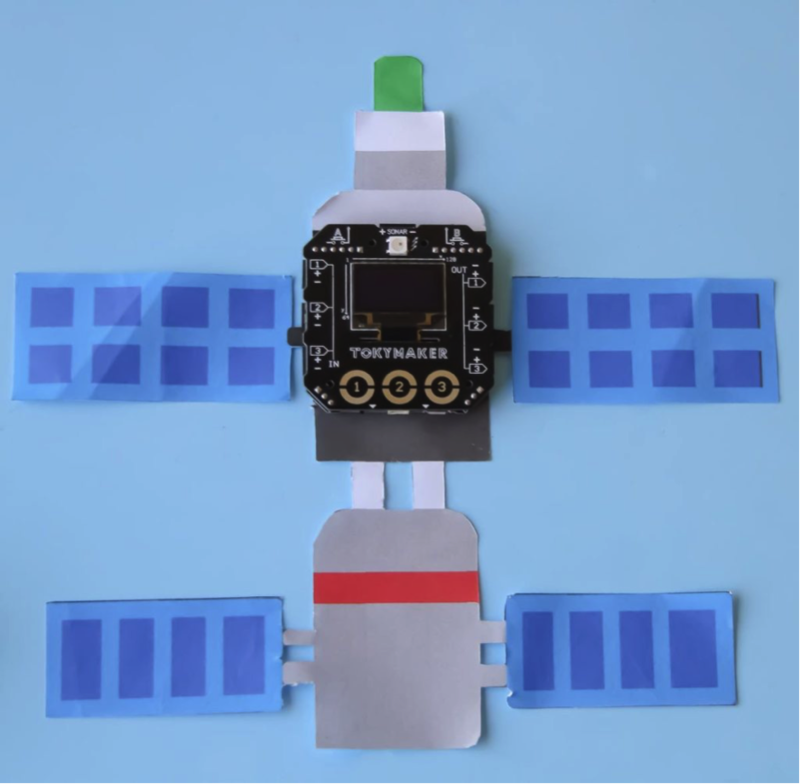
Find or make your own image of the space station, cut it out, and tape the Tokymaker onto the front. Glue the battery pack on the back. Plug the servomotor into Output 1, wrap its cable around, and glue the servo on the back so it’s standing up. Find our create your own astronaut image and tape the printed astronaut to one end of the stick. Cut the stick to size, then glue the other end to the servo arm so the astronaut faces the front.
Étape 5 - Spacewalk!
Now whenever the ISS passes over your location, your Tokymaker will move the servo to raise the astronaut, light up an LED, and show a message on the OLED screen with the number of orbits that day!
Étape 6 - Program the Tokymaker
Now for the physical part: Every time the number 100 is in the Adafruit IO feed, your Tokymaker will run a program to turn on a light, move a motor, whatever you want. Go to tokylabs.com/ISS and download the basic ISS Notifier code to your Tokymaker. (Or make it yourself at create.tokylabs.com!)
Étape 7 - Build your ISS Notifier
Find or make your own image of the space station, cut it out, and tape the Tokymaker onto the front. Glue the battery pack on the back. Plug the servomotor into Output 1, wrap its cable around, and glue the servo on the back so it’s standing up. Find our create your own astronaut image and tape the printed astronaut to one end of the stick. Cut the stick to size, then glue the other end to the servo arm so the astronaut faces the front.
Étape 8 - Spacewalk!
Now whenever the ISS passes over your location, your Tokymaker will move the servo to raise the astronaut, light up an LED, and show a message on the OLED screen with the number of orbits that day!
Notes et références
Based in Shanghai and Barcelona, TokyLabs envisions technology not as a final objective but as a tool to achieve creative goals.
Published
 Français
 English
 Deutsch
 Español
 Italiano
 Português