(Cette version a été marquée pour être traduite) |
|||
| Ligne 2 : | Ligne 2 : | ||
|Main_Picture=Pet_that_lights_up_upon_interaction_6.PNG | |Main_Picture=Pet_that_lights_up_upon_interaction_6.PNG | ||
|Licences=Attribution (CC BY) | |Licences=Attribution (CC BY) | ||
| − | |Description=<translate>In this tutorial, you will learn how to create a wooden pet that lights up when you touch its tail. This will form the basis for a next tutorial in which you will learn how to connect your pet to social networks.</translate> | + | |Description=<translate><!--T:1--> In this tutorial, you will learn how to create a wooden pet that lights up when you touch its tail. This will form the basis for a next tutorial in which you will learn how to connect your pet to social networks.</translate> |
|Area=Electronics | |Area=Electronics | ||
|Type=Creation | |Type=Creation | ||
| Ligne 19 : | Ligne 19 : | ||
{{ {{tntn|Materials}} | {{ {{tntn|Materials}} | ||
|Step_Picture_00=Pet_that_lights_up_upon_interaction_sheep_box_connected_pet.svg | |Step_Picture_00=Pet_that_lights_up_upon_interaction_sheep_box_connected_pet.svg | ||
| − | |Material=<translate>For this activity, you will need to laser cut your own pet. The .svg file is available for download [https://drive.google.com/file/d/1AHXk4zxDN0U7YNiMKVyBzvakh8pY8MH9/view?usp=sharing here].</translate> | + | |Material=<translate><!--T:2--> For this activity, you will need to laser cut your own pet. The .svg file is available for download [https://drive.google.com/file/d/1AHXk4zxDN0U7YNiMKVyBzvakh8pY8MH9/view?usp=sharing here].</translate> |
|Tools=<translate></translate> | |Tools=<translate></translate> | ||
|ExternalAttachmentsLinks={{ {{tntn|ExternalAttachmentsLinks}} | |ExternalAttachmentsLinks={{ {{tntn|ExternalAttachmentsLinks}} | ||
| Ligne 27 : | Ligne 27 : | ||
{{ {{tntn|Separator}}}} | {{ {{tntn|Separator}}}} | ||
{{ {{tntn|Tuto Step}} | {{ {{tntn|Tuto Step}} | ||
| − | |Step_Title=<translate>Install Arduino IDE</translate> | + | |Step_Title=<translate><!--T:3--> Install Arduino IDE</translate> |
| − | |Step_Content=<translate>You will need to use Arduino IDE to code and upload the firmware onto your ESP32 board. | + | |Step_Content=<translate><!--T:4--> |
| + | You will need to use Arduino IDE to code and upload the firmware onto your ESP32 board. | ||
| + | <!--T:5--> | ||
Download the software by visiting [https://www.arduino.cc/en/Main/Software? Arduino IDE] > Scroll down until you see the “Download the Arduino IDE” section and choose the version based upon your operating system (e.g. If you have Windows 7, choose “Windows Installer” / if you have Windows 10, choose “Windows app”) > On the next page choose “Just download” and run the installation files.</translate> | Download the software by visiting [https://www.arduino.cc/en/Main/Software? Arduino IDE] > Scroll down until you see the “Download the Arduino IDE” section and choose the version based upon your operating system (e.g. If you have Windows 7, choose “Windows Installer” / if you have Windows 10, choose “Windows app”) > On the next page choose “Just download” and run the installation files.</translate> | ||
}} | }} | ||
{{ {{tntn|Tuto Step}} | {{ {{tntn|Tuto Step}} | ||
| − | |Step_Title=<translate>Prepare the ESP32 board on your computer</translate> | + | |Step_Title=<translate><!--T:6--> Prepare the ESP32 board on your computer</translate> |
| − | |Step_Content=<translate>Follow the [https://github.com/espressif/arduino-esp32/blob/master/README.md#installation-instructions instructions provided on GitHub] for your Operating System. For example, if you have Windows 7 or 10, choose “Instructions for Windows” / if you have a MacBook, choose “Instructions for Mac” | + | |Step_Content=<translate><!--T:7--> |
| + | Follow the [https://github.com/espressif/arduino-esp32/blob/master/README.md#installation-instructions instructions provided on GitHub] for your Operating System. For example, if you have Windows 7 or 10, choose “Instructions for Windows” / if you have a MacBook, choose “Instructions for Mac” | ||
| + | <!--T:8--> | ||
For the “Instructions for Windows” section, you can ignore the following step.</translate> | For the “Instructions for Windows” section, you can ignore the following step.</translate> | ||
|Step_Picture_00=Pet_that_lights_up_upon_interaction_Capture.PNG | |Step_Picture_00=Pet_that_lights_up_upon_interaction_Capture.PNG | ||
}} | }} | ||
{{ {{tntn|Tuto Step}} | {{ {{tntn|Tuto Step}} | ||
| − | |Step_Title=<translate>Check that the board is correctly configured</translate> | + | |Step_Title=<translate><!--T:9--> Check that the board is correctly configured</translate> |
| − | |Step_Content=<translate>Launch Arduino IDE and select “ESP32 Dev Module” from the Tools menu > Board. | + | |Step_Content=<translate><!--T:10--> |
| + | Launch Arduino IDE and select “ESP32 Dev Module” from the Tools menu > Board. | ||
| + | <!--T:11--> | ||
Fetch the Blink example from File > Examples > 01.Basics > Blink. | Fetch the Blink example from File > Examples > 01.Basics > Blink. | ||
| + | <!--T:12--> | ||
write int LED_BUILTIN = 2; at the top of the code | write int LED_BUILTIN = 2; at the top of the code | ||
| + | <!--T:13--> | ||
/* | /* | ||
| + | <!--T:14--> | ||
ESP 32 Blink | ESP 32 Blink | ||
| + | <!--T:15--> | ||
Turns on an LED on for one second, then off for one second, repeatedly. | Turns on an LED on for one second, then off for one second, repeatedly. | ||
| + | <!--T:16--> | ||
The ESP32 has an internal blue LED at D2 (GPIO 02) | The ESP32 has an internal blue LED at D2 (GPIO 02) | ||
| + | <!--T:17--> | ||
<nowiki>*</nowiki>/ | <nowiki>*</nowiki>/ | ||
| + | <!--T:18--> | ||
int LED_BUILTIN = 2; | int LED_BUILTIN = 2; | ||
| + | <!--T:19--> | ||
void setup() | void setup() | ||
| + | <!--T:20--> | ||
{ | { | ||
| + | <!--T:21--> | ||
pinMode(LED_BUILTIN, OUTPUT); | pinMode(LED_BUILTIN, OUTPUT); | ||
| + | <!--T:22--> | ||
} | } | ||
| + | <!--T:23--> | ||
void loop() | void loop() | ||
| + | <!--T:24--> | ||
{ | { | ||
| + | <!--T:25--> | ||
digitalWrite(LED_BUILTIN, HIGH); // turn the LED on (HIGH is the voltage level) | digitalWrite(LED_BUILTIN, HIGH); // turn the LED on (HIGH is the voltage level) | ||
| + | <!--T:26--> | ||
delay(1000); // wait for a second | delay(1000); // wait for a second | ||
| + | <!--T:27--> | ||
digitalWrite(LED_BUILTIN, LOW); // turn the LED off by making the voltage LOW | digitalWrite(LED_BUILTIN, LOW); // turn the LED off by making the voltage LOW | ||
| + | <!--T:28--> | ||
delay(1000); // wait for a second | delay(1000); // wait for a second | ||
| + | <!--T:29--> | ||
} | } | ||
| + | <!--T:30--> | ||
Finally, upload the code by using the right arrow (→) button at the top right corner of the window, by choosing Sketch > Upload or by pressing Ctrl+U on the keyboard.</translate> | Finally, upload the code by using the right arrow (→) button at the top right corner of the window, by choosing Sketch > Upload or by pressing Ctrl+U on the keyboard.</translate> | ||
|Step_Picture_00=Pet_that_lights_up_upon_interaction_4.PNG | |Step_Picture_00=Pet_that_lights_up_upon_interaction_4.PNG | ||
| Ligne 86 : | Ligne 111 : | ||
}} | }} | ||
{{ {{tntn|Tuto Step}} | {{ {{tntn|Tuto Step}} | ||
| − | |Step_Title=<translate>Wiring the LED and the touch sensor to the ESP32</translate> | + | |Step_Title=<translate><!--T:31--> Wiring the LED and the touch sensor to the ESP32</translate> |
| − | |Step_Content=<translate>Connect a male/female jumper wire to D4 on of the board. D4 is by default connected to the internal touch sensor. | + | |Step_Content=<translate><!--T:32--> |
| + | Connect a male/female jumper wire to D4 on of the board. D4 is by default connected to the internal touch sensor. | ||
| + | <!--T:33--> | ||
Connect D2 (by default connected to the board’s internal led) to the positive leg of the LED, using a male to female jumper wire. | Connect D2 (by default connected to the board’s internal led) to the positive leg of the LED, using a male to female jumper wire. | ||
| + | <!--T:34--> | ||
Connect the negative leg of the LED to GND on the board, using a male/female jumper wire | Connect the negative leg of the LED to GND on the board, using a male/female jumper wire | ||
| + | <!--T:35--> | ||
If needed, use some tape to secure the jumper wires to the LED.</translate> | If needed, use some tape to secure the jumper wires to the LED.</translate> | ||
|Step_Picture_00=Pet_that_lights_up_upon_interaction_6.PNG | |Step_Picture_00=Pet_that_lights_up_upon_interaction_6.PNG | ||
}} | }} | ||
{{ {{tntn|Tuto Step}} | {{ {{tntn|Tuto Step}} | ||
| − | |Step_Title=<translate>Place the electronic board inside the pet</translate> | + | |Step_Title=<translate><!--T:36--> Place the electronic board inside the pet</translate> |
| − | |Step_Content=<translate>Place all the parts inside the pet, and connect the internal touch sensor to the aluminum tail.</translate> | + | |Step_Content=<translate><!--T:37--> Place all the parts inside the pet, and connect the internal touch sensor to the aluminum tail.</translate> |
|Step_Picture_00=Pet_that_lights_up_upon_interaction_7.PNG | |Step_Picture_00=Pet_that_lights_up_upon_interaction_7.PNG | ||
|Step_Picture_01=Pet_that_lights_up_upon_interaction_8.PNG | |Step_Picture_01=Pet_that_lights_up_upon_interaction_8.PNG | ||
}} | }} | ||
{{ {{tntn|Tuto Step}} | {{ {{tntn|Tuto Step}} | ||
| − | |Step_Title=<translate>Programming on tuniot</translate> | + | |Step_Title=<translate><!--T:38--> Programming on tuniot</translate> |
| − | |Step_Content=<translate>Let’s create a program that registers the values recorded by the touch sensor. | + | |Step_Content=<translate><!--T:39--> |
| + | Let’s create a program that registers the values recorded by the touch sensor. | ||
| + | <!--T:40--> | ||
For that we need to reach: http://easycoding.tn/esp32/demos/code/ | For that we need to reach: http://easycoding.tn/esp32/demos/code/ | ||
| + | <!--T:41--> | ||
Choose the appropriate blocks to create the code displayed below.</translate> | Choose the appropriate blocks to create the code displayed below.</translate> | ||
|Step_Picture_00=Pet_that_lights_up_upon_interaction_tuniot.PNG | |Step_Picture_00=Pet_that_lights_up_upon_interaction_tuniot.PNG | ||
}} | }} | ||
{{ {{tntn|Tuto Step}} | {{ {{tntn|Tuto Step}} | ||
| − | |Step_Title=<translate>Programming on Arduino IDE</translate> | + | |Step_Title=<translate><!--T:42--> Programming on Arduino IDE</translate> |
| − | |Step_Content=<translate>To upload the code on Arduino IDE, click on the “Copy Arduino code into clipboard” button. | + | |Step_Content=<translate><!--T:43--> |
| + | To upload the code on Arduino IDE, click on the “Copy Arduino code into clipboard” button. | ||
| + | <!--T:44--> | ||
then paste the code onto Arduino IDE, and upload it to the ESP32. | then paste the code onto Arduino IDE, and upload it to the ESP32. | ||
| + | <!--T:45--> | ||
If you click on Serial Monitor (top right of the Arduino IDE screen, below the “X” button), you should see the values recorded by the touch sensor. | If you click on Serial Monitor (top right of the Arduino IDE screen, below the “X” button), you should see the values recorded by the touch sensor. | ||
| + | <!--T:46--> | ||
You may need to adjust the value in the code (in our code we set the threshold to 30) so that the LED goes on whenever the tail is touched.</translate> | You may need to adjust the value in the code (in our code we set the threshold to 30) so that the LED goes on whenever the tail is touched.</translate> | ||
|Step_Picture_00=Pet_that_lights_up_upon_interaction_12.PNG | |Step_Picture_00=Pet_that_lights_up_upon_interaction_12.PNG | ||
| Ligne 129 : | Ligne 165 : | ||
}} | }} | ||
{{ {{tntn|Notes}} | {{ {{tntn|Notes}} | ||
| − | |Notes=<translate>This tutorial has been developed as part of the iTech project, co-financed by the Erasmus + Programme of the European Union. | + | |Notes=<translate><!--T:47--> |
| + | This tutorial has been developed as part of the iTech project, co-financed by the Erasmus + Programme of the European Union. | ||
| + | <!--T:48--> | ||
Project number: 2017-1-FR02-KA205-012764 | Project number: 2017-1-FR02-KA205-012764 | ||
| + | <!--T:49--> | ||
EU disclaimer: The content of this publication does not reflect the official opinion of the European Union. Responsibility for the information and views expressed in the therein lies entirely with the author(s). | EU disclaimer: The content of this publication does not reflect the official opinion of the European Union. Responsibility for the information and views expressed in the therein lies entirely with the author(s). | ||
| + | <!--T:50--> | ||
For more details, contact info@digijeunes.com</translate> | For more details, contact info@digijeunes.com</translate> | ||
}} | }} | ||
Version du 1 décembre 2019 à 18:00
Sommaire
- 1 Étape 1 - Install Arduino IDE
- 2 Étape 2 - Prepare the ESP32 board on your computer
- 3 Étape 3 - Check that the board is correctly configured
- 4 Étape 4 - Wiring the LED and the touch sensor to the ESP32
- 5 Étape 5 - Place the electronic board inside the pet
- 6 Étape 6 - Programming on tuniot
- 7 Étape 7 - Programming on Arduino IDE
- 8 Étape 8 -
- 9 Notes et références
- 10 Commentaires
Matériaux
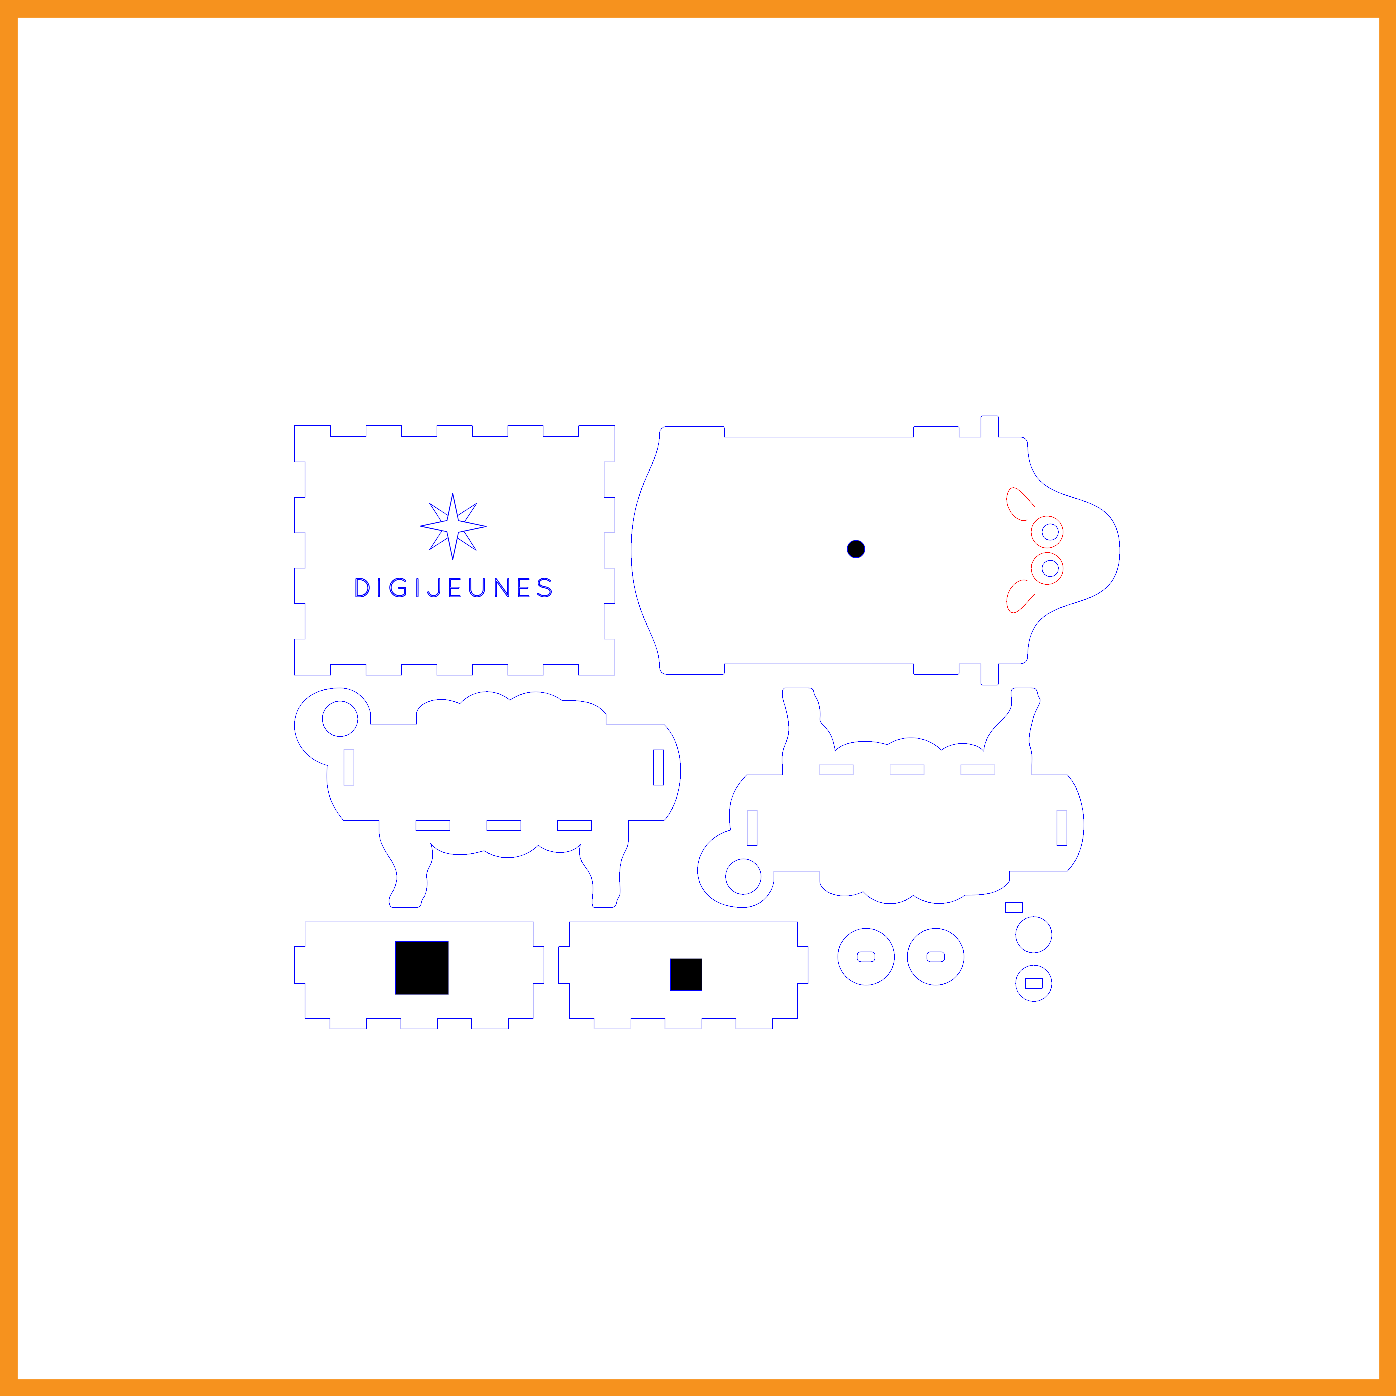
For this activity, you will need to laser cut your own pet. The .svg file is available for download here.
Outils
Étape 1 - Install Arduino IDE
You will need to use Arduino IDE to code and upload the firmware onto your ESP32 board.
Download the software by visiting Arduino IDE > Scroll down until you see the “Download the Arduino IDE” section and choose the version based upon your operating system (e.g. If you have Windows 7, choose “Windows Installer” / if you have Windows 10, choose “Windows app”) > On the next page choose “Just download” and run the installation files.
Étape 2 - Prepare the ESP32 board on your computer
Follow the instructions provided on GitHub for your Operating System. For example, if you have Windows 7 or 10, choose “Instructions for Windows” / if you have a MacBook, choose “Instructions for Mac”
For the “Instructions for Windows” section, you can ignore the following step.
Étape 3 - Check that the board is correctly configured
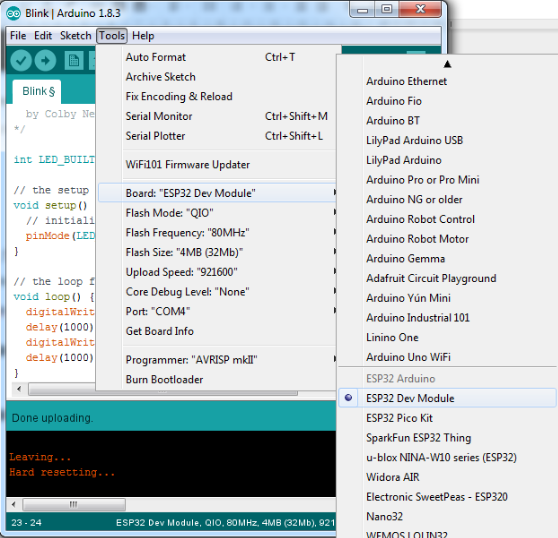
Launch Arduino IDE and select “ESP32 Dev Module” from the Tools menu > Board.
Fetch the Blink example from File > Examples > 01.Basics > Blink.
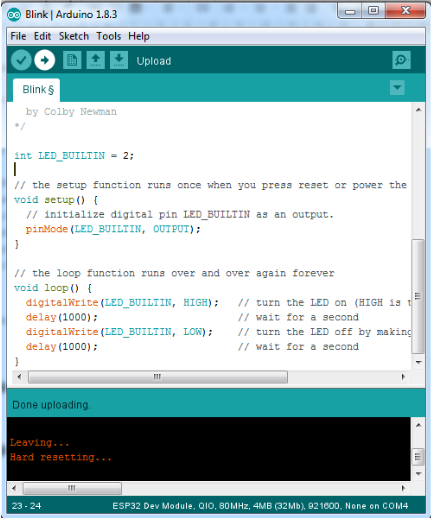
write int LED_BUILTIN = 2; at the top of the code
/*
ESP 32 Blink
Turns on an LED on for one second, then off for one second, repeatedly.
The ESP32 has an internal blue LED at D2 (GPIO 02)
*/
int LED_BUILTIN = 2;
void setup()
{
pinMode(LED_BUILTIN, OUTPUT);
}
void loop()
{
digitalWrite(LED_BUILTIN, HIGH); // turn the LED on (HIGH is the voltage level)
delay(1000); // wait for a second
digitalWrite(LED_BUILTIN, LOW); // turn the LED off by making the voltage LOW
delay(1000); // wait for a second
}
Finally, upload the code by using the right arrow (→) button at the top right corner of the window, by choosing Sketch > Upload or by pressing Ctrl+U on the keyboard.
Étape 4 - Wiring the LED and the touch sensor to the ESP32
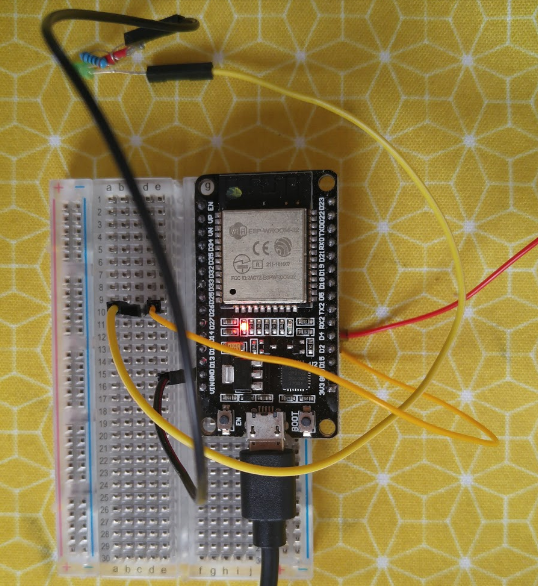
Connect a male/female jumper wire to D4 on of the board. D4 is by default connected to the internal touch sensor.
Connect D2 (by default connected to the board’s internal led) to the positive leg of the LED, using a male to female jumper wire.
Connect the negative leg of the LED to GND on the board, using a male/female jumper wire
If needed, use some tape to secure the jumper wires to the LED.
Étape 5 - Place the electronic board inside the pet
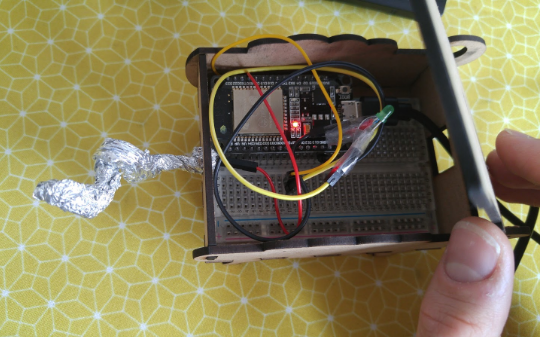
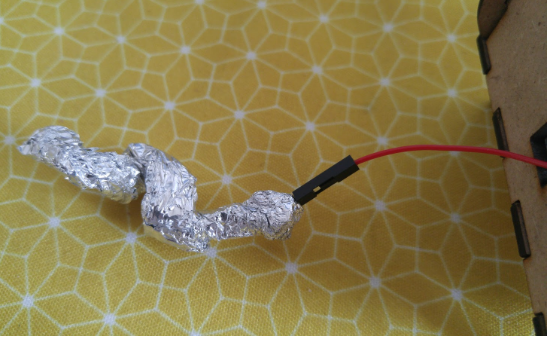
Place all the parts inside the pet, and connect the internal touch sensor to the aluminum tail.
Étape 6 - Programming on tuniot
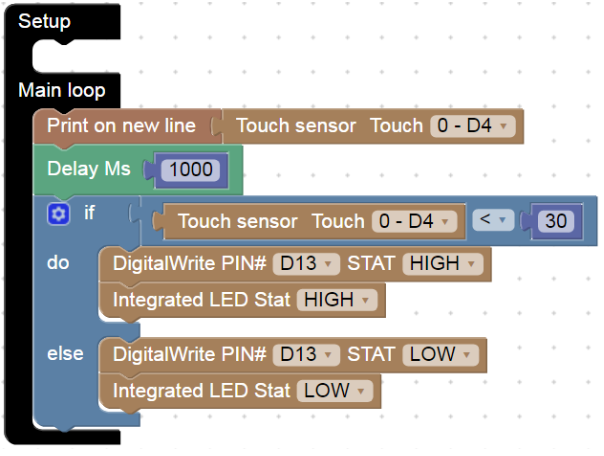
Let’s create a program that registers the values recorded by the touch sensor.
For that we need to reach: http://easycoding.tn/esp32/demos/code/
Choose the appropriate blocks to create the code displayed below.
Étape 7 - Programming on Arduino IDE
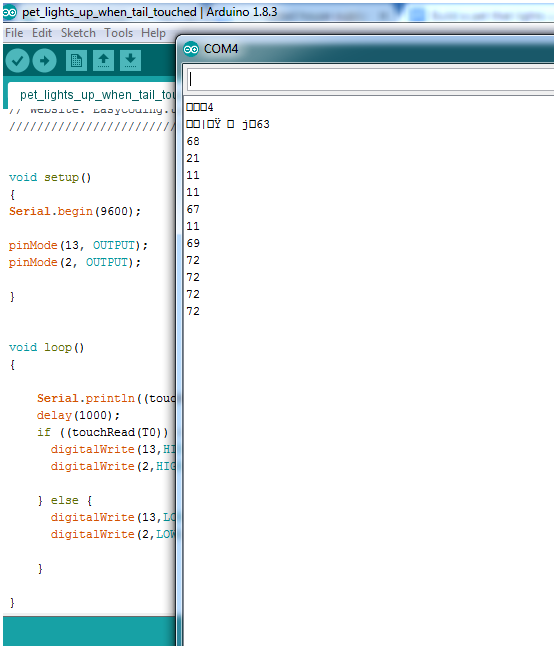
To upload the code on Arduino IDE, click on the “Copy Arduino code into clipboard” button.
then paste the code onto Arduino IDE, and upload it to the ESP32.
If you click on Serial Monitor (top right of the Arduino IDE screen, below the “X” button), you should see the values recorded by the touch sensor.
You may need to adjust the value in the code (in our code we set the threshold to 30) so that the LED goes on whenever the tail is touched.
Notes et références
This tutorial has been developed as part of the iTech project, co-financed by the Erasmus + Programme of the European Union.
Project number: 2017-1-FR02-KA205-012764
EU disclaimer: The content of this publication does not reflect the official opinion of the European Union. Responsibility for the information and views expressed in the therein lies entirely with the author(s).
For more details, contact info@digijeunes.com
Published


 Français
 English
 Deutsch
 Español
 Italiano
 Português