(Mise à jour pour être en accord avec la nouvelle version de la source de la page) |
(update property name) |
||
| (Une révision intermédiaire par un autre utilisateur non affichée) | |||
| Ligne 1 : | Ligne 1 : | ||
| − | {{ | + | {{Tuto Details |
| − | |||
| − | |||
| − | |||
|Main_Picture=Light_sensitive_e-textile_bag_7.PNG | |Main_Picture=Light_sensitive_e-textile_bag_7.PNG | ||
|Licences=Attribution (CC BY) | |Licences=Attribution (CC BY) | ||
| Ligne 14 : | Ligne 11 : | ||
|Currency=EUR (€) | |Currency=EUR (€) | ||
|Tags=e-textile, electronics, arduino, mBlock, coding, visual coding, light sensor | |Tags=e-textile, electronics, arduino, mBlock, coding, visual coding, light sensor | ||
| + | |SourceLanguage=none | ||
| + | |Language=en | ||
| + | |IsTranslation=1 | ||
}} | }} | ||
| − | {{ | + | {{Introduction |
|Introduction=In this tutorial you will learn how to set up the e-textile bag to create a smart object that reacts to the amount of light recorded by an ambient light sensor. | |Introduction=In this tutorial you will learn how to set up the e-textile bag to create a smart object that reacts to the amount of light recorded by an ambient light sensor. | ||
}} | }} | ||
| − | {{ | + | {{Materials |
|Step_Picture_00=Light_sensitive_e-textile_bag_1.PNG | |Step_Picture_00=Light_sensitive_e-textile_bag_1.PNG | ||
|Material=- e-textile bag (see tutorial [[Electronic textile bag|here)]] | |Material=- e-textile bag (see tutorial [[Electronic textile bag|here)]] | ||
| Ligne 28 : | Ligne 28 : | ||
- computer with Arduino IDE installed | - computer with Arduino IDE installed | ||
| − | |Prerequisites={{ | + | |Prerequisites={{Prerequisites |
|Prerequisites=Electronic textile bag | |Prerequisites=Electronic textile bag | ||
}} | }} | ||
}} | }} | ||
| − | {{ | + | {{Separator}} |
| − | {{ | + | {{Tuto Step |
|Step_Title=Prepare the arduino board | |Step_Title=Prepare the arduino board | ||
|Step_Content=We will be using S4A to program the board. Therefore, we need to first set up our Arduino adequately. | |Step_Content=We will be using S4A to program the board. Therefore, we need to first set up our Arduino adequately. | ||
| Ligne 63 : | Ligne 63 : | ||
|Step_Picture_03=Light_sensitive_e-textile_bag_2.PNG | |Step_Picture_03=Light_sensitive_e-textile_bag_2.PNG | ||
}} | }} | ||
| − | {{ | + | {{Tuto Step |
|Step_Title=Wire the sensor and actuator | |Step_Title=Wire the sensor and actuator | ||
|Step_Content=You will need to connect the ambient light sensor and the LED patches to the Arduino board. The ambient light sensor patch has 3 cables deriving from it, whereas the LED patch has two cables. | |Step_Content=You will need to connect the ambient light sensor and the LED patches to the Arduino board. The ambient light sensor patch has 3 cables deriving from it, whereas the LED patch has two cables. | ||
| Ligne 87 : | Ligne 87 : | ||
|Step_Picture_02=Light_sensitive_e-textile_bag_6.PNG | |Step_Picture_02=Light_sensitive_e-textile_bag_6.PNG | ||
}} | }} | ||
| − | {{ | + | {{Tuto Step |
|Step_Title=Program the Arduino | |Step_Title=Program the Arduino | ||
|Step_Content=We want to program the Arduino board so that the ambient light sensor interacts with the LED. | |Step_Content=We want to program the Arduino board so that the ambient light sensor interacts with the LED. | ||
| Ligne 102 : | Ligne 102 : | ||
|Step_Picture_02=Light_sensitive_e-textile_bag_9.PNG | |Step_Picture_02=Light_sensitive_e-textile_bag_9.PNG | ||
}} | }} | ||
| − | {{ {{ | + | {{Tuto Step |
| + | |Step_Title= | ||
| + | |Step_Content= | ||
| + | |Step_Picture_00=Musical_e-textile_bag_eu_flag_co_funded_pos_rgb_right.jpg | ||
| + | }} | ||
| + | {{Notes | ||
|Notes=This tutorial has been developed as part of the #iTech project, co-financed by the Erasmus + Programme of the European Union. | |Notes=This tutorial has been developed as part of the #iTech project, co-financed by the Erasmus + Programme of the European Union. | ||
| + | |||
| + | Project number: 2017-1-FR02-KA205-012764 | ||
| + | |||
| + | EU disclaimer: The content of this publication does not reflect the official opinion of the European Union. Responsibility for the information and views expressed in the therein lies entirely with the author(s). | ||
For more details, contact info@digijeunes.com | For more details, contact info@digijeunes.com | ||
}} | }} | ||
| − | {{ | + | {{Tuto Status |
|Complete=Published | |Complete=Published | ||
}} | }} | ||
Version actuelle datée du 9 décembre 2019 à 11:41
Introduction
Matériaux
- e-textile bag (see tutorial here)
- light sensor
Outils
- soldering iron
- needle and thread
- computer with Arduino IDE installed
Étape 1 - Prepare the arduino board
We will be using S4A to program the board. Therefore, we need to first set up our Arduino adequately.
Download the S4A software by reaching S4A and then clicking on “Downloads” > Choose the correct version based upon your operating system.
Afterwards, download the S4A firmware by reaching this link > Right-click > Save as > Remove the .txt part of the name > Save as type: Change from “Text Document” to “All Files” > Save.
Upload the S4A firmware
You will also need to use Arduino IDE to code and upload the firmware onto your Arduino Leonardo board.
Download the software by visiting Arduino IDE > Scroll down until you see the “Download the Arduino IDE” section and choose the version based upon your operating system (e.g. If you have Windows 7, choose “Windows Installer” / if you have Windows 10, choose “Windows app”) > On the next page choose “Just download” and run the installation files.
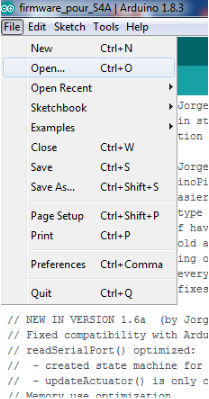
Launch Arduino IDE and open the S4A firmware by going to File > Open or by pressing Ctrl+O and then browsing to the location you previously saved the firmware to.
Connect the Arduino to your computer.
Select Arduino Leonardo from Tools menu > Board.
Select the correct port from the Tools menu > Port.
Upload the S4A firmware into it by using the right arrow (→) button at the top right corner of the window, by choosing Sketch > Upload or by pressing Ctrl+U on the keyboard.
Launch S4A
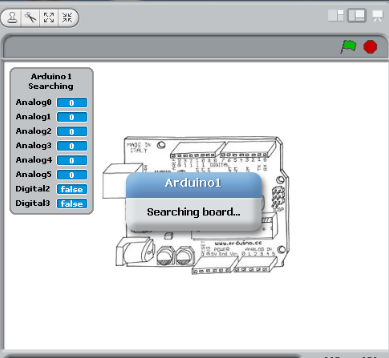
If the S4A firmware was successfully uploaded into the Arduino board, the “searching board…” message should disappear in a few seconds.
Étape 2 - Wire the sensor and actuator
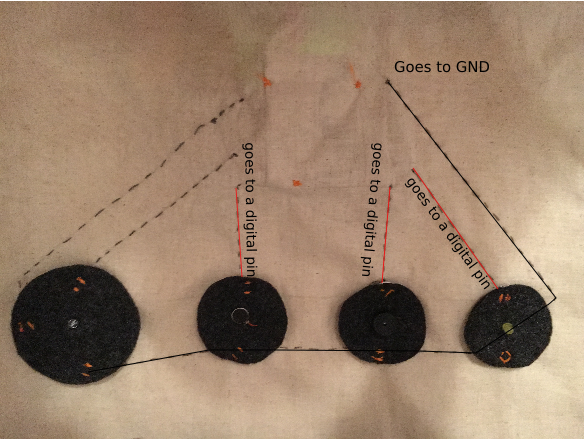
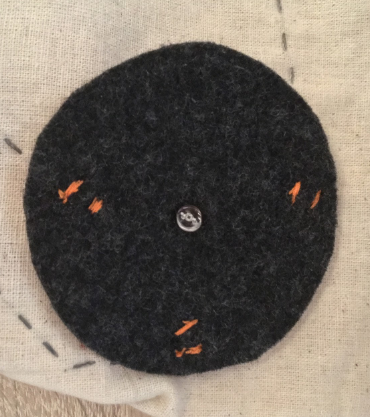
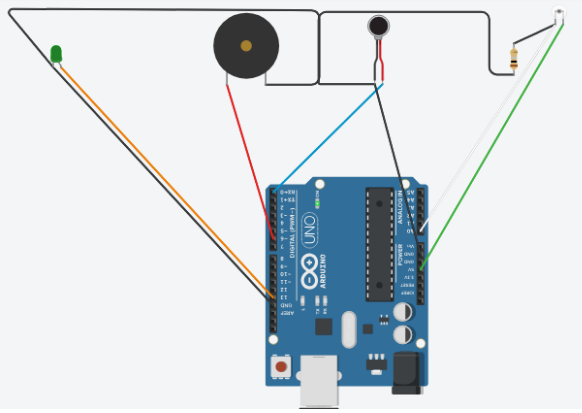
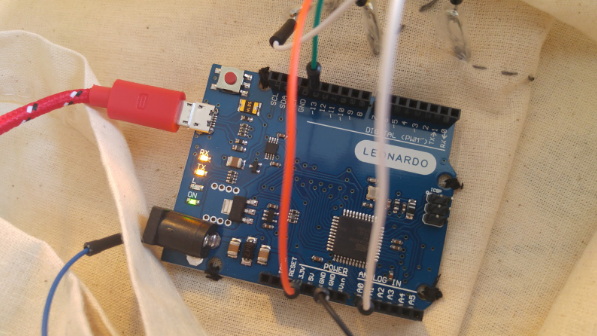
You will need to connect the ambient light sensor and the LED patches to the Arduino board. The ambient light sensor patch has 3 cables deriving from it, whereas the LED patch has two cables.
The positive side of the ambient light sensor goes to 5V.
The negative side goes to GND. You can use either of the 3 GND pins available on the board.
If you are not sure which one of the ambient light sensor legs is positive, just attempt to connect either to pin 5V and the other one to GND. If that doesn’t work, try the reverse.
Finally connect the remaining cable of the ambient light sensor patch to A0.
The negative side of the LED goes to GND and the positive one to a digital pin (ex. 13).
In the end it should look like this:
- white cable - A0
- green cable - 5V
- blue cable - GND
- orange cable - 13
- black cable - GND
Étape 3 - Program the Arduino
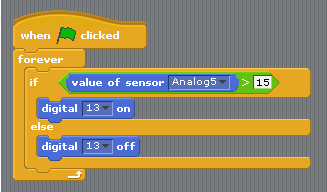
We want to program the Arduino board so that the ambient light sensor interacts with the LED.
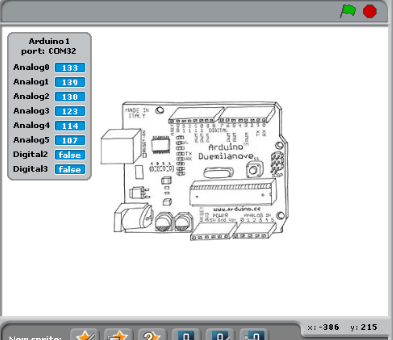
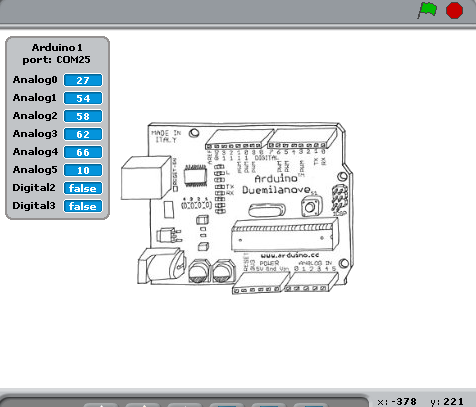
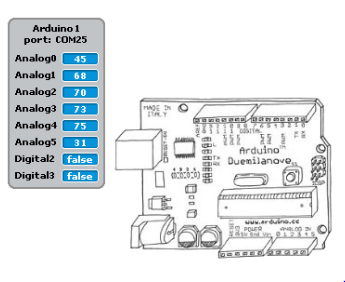
Take notice of how the value of A0 changes based on fluctuations in the amount of light.
In our example, A5 (i.e. Analog pin 5, which is where we connected the ambient light sensor), displays a value around 30 when no artificial light is pointed at it.
Whereas if we point a smartphone torch at the ambient light sensor, the value drops down to around 10.
Once you’ve understood how the ambient light sensor reacts to changes in the amount of light, you are ready to program the Arduino so that, whenever the ambient light sensor records a value higher than 15 (in our example), the LED patch will turn on, otherwise the LED patch will stay off.
Notes et références
This tutorial has been developed as part of the #iTech project, co-financed by the Erasmus + Programme of the European Union.
Project number: 2017-1-FR02-KA205-012764
EU disclaimer: The content of this publication does not reflect the official opinion of the European Union. Responsibility for the information and views expressed in the therein lies entirely with the author(s).
For more details, contact info@digijeunes.com
Published


 Français
 English
 Deutsch
 Español
 Italiano
 Português