(update property name) |
|||
| (Une révision intermédiaire par un autre utilisateur non affichée) | |||
| Ligne 1 : | Ligne 1 : | ||
| − | {{ | + | {{Tuto Details |
|Main_Picture=Laser_cut_Spirograph_1.PNG | |Main_Picture=Laser_cut_Spirograph_1.PNG | ||
|Licences=Attribution (CC BY) | |Licences=Attribution (CC BY) | ||
| Ligne 15 : | Ligne 15 : | ||
|IsTranslation=0 | |IsTranslation=0 | ||
}} | }} | ||
| − | {{ | + | {{Introduction |
|Introduction== Age range = | |Introduction== Age range = | ||
>12 | >12 | ||
| Ligne 40 : | Ligne 40 : | ||
* [https://www.tinkercad.com/things/newv2?lessonid=E337L76IQCBDZ9W&projectid=O2C1PXBIQ2KHCOD&collectionid=O2C1PXBIQ2KHCOD&title=Scale%2c%20Copy%20%26amp%3b%20Paste <u>Scale, copy, paste</u>] | * [https://www.tinkercad.com/things/newv2?lessonid=E337L76IQCBDZ9W&projectid=O2C1PXBIQ2KHCOD&collectionid=O2C1PXBIQ2KHCOD&title=Scale%2c%20Copy%20%26amp%3b%20Paste <u>Scale, copy, paste</u>] | ||
}} | }} | ||
| − | {{ | + | {{Materials |
|Step_Picture_00=Laser_cut_Spirograph_1.PNG | |Step_Picture_00=Laser_cut_Spirograph_1.PNG | ||
| + | |Step_Picture_01=Piccolo_cnc_drawing_robot_Erasmus_logo.jpg | ||
|Material=computer with internet connection | |Material=computer with internet connection | ||
|Tools=lasercut machine | |Tools=lasercut machine | ||
}} | }} | ||
| − | {{ | + | {{Separator}} |
| − | {{ | + | {{Tuto Step |
|Step_Title=Getting started | |Step_Title=Getting started | ||
|Step_Content=* Open a new document in tinkercad | |Step_Content=* Open a new document in tinkercad | ||
| Ligne 58 : | Ligne 59 : | ||
''Use the Mouse-wheel to zoom-in zoom-out.'' | ''Use the Mouse-wheel to zoom-in zoom-out.'' | ||
}} | }} | ||
| − | {{ | + | {{Tuto Step |
|Step_Title=Designing the gear tooth | |Step_Title=Designing the gear tooth | ||
|Step_Content=* Draw a rectangle (6x12) using the red BOX shape | |Step_Content=* Draw a rectangle (6x12) using the red BOX shape | ||
| Ligne 113 : | Ligne 114 : | ||
|Step_Picture_05=Laser_cut_Spirograph_9.PNG | |Step_Picture_05=Laser_cut_Spirograph_9.PNG | ||
}} | }} | ||
| − | {{ | + | {{Tuto Step |
|Step_Title=Designing the gears | |Step_Title=Designing the gears | ||
|Step_Content=* Design a CYLINDER with diameter 50 mm. | |Step_Content=* Design a CYLINDER with diameter 50 mm. | ||
| Ligne 148 : | Ligne 149 : | ||
|Step_Picture_05=Laser_cut_Spirograph_16.PNG | |Step_Picture_05=Laser_cut_Spirograph_16.PNG | ||
}} | }} | ||
| − | {{ | + | {{Tuto Step |
|Step_Title=Designing the spirograph | |Step_Title=Designing the spirograph | ||
|Step_Content=Create the same thing using the external circle for our spirograph: | |Step_Content=Create the same thing using the external circle for our spirograph: | ||
| Ligne 181 : | Ligne 182 : | ||
|Step_Picture_05=Laser_cut_Spirograph_25.PNG | |Step_Picture_05=Laser_cut_Spirograph_25.PNG | ||
}} | }} | ||
| − | {{ | + | {{Tuto Step |
|Step_Title=Export the file as .svg format | |Step_Title=Export the file as .svg format | ||
|Step_Content=Click on the EXPORT button on the top right corner of the Tinkercad interface. | |Step_Content=Click on the EXPORT button on the top right corner of the Tinkercad interface. | ||
| Ligne 192 : | Ligne 193 : | ||
|Step_Picture_00=Laser_cut_Spirograph_26.PNG | |Step_Picture_00=Laser_cut_Spirograph_26.PNG | ||
}} | }} | ||
| − | {{ | + | {{Notes |
|Notes=This tutorial was produced as part of the FabEdu project, co-financed by the Erasmus + Programme of the European Union. | |Notes=This tutorial was produced as part of the FabEdu project, co-financed by the Erasmus + Programme of the European Union. | ||
| Ligne 199 : | Ligne 200 : | ||
The content of this publication does not reflect the official opinion of the European Union. Responsibility for the information and views expressed therein lies entirely with the author(s). | The content of this publication does not reflect the official opinion of the European Union. Responsibility for the information and views expressed therein lies entirely with the author(s). | ||
}} | }} | ||
| − | {{ | + | {{Tuto Status |
|Complete=Draft | |Complete=Draft | ||
}} | }} | ||
Version actuelle datée du 9 décembre 2019 à 11:41
Introduction
Age range
>12
Skill level
Beginner
Objectives
The Learning goals for this activity are:
- Learn to design compound shapes
- Learn the difference between 2D and 3D design
- Learn the basics of designing for laser cutting
- Master the basics of Tinkercad (an on-line software for 3D modeling)
- Comprehend how gears work
Background knowledge and competences
The basic Tinkercad tutorials
Étape 1 - Getting started
- Open a new document in tinkercad
- Select view TOP
- Switch to Orthographic view
Always use Shift plus Right-click to move the workplane.
Use the Mouse-wheel to zoom-in zoom-out.
Étape 2 - Designing the gear tooth
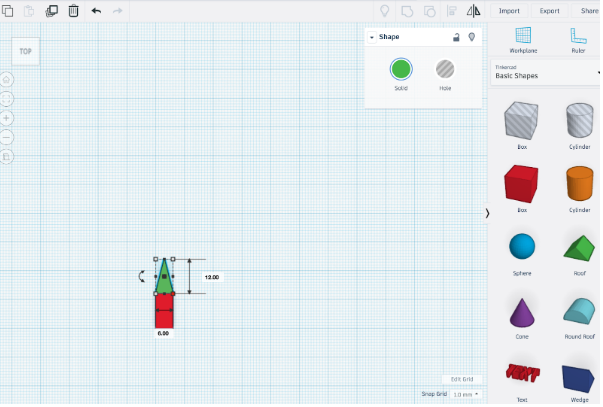
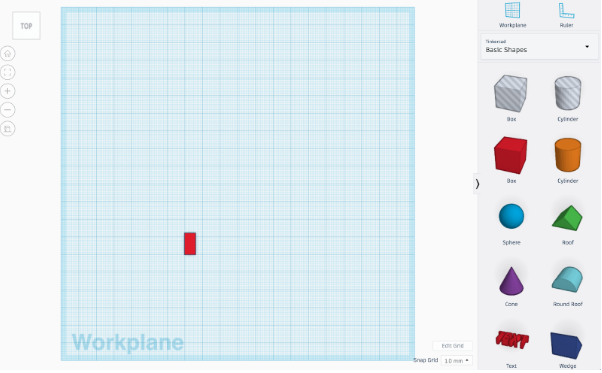
- Draw a rectangle (6x12) using the red BOX shape
Drag the red box in the center of the Workplane.
Customize Length to 12 and Width to 6.
- Draw a roof shape
We are going to use the roof shape in order to obtain a triangle.
Then click on the right arrow near the TOP writ. You’ll find yourself in the RIGHT view.
Rotate the green shape by 90 degrees and drag it near the red one.
Go back to TOP view.
Triangle dimension should be 6x12 and same height (Z) of the box.
Customize height of the triangle to 12 and the base to 6.
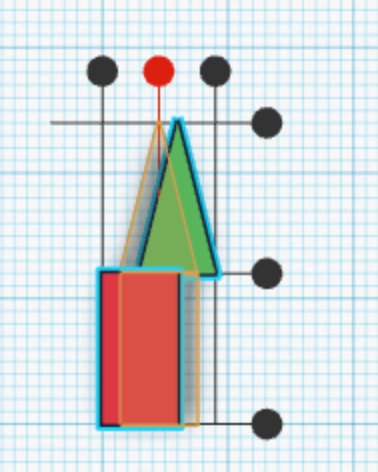
Drag the green triangle on top of the rectangular.
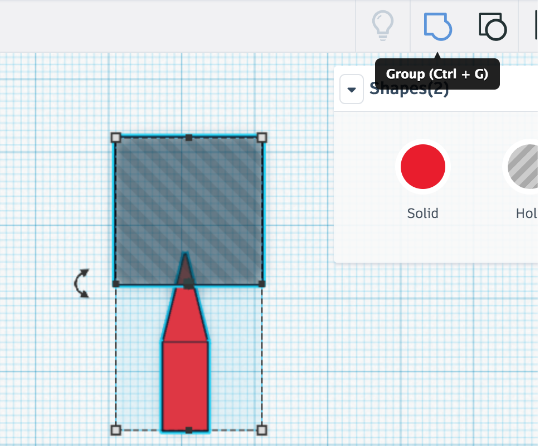
Select the roof and the rectangular box.
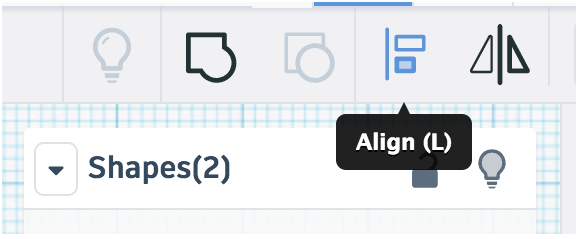
Align them to the HORIZONTAL CENTER.
Align them to the top so their surface are on the same height.
Select the two shapes (if needed) and click the GROUP icon.
Your shapes will be combined and united into one single shape.
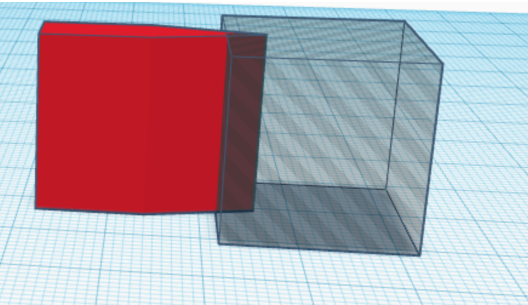
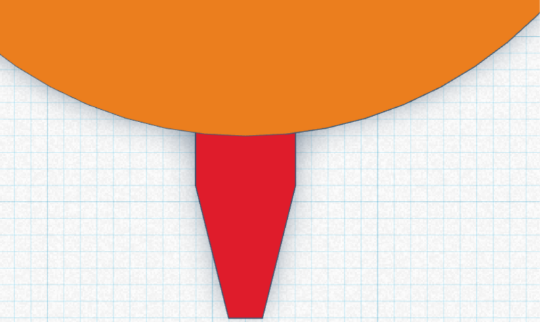
Design a small EMPTY box that covers the height (Z) of the combined shape. We aim to cut the spike of the triangle in order to make it truncated.
Select the first complex shape and the empty box: the triangle will be truncated. (using GROUP command).
Now we have our tooth!
Tip: when designing for lasercut the only important thing is the two dimensional shape. The thickness / height (Z dimension) of the objects is not important, e.g. could be 2 mm or even 5 cm.. The only requirement is that the thickness is the same for every shape that creates an object.
Étape 3 - Designing the gears
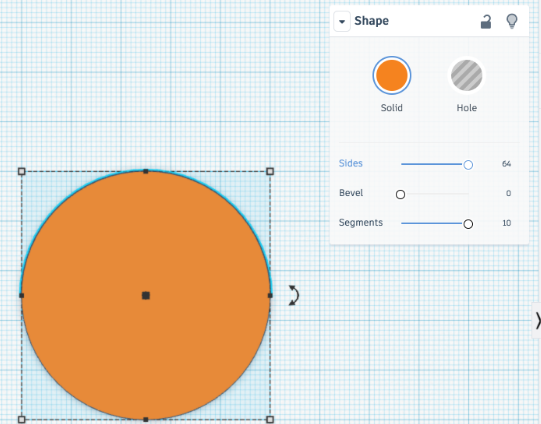
- Design a CYLINDER with diameter 50 mm.
Use the largest number of sides in order to have a smooth circle.
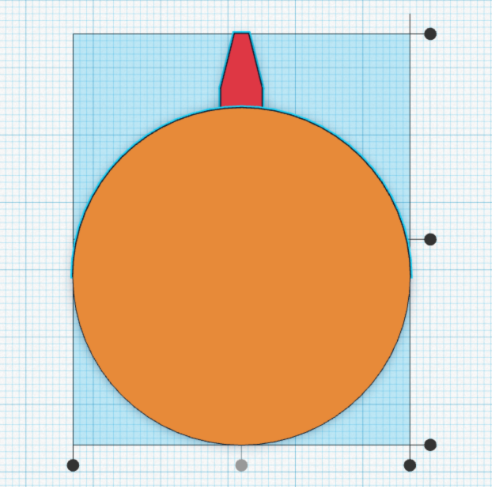
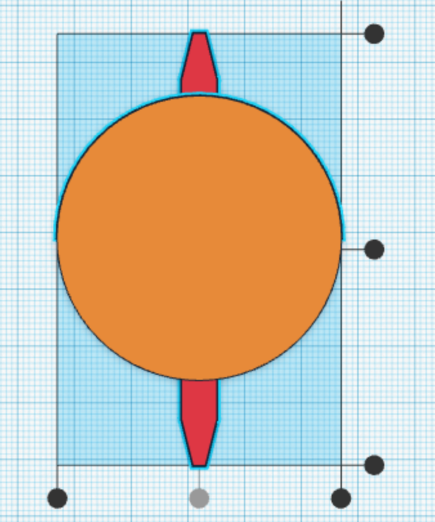
Copy the tooth and place it near the cylinder and align it horizontally in the center. Place the tooth so that the (once) rectangle part is out of the cylinder for 3mm.
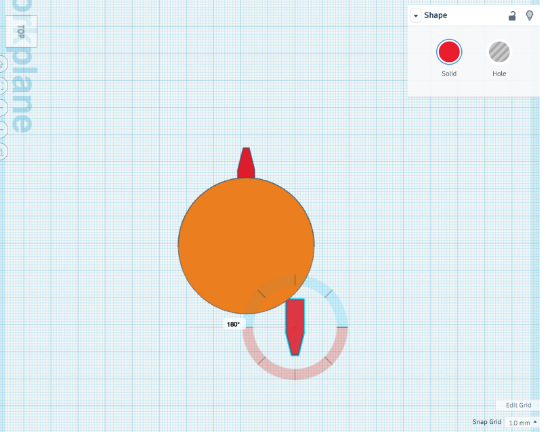
Copy the tooth and place it at the bottom of the cylinder, repeating the same process.
Select the teeth and the cylinder and align everything to the center (just to be sure).
Select the teeth and group them.
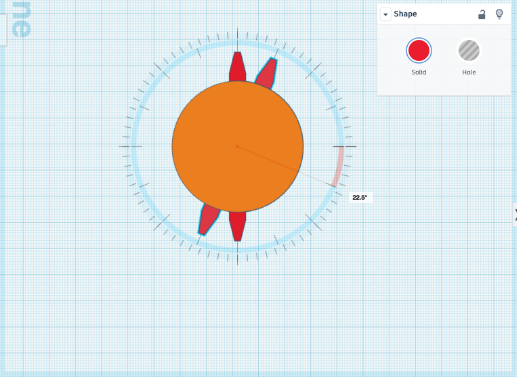
Select the teeth and press CTRL+D (or CMD+D on mac) and rotate with the mouse of 22,5 degrees.
Keep on pressing CTRL+D until the whole circle is covered. This function duplicates in array using the same degree of rotation of the first copy.
Make sure that the cylinder has the same height (Z) of the teeth.
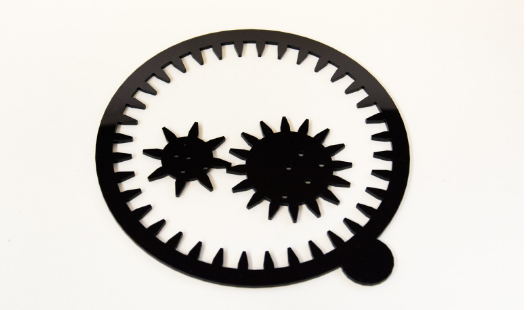
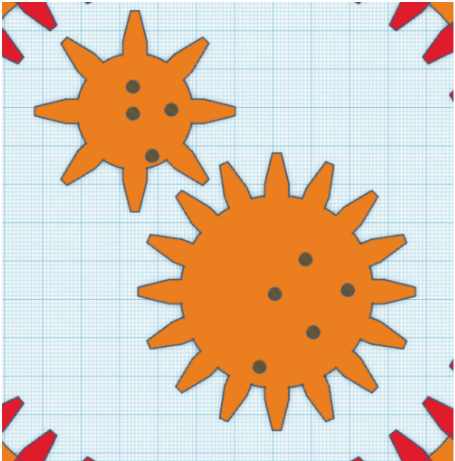
Now select all and GROUP the shapes in order to create the first gear.
Repeat the actions creating a cylinder that is 3cm diameter.
(To copy just one tooth use the command ungroup a couple of times selecting the first gear. Be sure to group it again once the tooth has been copied).
This time the tooth should be rotated by 45°.
Étape 4 - Designing the spirograph
Create the same thing using the external circle for our spirograph:
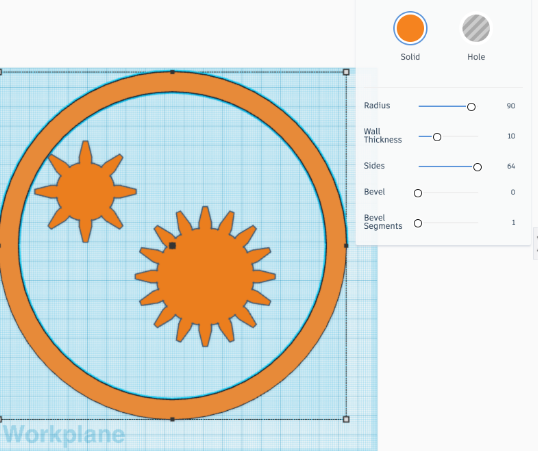
Instead of the cylinder you can draw a TUBE shape.
(suggested size for the tube:
Radius: 90
Wall thickness: 10
Sides: maximum)
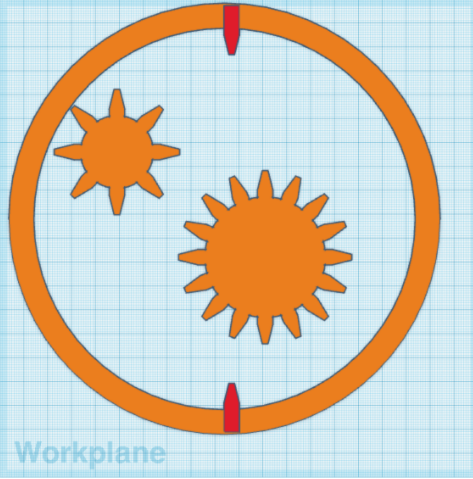
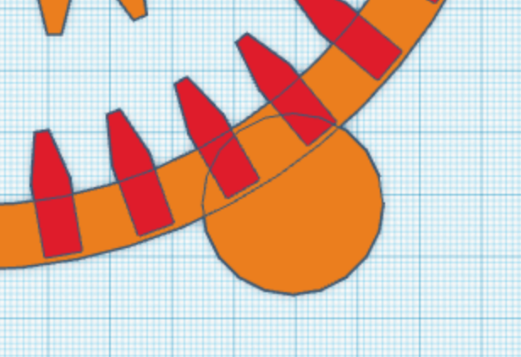
Teeth should be placed inside the ring.
Place a tooth in the horizontal center, make sure the rectangular part is out of approx. 3mm… repeat all of the steps as we did for the gears, but remember that now the teeth should be placed inside the ring.
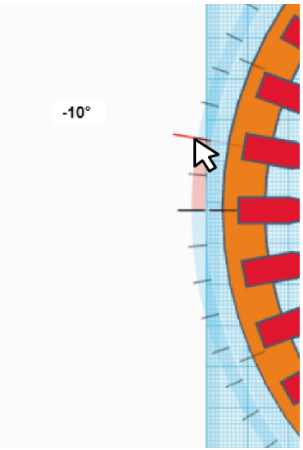
Rotate the teeth by 10°.
To do this, move the cursor on the outer, smaller scale and move.
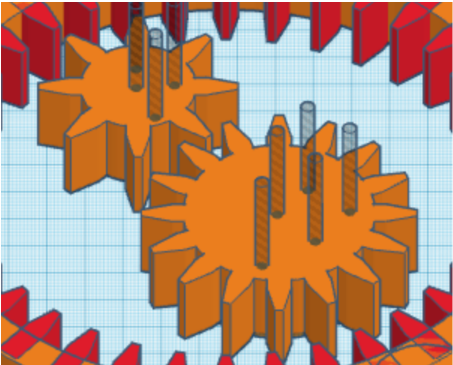
Create random holes in the two gears using the empty cylinder (displace the holes from the center in order to have better drawings). Holes can be 3mm diameter, just enough to use them with a pen or pencil.
You can add a circle / cylinder in a corner of the ring shape: this can function has an handle, to keep the spirograph in place while drawing.
Étape 5 - Export the file as .svg format
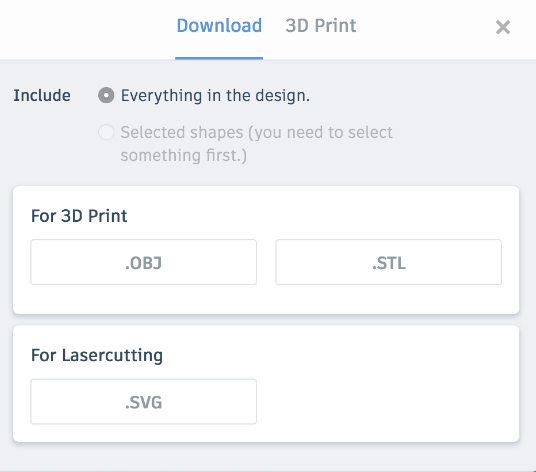
Click on the EXPORT button on the top right corner of the Tinkercad interface.
Download SVG For Lasercutting.
You now have files ready for laser cutting!
Tip: if you don’t own a laser cutter you can also 3D print your spirograph. Just be sure that the height/thickness (Z dimension) of all of the object is coherent. For example 2 or 3mm.
Notes et références
This tutorial was produced as part of the FabEdu project, co-financed by the Erasmus + Programme of the European Union.
Project number: 2017-1-FR02-KA205-012767
The content of this publication does not reflect the official opinion of the European Union. Responsibility for the information and views expressed therein lies entirely with the author(s).
Draft

 Français
 English
 Deutsch
 Español
 Italiano
 Português