(update property name) |
|||
| (Une révision intermédiaire par un autre utilisateur non affichée) | |||
| Ligne 1 : | Ligne 1 : | ||
| − | {{ | + | {{Tuto Details |
|Main_Picture=Fruit_piano_fruit_piano.PNG | |Main_Picture=Fruit_piano_fruit_piano.PNG | ||
|Licences=Attribution (CC BY) | |Licences=Attribution (CC BY) | ||
| Ligne 14 : | Ligne 14 : | ||
|IsTranslation=0 | |IsTranslation=0 | ||
}} | }} | ||
| − | {{ | + | {{Introduction |
|Introduction=<translate><!--T:85--> A Bulgarian version of this tutorial is available [https://docs.google.com/document/d/1sywJabBM7Ox72Wf-_mbloyc1GPnyQE-aSZ73RtvzJbA/edit?usp=sharing here]</translate> | |Introduction=<translate><!--T:85--> A Bulgarian version of this tutorial is available [https://docs.google.com/document/d/1sywJabBM7Ox72Wf-_mbloyc1GPnyQE-aSZ73RtvzJbA/edit?usp=sharing here]</translate> | ||
}} | }} | ||
| − | {{ | + | {{Materials |
|Material=<translate><!--T:24--> | |Material=<translate><!--T:24--> | ||
- Computer with scratch offline editor | - Computer with scratch offline editor | ||
| Ligne 31 : | Ligne 31 : | ||
|Tools=<translate></translate> | |Tools=<translate></translate> | ||
}} | }} | ||
| − | {{ | + | {{Separator}} |
| − | {{ | + | {{Tuto Step |
|Step_Title=<translate><!--T:28--> Activity</translate> | |Step_Title=<translate><!--T:28--> Activity</translate> | ||
|Step_Content=<translate><!--T:29--> | |Step_Content=<translate><!--T:29--> | ||
| Ligne 41 : | Ligne 41 : | ||
|Step_Picture_00=Fruit_piano_fruit_piano.PNG | |Step_Picture_00=Fruit_piano_fruit_piano.PNG | ||
}} | }} | ||
| − | {{ | + | {{Tuto Step |
|Step_Title=<translate></translate> | |Step_Title=<translate></translate> | ||
|Step_Content=<translate><!--T:60--> | |Step_Content=<translate><!--T:60--> | ||
| Ligne 53 : | Ligne 53 : | ||
|Step_Picture_00=Fruit_piano_fruit_piano2.PNG | |Step_Picture_00=Fruit_piano_fruit_piano2.PNG | ||
}} | }} | ||
| − | {{ | + | {{Tuto Step |
|Step_Title=<translate></translate> | |Step_Title=<translate></translate> | ||
|Step_Content=<translate><!--T:63--> | |Step_Content=<translate><!--T:63--> | ||
| Ligne 62 : | Ligne 62 : | ||
|Step_Picture_00=Fruit_piano_fruit_piano3.PNG | |Step_Picture_00=Fruit_piano_fruit_piano3.PNG | ||
}} | }} | ||
| − | {{ | + | {{Tuto Step |
|Step_Title=<translate></translate> | |Step_Title=<translate></translate> | ||
|Step_Content=<translate><!--T:65--> | |Step_Content=<translate><!--T:65--> | ||
| Ligne 77 : | Ligne 77 : | ||
|Step_Picture_00=Fruit_piano_fruit_piano4.PNG | |Step_Picture_00=Fruit_piano_fruit_piano4.PNG | ||
}} | }} | ||
| − | {{ | + | {{Tuto Step |
|Step_Title=<translate></translate> | |Step_Title=<translate></translate> | ||
|Step_Content=<translate><!--T:69--> To add a sound, go to the Sound (purple) section, and choose one block “play note _ for _ beats”.</translate> | |Step_Content=<translate><!--T:69--> To add a sound, go to the Sound (purple) section, and choose one block “play note _ for _ beats”.</translate> | ||
|Step_Picture_00=Fruit_piano_fruit_piano5.PNG | |Step_Picture_00=Fruit_piano_fruit_piano5.PNG | ||
}} | }} | ||
| − | {{ | + | {{Tuto Step |
|Step_Title=<translate></translate> | |Step_Title=<translate></translate> | ||
|Step_Content=<translate><!--T:70--> At this stage your code will look like this:</translate> | |Step_Content=<translate><!--T:70--> At this stage your code will look like this:</translate> | ||
|Step_Picture_00=Fruit_piano_fruit_piano11.PNG | |Step_Picture_00=Fruit_piano_fruit_piano11.PNG | ||
}} | }} | ||
| − | {{ | + | {{Tuto Step |
|Step_Title=<translate></translate> | |Step_Title=<translate></translate> | ||
|Step_Content=<translate><!--T:71--> Your code is already functional, you can test it by clicking on the green flag on the top of the screen.</translate> | |Step_Content=<translate><!--T:71--> Your code is already functional, you can test it by clicking on the green flag on the top of the screen.</translate> | ||
|Step_Picture_00=Fruit_piano_fruit_piano6.PNG | |Step_Picture_00=Fruit_piano_fruit_piano6.PNG | ||
}} | }} | ||
| − | {{ | + | {{Tuto Step |
|Step_Title=<translate></translate> | |Step_Title=<translate></translate> | ||
|Step_Content=<translate><!--T:72--> | |Step_Content=<translate><!--T:72--> | ||
| Ligne 101 : | Ligne 101 : | ||
|Step_Picture_00=Fruit_piano_fruit_piano7.PNG | |Step_Picture_00=Fruit_piano_fruit_piano7.PNG | ||
}} | }} | ||
| − | {{ | + | {{Tuto Step |
|Step_Title=<translate></translate> | |Step_Title=<translate></translate> | ||
|Step_Content=<translate><!--T:74--> Your piano is now ready, you just need to tune it ! You need to determine the exact sound of each note. By clicking on each note, a small keyboard will pop up, which will enable you to select the note that you are looking for.</translate> | |Step_Content=<translate><!--T:74--> Your piano is now ready, you just need to tune it ! You need to determine the exact sound of each note. By clicking on each note, a small keyboard will pop up, which will enable you to select the note that you are looking for.</translate> | ||
|Step_Picture_00=Fruit_piano_fruit_piano8.PNG | |Step_Picture_00=Fruit_piano_fruit_piano8.PNG | ||
}} | }} | ||
| − | {{ | + | {{Tuto Step |
|Step_Title=<translate></translate> | |Step_Title=<translate></translate> | ||
|Step_Content=<translate><!--T:75--> | |Step_Content=<translate><!--T:75--> | ||
| Ligne 127 : | Ligne 127 : | ||
|Step_Picture_00=Fruit_piano_fruit_piano9.PNG | |Step_Picture_00=Fruit_piano_fruit_piano9.PNG | ||
}} | }} | ||
| − | {{ | + | {{Tuto Step |
|Step_Title=<translate></translate> | |Step_Title=<translate></translate> | ||
|Step_Content=<translate><!--T:81--> | |Step_Content=<translate><!--T:81--> | ||
| Ligne 142 : | Ligne 142 : | ||
|Step_Picture_00=Fruit_piano_fruit_piano10.PNG | |Step_Picture_00=Fruit_piano_fruit_piano10.PNG | ||
}} | }} | ||
| − | {{ | + | {{Tuto Step |
|Step_Title=<translate></translate> | |Step_Title=<translate></translate> | ||
|Step_Content=<translate></translate> | |Step_Content=<translate></translate> | ||
|Step_Picture_00=Musical_e-textile_bag_eu_flag_co_funded_pos_rgb_right.jpg | |Step_Picture_00=Musical_e-textile_bag_eu_flag_co_funded_pos_rgb_right.jpg | ||
}} | }} | ||
| − | {{ | + | {{Notes |
|Notes=<translate><!--T:22--> | |Notes=<translate><!--T:22--> | ||
This tutorial has been developed as part of the [http://www.digijeunes.com/projets/itech/ i Tech] project, co-financed by the Erasmus + Programme of the European Union. | This tutorial has been developed as part of the [http://www.digijeunes.com/projets/itech/ i Tech] project, co-financed by the Erasmus + Programme of the European Union. | ||
| + | <!--T:86--> | ||
Project number: 2017-1-FR02-KA205-012764 | Project number: 2017-1-FR02-KA205-012764 | ||
| − | EU disclaimer: The content of this publication does not reflect the official opinion of the European Union. Responsibility for the information and views expressed in the therein lies entirely with the author(s). | + | <!--T:59--> |
| + | EU disclaimer: The content of this publication does not reflect the official opinion of the European Union. Responsibility for the information and views expressed in the therein lies entirely with the author(s). | ||
| + | <!--T:87--> | ||
For more details, contact info@digijeunes.com</translate> | For more details, contact info@digijeunes.com</translate> | ||
}} | }} | ||
| − | {{ | + | {{Tuto Status |
|Complete=Published | |Complete=Published | ||
}} | }} | ||
Version actuelle datée du 9 décembre 2019 à 11:35
Introduction
Matériaux
- Computer with scratch offline editor
- Makey makey (or DIY makeymakey with Arduino Leonardo) + USB cable
- 5 alligator clips
- 5 fruits or conductive items
Outils
Étape 1 - Activity
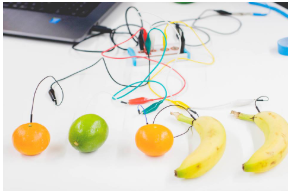
The activity consists in turning fruits into a keyboard to play music with.
To get started, plug the makey makey (or DIY makey makey with Arduino Leonardo) to your computer and connect all bananas (or other conductive items) to the board via alligator clips.
Étape 2 -
Each fruit is connected to makey makey arrows, space or click buttons.
We will start by using these 5 keys.
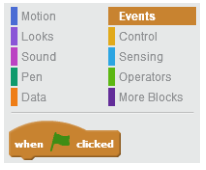
You can now launch scratch and start writing your code. To start with, go to “Events” (light brown) section.
Étape 3 -
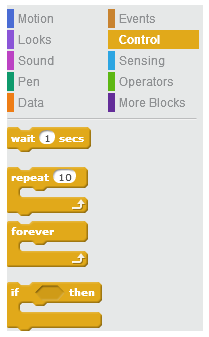
Next pick the “when green flag clicked” and the “forever” block.
In order to create an action, choose the “if then” block from the Control category.
Étape 4 -
“If then”, is the most common function used in coding and is used to create an interaction between your code and the outside world.
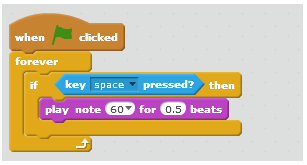
Since the activity consists in creating a piano we would like that sounds were triggered when a certain key were pressed.Under the sensing section, you will find the “Key _ pressed?” block.
Click on the small black arrow and select the key you need.
We have a condition (If then), we have chosen a key, we only need to add a sound.
Étape 5 -
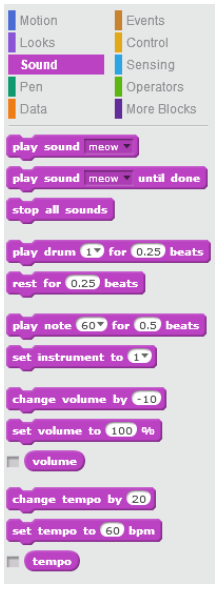
To add a sound, go to the Sound (purple) section, and choose one block “play note _ for _ beats”.
Étape 7 -
Your code is already functional, you can test it by clicking on the green flag on the top of the screen.
Étape 8 -
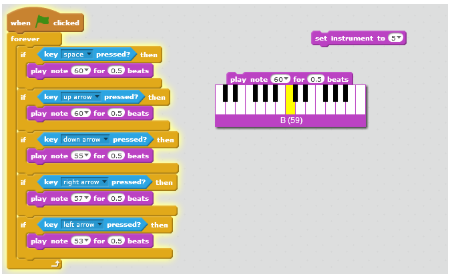
You now need to add extra keys in order to have more piano notes altogether.
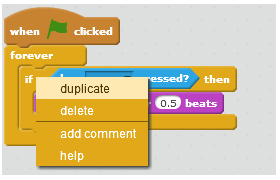
Right click on the “If then” block and a small menu will pop up. Click on “duplicate” and paste it below the first conditional. Repeat the operation for each key.
Étape 9 -
Your piano is now ready, you just need to tune it ! You need to determine the exact sound of each note. By clicking on each note, a small keyboard will pop up, which will enable you to select the note that you are looking for.
Étape 10 -
The Piano sounds funny? It’s perfectly normal! some chords played together sound well and some other don’t… So it’s time for a little bit of music theory, don’t be scared it will be fast and fun.
Here is an example of how different cords can produce different feelings depending on the order in which they are played: https://en.wikipedia.org/wiki/I%E2%80%93V%E2%80%9...
Other happy chords?
73 Songs You Can Play With The Same Four Chords
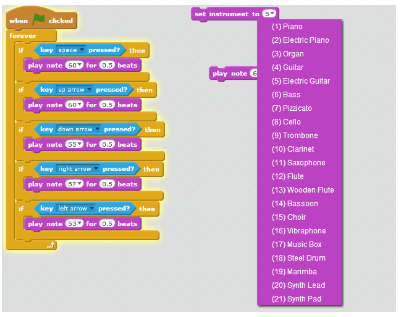
Do you want to change instrument?
It’s easy in Scratch. You can find plenty of instruments available in a list located in the Sound (purple) section.
Étape 11 -
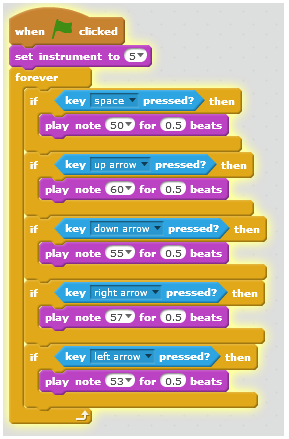
Example of a finished code:
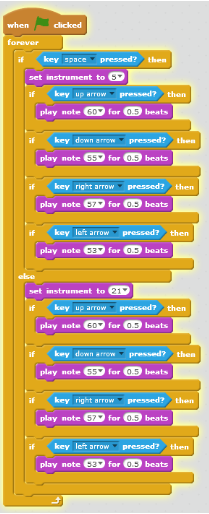
To go further...This code is using 4 chords and one key for change instrument. The same like a piano use pedal for change the tuning, if one key (space in this case) is pressed the code play the sound of a ‘guitar’ and when the key is released the sound is the one of ‘lead synth’.
Now you have the possibility to create a more interesting instrument. In the next lessons you will discover the Operator (light green) section, and add more possibilities and effects.
Stay tuned ;-)
Notes et références
This tutorial has been developed as part of the i Tech project, co-financed by the Erasmus + Programme of the European Union.
Project number: 2017-1-FR02-KA205-012764
EU disclaimer: The content of this publication does not reflect the official opinion of the European Union. Responsibility for the information and views expressed in the therein lies entirely with the author(s).
For more details, contact info@digijeunes.com
Published

 Français
 English
 Deutsch
 Español
 Italiano
 Português