(Mise à jour pour être en accord avec la nouvelle version de la source de la page) |
(update property name) |
||
| (Une révision intermédiaire par un autre utilisateur non affichée) | |||
| Ligne 1 : | Ligne 1 : | ||
| − | {{ | + | {{Tuto Details |
|Main_Picture=E-textile_blinking_bag_1.PNG | |Main_Picture=E-textile_blinking_bag_1.PNG | ||
|Licences=Attribution (CC BY) | |Licences=Attribution (CC BY) | ||
| Ligne 15 : | Ligne 15 : | ||
|IsTranslation=1 | |IsTranslation=1 | ||
}} | }} | ||
| − | {{ | + | {{Introduction |
|Introduction=In this tutorial you will learn how to have the LED patch of your textile bag blink. | |Introduction=In this tutorial you will learn how to have the LED patch of your textile bag blink. | ||
| Ligne 22 : | Ligne 22 : | ||
A romanian version of this tutorial is available [https://docs.google.com/document/d/1WxqQ4_5gqy94cQbUddNG7E6SFb7A4MmDr4GHvE66kso/edit?usp=sharing here] | A romanian version of this tutorial is available [https://docs.google.com/document/d/1WxqQ4_5gqy94cQbUddNG7E6SFb7A4MmDr4GHvE66kso/edit?usp=sharing here] | ||
}} | }} | ||
| − | {{ | + | {{Materials |
|Step_Picture_00=E-textile_blinking_bag_2.PNG | |Step_Picture_00=E-textile_blinking_bag_2.PNG | ||
|Step_Picture_01=E-textile_blinking_bag_1.PNG | |Step_Picture_01=E-textile_blinking_bag_1.PNG | ||
| Ligne 30 : | Ligne 30 : | ||
- needle and thread | - needle and thread | ||
| − | |Prerequisites={{ | + | |Prerequisites={{Prerequisites |
|Prerequisites=Electronic textile bag | |Prerequisites=Electronic textile bag | ||
}} | }} | ||
}} | }} | ||
| − | {{ | + | {{Separator}} |
| − | {{ | + | {{Tuto Step |
|Step_Title=Prepare the board and the bag | |Step_Title=Prepare the board and the bag | ||
|Step_Content=Connect one end of the micro usb cable to the computer, the other end to the Arduino Leonardo board. | |Step_Content=Connect one end of the micro usb cable to the computer, the other end to the Arduino Leonardo board. | ||
| Ligne 45 : | Ligne 45 : | ||
|Step_Picture_01=E-textile_blinking_bag_4.PNG | |Step_Picture_01=E-textile_blinking_bag_4.PNG | ||
}} | }} | ||
| − | {{ | + | {{Tuto Step |
|Step_Title=Set up the board on mBlock | |Step_Title=Set up the board on mBlock | ||
|Step_Content=Before you can start programming your Arduino, you will need to set it up on [http://www.mblock.cc/software/mblock/mblock3/ mBlock]. | |Step_Content=Before you can start programming your Arduino, you will need to set it up on [http://www.mblock.cc/software/mblock/mblock3/ mBlock]. | ||
| Ligne 57 : | Ligne 57 : | ||
|Step_Picture_01=E-textile_blinking_bag_5.PNG | |Step_Picture_01=E-textile_blinking_bag_5.PNG | ||
}} | }} | ||
| − | {{ | + | {{Tuto Step |
|Step_Title=Coding on mBlock | |Step_Title=Coding on mBlock | ||
|Step_Content=On mBlock, you will need to create a simple code to have your Led patch blink every second. | |Step_Content=On mBlock, you will need to create a simple code to have your Led patch blink every second. | ||
| Ligne 77 : | Ligne 77 : | ||
|Step_Picture_01=E-textile_blinking_bag_7.PNG | |Step_Picture_01=E-textile_blinking_bag_7.PNG | ||
}} | }} | ||
| − | {{ | + | {{Tuto Step |
|Step_Title=Coding on Arduino IDE | |Step_Title=Coding on Arduino IDE | ||
|Step_Content=It’s possible that your will encounter problems connecting your Arduino leonardo to mBlock. In that case, you may need to use Arduino IDE to code and upload the firmware onto your Arduino Leonardo board. | |Step_Content=It’s possible that your will encounter problems connecting your Arduino leonardo to mBlock. In that case, you may need to use Arduino IDE to code and upload the firmware onto your Arduino Leonardo board. | ||
| Ligne 100 : | Ligne 100 : | ||
|Step_Picture_02=E-textile_blinking_bag_9.PNG | |Step_Picture_02=E-textile_blinking_bag_9.PNG | ||
}} | }} | ||
| − | {{ | + | {{Tuto Step |
| − | | | + | |Step_Title= |
| − | + | |Step_Content= | |
| − | + | |Step_Picture_00=Musical_e-textile_bag_eu_flag_co_funded_pos_rgb_right.jpg | |
| + | }} | ||
| + | {{Notes | ||
| + | |Notes= | ||
}} | }} | ||
| − | {{ | + | {{Tuto Status |
|Complete=Published | |Complete=Published | ||
}} | }} | ||
Version actuelle datée du 9 décembre 2019 à 11:31
Introduction
In this tutorial you will learn how to have the LED patch of your textile bag blink.
Une version de ce tutoriel en français est disponible ici
A romanian version of this tutorial is available hereÉtape 1 - Prepare the board and the bag
Connect one end of the micro usb cable to the computer, the other end to the Arduino Leonardo board.
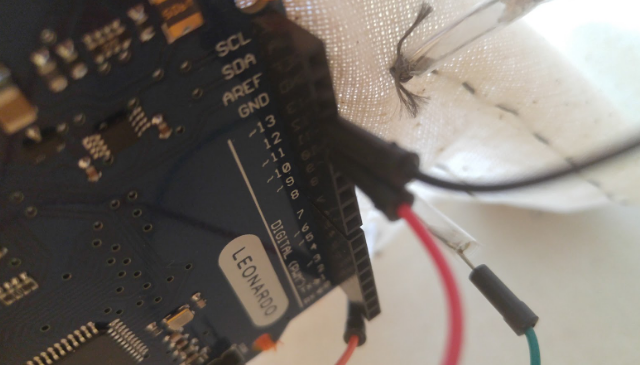
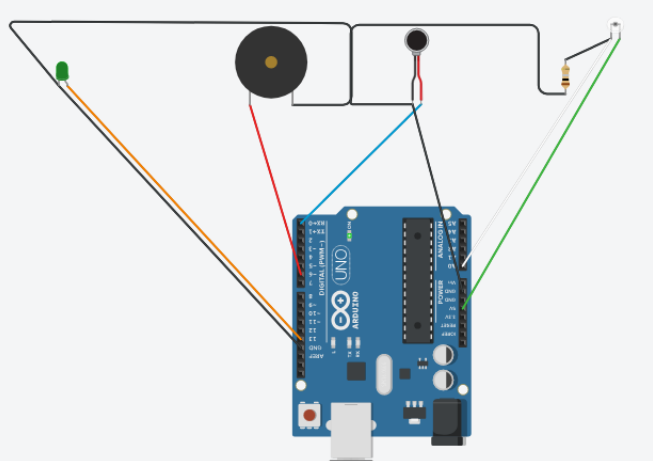
Connect the positive side of the LED patch to pin 13 on the Arduino Leonardo. Connect the negative leg of the LED patch to GND on the board. You can use either of the 3 GND pins available on the board.
- black cable - GND
- orange cable - pin 13
Étape 2 - Set up the board on mBlock
Before you can start programming your Arduino, you will need to set it up on mBlock.
Choose the version depending on your operating system (e.g. If you have a MacBook, choose “Mac OS” / if you have Windows 10, choose “Windows 7 and above”). Download and run the installation files and then open mBlock.
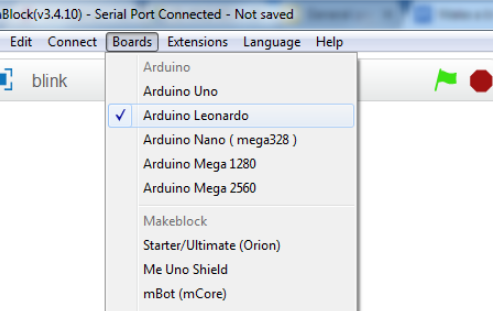
Select the Arduino Leonardo board from the “Boards” menu.
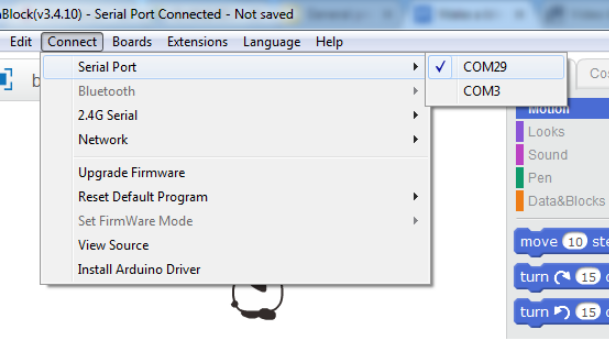
Then connect to your Arduino board (the COM port number varies based upon your computer’s USB plugs - when you choose the correct one to which your Arduino Leonardo is connected to, the ON and TX led lights on the board will turn solid green, and orange respectively).
Étape 3 - Coding on mBlock
On mBlock, you will need to create a simple code to have your Led patch blink every second.
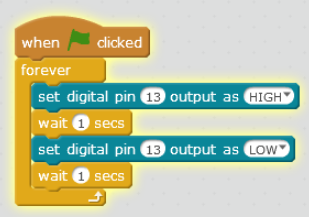
The code shall look exactly like this: (see image)
You need to drag and drop each block from the “Scripts” section on the middle to the blank area on the right hand side.
You will find each block in the following subsections:
- When <flag> clicked - “Events” subsection
- forever / wait 1 secs - “Control” subsection
- set digital pin… - “Robots” subsection
Note the you can change small details to make your own personal code. For example you can change the frequency of the blinking by shortening or lengthening the delay between each “HIGH” state and “LOW” state of pin 13.
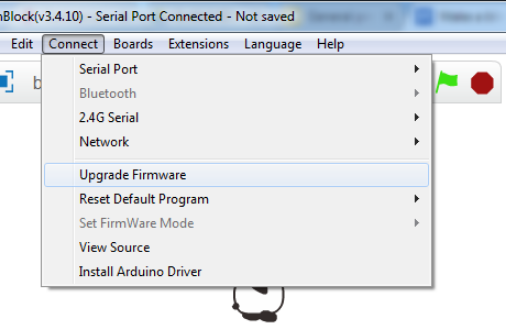
When you are done coding, click on “Upgrade Firmware” in the Connect menu (at which point both the RX and the TX led lights on the board will flash orange).
Do this only once. You can now modify your code without having to Upgrade the Firmware each time.
Étape 4 - Coding on Arduino IDE
It’s possible that your will encounter problems connecting your Arduino leonardo to mBlock. In that case, you may need to use Arduino IDE to code and upload the firmware onto your Arduino Leonardo board.
Download the software by visiting Arduino IDE > Scroll down until you see the “Download the Arduino IDE” section and choose the version based upon your operating system (e.g. If you have Windows 7, choose “Windows Installer” / if you have Windows 10, choose “Windows app”) > On the next page choose “Just download” and run the installation files.
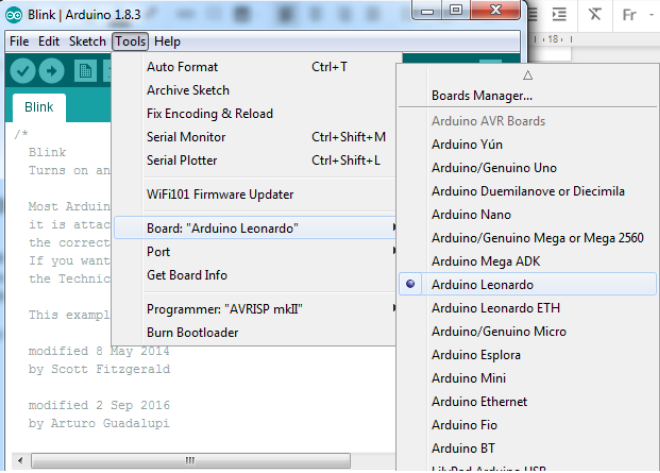
Launch Arduino IDE and select Arduino Leonardo from the Tools menu > Board.
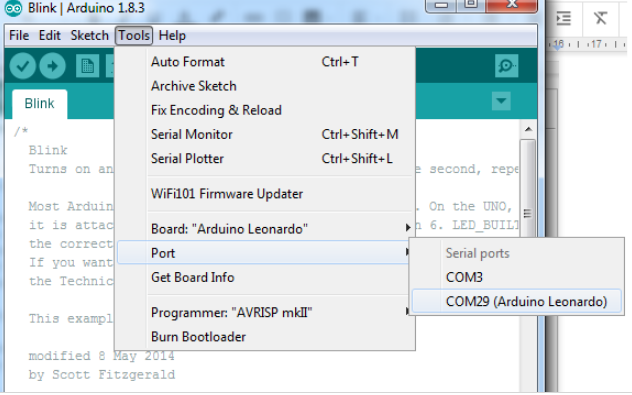
Select the correct port from the Tools menu > Port.
Choose the Blink example from File > Examples > 01.Basics > Blink.
Finally, upload the code by using the right arrow (→) button at the top right corner of the window, by choosing Sketch > Upload or by pressing Ctrl+U on the keyboard.
Alternatively, you can use both tools together in order to easily create code (by using the intuitive interface mBlock offers) and then reliably upload it to the board (by using the strong connection to the board that Arduino IDE offers).
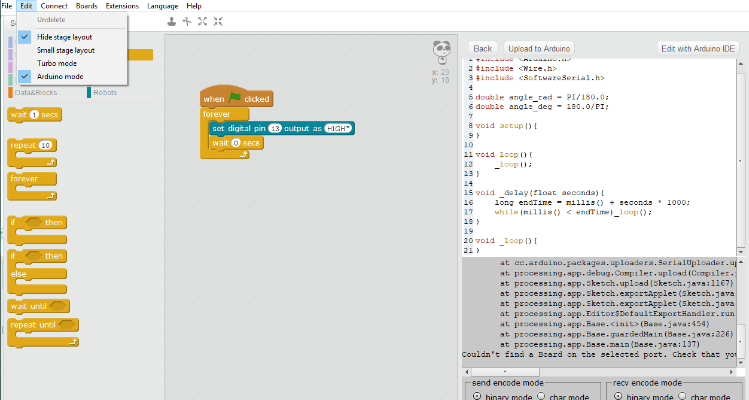
In mBlock, you simply need to click on Edit > Arduino Mode and when the new pane opens up on the right-hand side, choose Edit with Arduino IDE.
Afterwards, simply follow the same steps as before to upload the code to the board and you should be good to go!
Published

 Français
 English
 Deutsch
 Español
 Italiano
 Português