| (11 révisions intermédiaires par le même utilisateur non affichées) | |||
| Ligne 6 : | Ligne 6 : | ||
|Type=XXX | |Type=XXX | ||
|Difficulty=Medium | |Difficulty=Medium | ||
| − | |Duration= | + | |Duration=5 |
|Duration-type=day(s) | |Duration-type=day(s) | ||
| − | |Cost= | + | |Cost=350 |
|Currency=USD ($) | |Currency=USD ($) | ||
|Tags=Hydroponics, Vegatable Garden | |Tags=Hydroponics, Vegatable Garden | ||
}} | }} | ||
{{Introduction | {{Introduction | ||
| − | |Introduction=<translate>'''The prototype considers SDG 11's call by the United Nations. The project speaks to being self efficient in urban environments by enabling urban living with with the ability and ease of use and use of a 'smart vegetable garden. The idea is for the user to self sustain their families through the use of a compact hybrid hydroponic greenhouse structure which produces high yields, provides nutritious foods and reduces transportation of food produce.'''</translate> | + | |Introduction=<translate>'''The prototype considers SDG 11's call by the United Nations. The project speaks to being self efficient in urban environments by enabling urban living with with the ability and ease of use and use of a 'smart vegetable garden. The idea is for the user to self sustain their families through the use of a compact hybrid hydroponic greenhouse structure which produces high yields, provides nutritious foods and reduces transportation of food produce.''' |
| + | |||
| + | |||
| + | '''The idea in the design was to come up with an energy efficient solution which will enable plants to grow in varied environments. The prototype is a controlled system linked to remote system, envisioned to be accessible via a smart phone application which also includes a community engagement platform.'''</translate> | ||
| + | }} | ||
| + | {{Materials | ||
| + | |Tuto_Attachments={{Tuto Attachments | ||
| + | |Attachment=Nutridome_I_SDG_11_I_South_Africa_Nutridome_-_Hybrid_Hydroponics_LR.pdf | ||
| + | }}{{Tuto Attachments | ||
| + | |Attachment=Nutridome_I_SDG_11_I_South_Africa_Tools_and_materials.png | ||
| + | }} | ||
}} | }} | ||
| − | |||
{{Tuto Step | {{Tuto Step | ||
|Step_Title=<translate>Linking the LED Lighting</translate> | |Step_Title=<translate>Linking the LED Lighting</translate> | ||
| − | |Step_Content=<translate></translate> | + | |Step_Content=<translate>We used 3 LED lights because we only had 9V batteries. This forced us to have an external power source that could cope with those power needs. To deal with 9V we decided to use a relay as a magnetic switch because the Arduino can only handle 5V and this is where the relay helped us. The Arduino code was written to play on a loop since we didn't have the required modules to communicate with the system. |
| + | |||
| + | |||
| + | The concept was created for the South African climate which has wonderful sunlight. The LED system is designed to be cost effective on resources and created as a back up where sunlight is not sufficient for plant growth.</translate> | ||
|Step_Picture_00=Group-JDS_Group_1a.jpg | |Step_Picture_00=Group-JDS_Group_1a.jpg | ||
|Step_Picture_01=LED_Lighting_connection.jpg | |Step_Picture_01=LED_Lighting_connection.jpg | ||
|Step_Picture_02=Nutridome_I_SDG_11_I_South_Africa_Nutridome_Video1_LED_Lighting.mp4 | |Step_Picture_02=Nutridome_I_SDG_11_I_South_Africa_Nutridome_Video1_LED_Lighting.mp4 | ||
| + | |Step_Picture_03=Nutridome_I_SDG_11_I_South_Africa_4a.mp4 | ||
}} | }} | ||
{{Tuto Step | {{Tuto Step | ||
|Step_Title=<translate>Creating Hydroponic Pump System</translate> | |Step_Title=<translate>Creating Hydroponic Pump System</translate> | ||
| − | |Step_Content=<translate>This is a prototype illustration of the concept, the</translate> | + | |Step_Content=<translate>This is a prototype illustration of the concept here is on a smaller scale. The dome design is capable of housing hydroponic vertical PVC piping 5ft tall. |
| + | |||
| + | |||
| + | Start off by drilling five holes that are 50mm apart. Drill holes that will be space for our cups, cut the cup space to your satisfaction because you must consider the depth of the pipe ensuring that water reaches the plant . SEAL both ends of the PVC pipe making sure that they are water proof sealing with silicon. Next Drill two more holes one at the bottom for the water inflow from the pump. Next drill a hole at the bottom of the cup where the water will seep out again in the bucket.</translate> | ||
|Step_Picture_00=Prototype_of_Hydroponic_vertical_garden_.jpg | |Step_Picture_00=Prototype_of_Hydroponic_vertical_garden_.jpg | ||
}} | }} | ||
{{Tuto Step | {{Tuto Step | ||
|Step_Title=<translate>Creating the Shell Structure</translate> | |Step_Title=<translate>Creating the Shell Structure</translate> | ||
| − | |Step_Content=<translate></translate> | + | |Step_Content=<translate>This is a PVC pipe that has been drilled with holes we were going to use disposable plastic cups but we found some plastic growing cups in the store room and we used those. for this demonstration we are using an ordinary aquarium pump and pipes for the water flow. The bucket is just a normal bucket. |
| + | |||
| + | |||
| + | The dome was made from 25mm PVC electrical wiring pipes. The dome was inspiration for the idea as we saw it at the Centre and realised its potential. the PVC pipes are held together with cable ties, glue and connectors. | ||
| + | |||
| + | |||
| + | The shading is normal garden shade and plastic sheeting can be placed over the structure to create more controlled environments. This will be when you have put the hydroponic system with lighting inside the dome we just wanted to illustrate the look for the final product of the dome.</translate> | ||
|Step_Picture_00=Group-JDS_Group_Dome.jpg | |Step_Picture_00=Group-JDS_Group_Dome.jpg | ||
|Step_Picture_01=Nutridome_I_SDG_11_I_South_Africa_Dome_11.jpg | |Step_Picture_01=Nutridome_I_SDG_11_I_South_Africa_Dome_11.jpg | ||
| Ligne 36 : | Ligne 58 : | ||
{{Tuto Step | {{Tuto Step | ||
|Step_Title=<translate>Setting up the Dome</translate> | |Step_Title=<translate>Setting up the Dome</translate> | ||
| − | |Step_Content=<translate></translate> | + | |Step_Content=<translate>The design is created to enable both a hydroponic system as well as vegetables that need to grow with soil. As the structure was designed to alleviate concerns with the rapid rate of urbanisation and expansion in years to come, the design was envisioned to be installed on cement or in a garden. |
| − | |Step_Picture_00= | + | |
| + | |||
| + | As you can see in the second illustration provided, plants can be placed in soil in containers in the centre and around the base of the structure surrounding the hydroponic systems.</translate> | ||
| + | |Step_Picture_00=Nutridome_I_SDG_11_I_South_Africa_Nutripod_with_Potatoes.png | ||
|Step_Picture_01=Nutridome_I_SDG_11_I_South_Africa_Dome_22.jpg | |Step_Picture_01=Nutridome_I_SDG_11_I_South_Africa_Dome_22.jpg | ||
}} | }} | ||
{{Tuto Step | {{Tuto Step | ||
|Step_Title=<translate>Setting up the plants in the hydroponic system</translate> | |Step_Title=<translate>Setting up the plants in the hydroponic system</translate> | ||
| − | |Step_Content=<translate></translate> | + | |Step_Content=<translate>In this step, the above steps were combined and the plants were placed into each tube with the roots left to dangle inside the PVC piping system. No soil is left around the plants and the roots are only supported by coconut husk. |
| + | |||
| + | |||
| + | The roots then feed off of plant nutrient water and without the soil, produce yields are at high rates and the oxygen flow is strong. | ||
| + | |||
| + | Once the plants are fitted into the piping, place the vertical gardens into the dome structure, the idea being, 1 / 2 vertical gardens for each triangle providing 8 / 16 hydroponic structures.</translate> | ||
|Step_Picture_00=Nutridome_I_SDG_11_I_South_Africa_plant_set_up_1.jpeg | |Step_Picture_00=Nutridome_I_SDG_11_I_South_Africa_plant_set_up_1.jpeg | ||
|Step_Picture_01=Nutridome_I_SDG_11_I_South_Africa_plant_set_up_2.jpeg | |Step_Picture_01=Nutridome_I_SDG_11_I_South_Africa_plant_set_up_2.jpeg | ||
|Step_Picture_02=Nutridome_I_SDG_11_I_South_Africa_plant_set_up_3.jpeg | |Step_Picture_02=Nutridome_I_SDG_11_I_South_Africa_plant_set_up_3.jpeg | ||
| + | }} | ||
| + | {{Tuto Step | ||
| + | |Step_Title=<translate>Why consider a hydroponic system</translate> | ||
| + | |Step_Content=<translate>==== How you will benefit from the system ==== | ||
| + | '''Water saving''' | ||
| + | |||
| + | more efficient farming is needed with under 1% fresh water available globally | ||
| + | |||
| + | Lowers the consumers costs | ||
| + | |||
| + | |||
| + | '''No soil''' | ||
| + | |||
| + | More attainable for urban living | ||
| + | |||
| + | More efficient on water usage without soil | ||
| + | |||
| + | |||
| + | '''General Benefits''' | ||
| + | <br /> | ||
| + | |||
| + | * Fast growth | ||
| + | * Quick yields | ||
| + | * Less disease | ||
| + | * Less pesticides | ||
| + | * Less plastic usage | ||
| + | * Higher yields | ||
| + | * Affordable | ||
| + | * Less food transportation | ||
| + | * More nutrients for the consumer | ||
| + | * Educational within self sustaining food chain</translate> | ||
| + | |Step_Picture_00=Nutridome_I_SDG_11_I_South_Africa_Upload_me.jpg | ||
}} | }} | ||
{{Notes | {{Notes | ||
| Ligne 56 : | Ligne 118 : | ||
}} | }} | ||
{{Tuto Status | {{Tuto Status | ||
| − | |Complete= | + | |Complete=Published |
}} | }} | ||
Version actuelle datée du 13 décembre 2020 à 17:02
Introduction
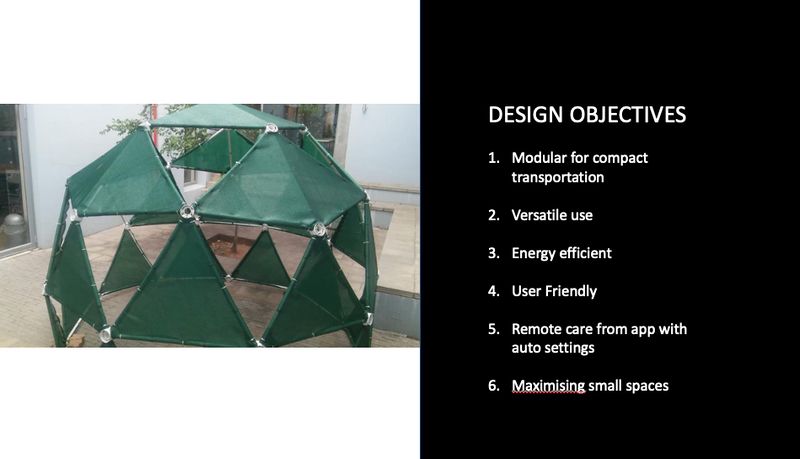
The prototype considers SDG 11's call by the United Nations. The project speaks to being self efficient in urban environments by enabling urban living with with the ability and ease of use and use of a 'smart vegetable garden. The idea is for the user to self sustain their families through the use of a compact hybrid hydroponic greenhouse structure which produces high yields, provides nutritious foods and reduces transportation of food produce.
Étape 1 - Linking the LED Lighting
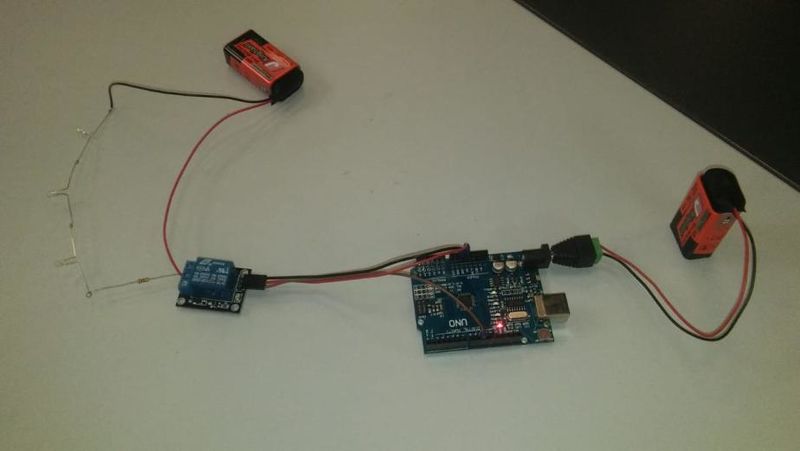
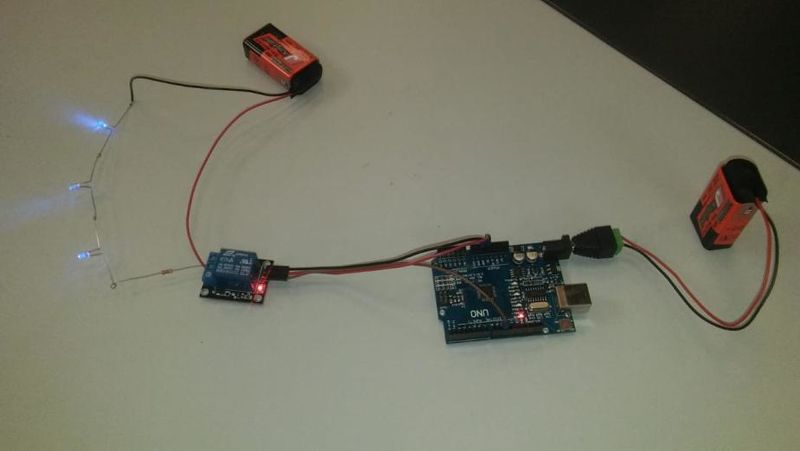
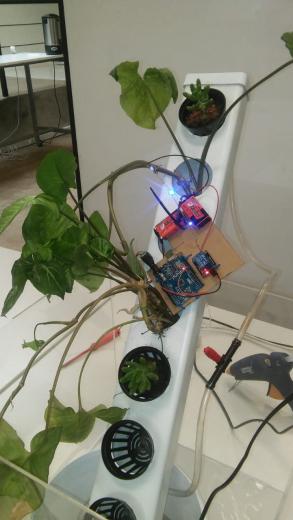
We used 3 LED lights because we only had 9V batteries. This forced us to have an external power source that could cope with those power needs. To deal with 9V we decided to use a relay as a magnetic switch because the Arduino can only handle 5V and this is where the relay helped us. The Arduino code was written to play on a loop since we didn't have the required modules to communicate with the system.
The concept was created for the South African climate which has wonderful sunlight. The LED system is designed to be cost effective on resources and created as a back up where sunlight is not sufficient for plant growth.
Étape 2 - Creating Hydroponic Pump System
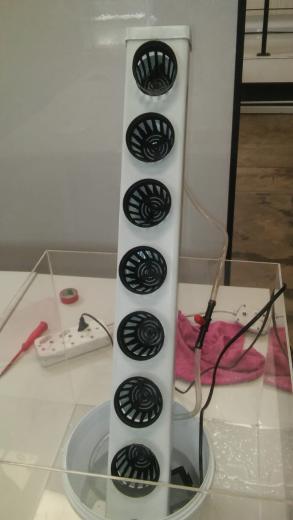
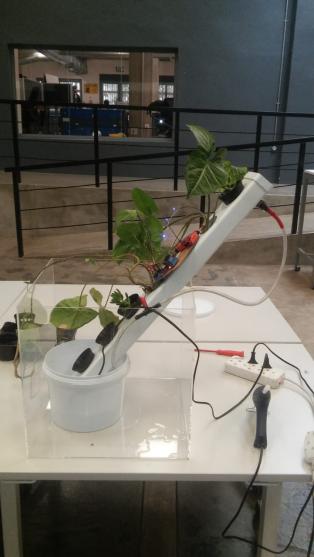
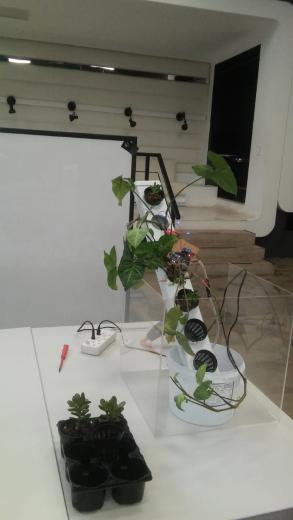
This is a prototype illustration of the concept here is on a smaller scale. The dome design is capable of housing hydroponic vertical PVC piping 5ft tall.
Start off by drilling five holes that are 50mm apart. Drill holes that will be space for our cups, cut the cup space to your satisfaction because you must consider the depth of the pipe ensuring that water reaches the plant . SEAL both ends of the PVC pipe making sure that they are water proof sealing with silicon. Next Drill two more holes one at the bottom for the water inflow from the pump. Next drill a hole at the bottom of the cup where the water will seep out again in the bucket.
Étape 3 - Creating the Shell Structure
This is a PVC pipe that has been drilled with holes we were going to use disposable plastic cups but we found some plastic growing cups in the store room and we used those. for this demonstration we are using an ordinary aquarium pump and pipes for the water flow. The bucket is just a normal bucket.
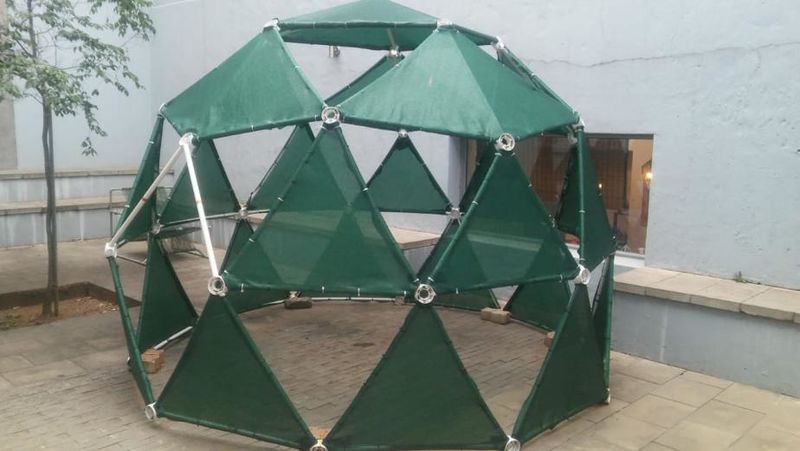
The dome was made from 25mm PVC electrical wiring pipes. The dome was inspiration for the idea as we saw it at the Centre and realised its potential. the PVC pipes are held together with cable ties, glue and connectors.
The shading is normal garden shade and plastic sheeting can be placed over the structure to create more controlled environments. This will be when you have put the hydroponic system with lighting inside the dome we just wanted to illustrate the look for the final product of the dome.
Étape 4 - Setting up the Dome
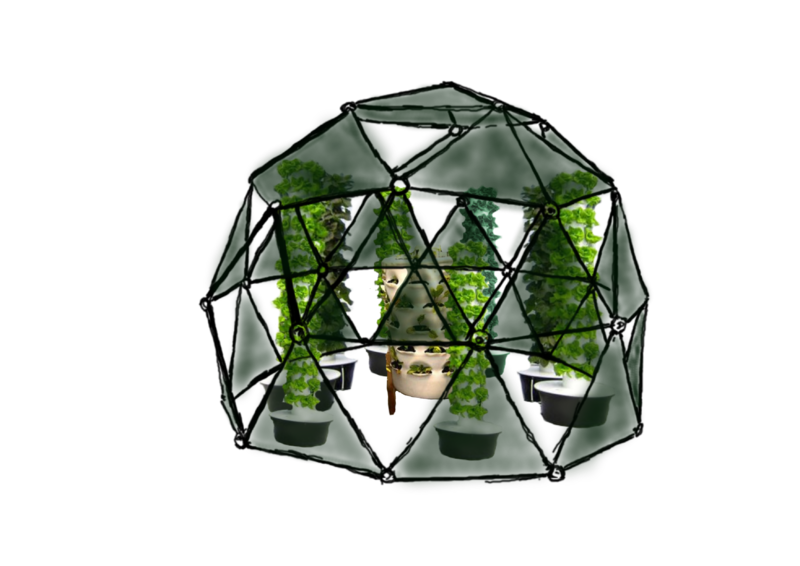
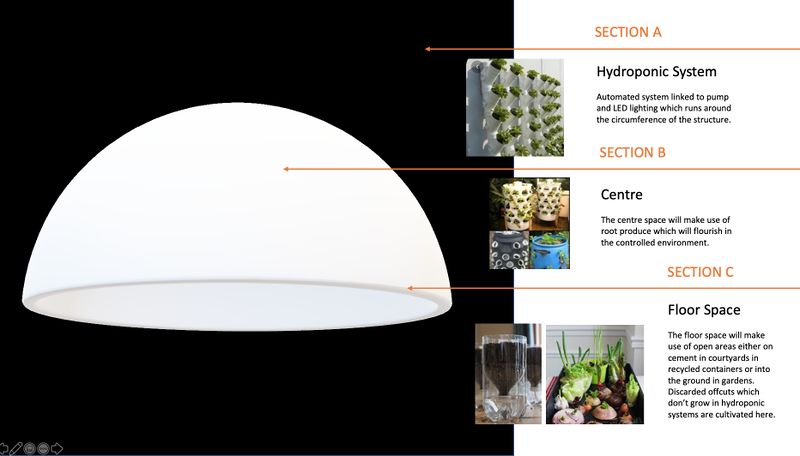
The design is created to enable both a hydroponic system as well as vegetables that need to grow with soil. As the structure was designed to alleviate concerns with the rapid rate of urbanisation and expansion in years to come, the design was envisioned to be installed on cement or in a garden.
As you can see in the second illustration provided, plants can be placed in soil in containers in the centre and around the base of the structure surrounding the hydroponic systems.
Étape 5 - Setting up the plants in the hydroponic system
In this step, the above steps were combined and the plants were placed into each tube with the roots left to dangle inside the PVC piping system. No soil is left around the plants and the roots are only supported by coconut husk.
The roots then feed off of plant nutrient water and without the soil, produce yields are at high rates and the oxygen flow is strong.
Once the plants are fitted into the piping, place the vertical gardens into the dome structure, the idea being, 1 / 2 vertical gardens for each triangle providing 8 / 16 hydroponic structures.
Étape 6 - Why consider a hydroponic system
How you will benefit from the system
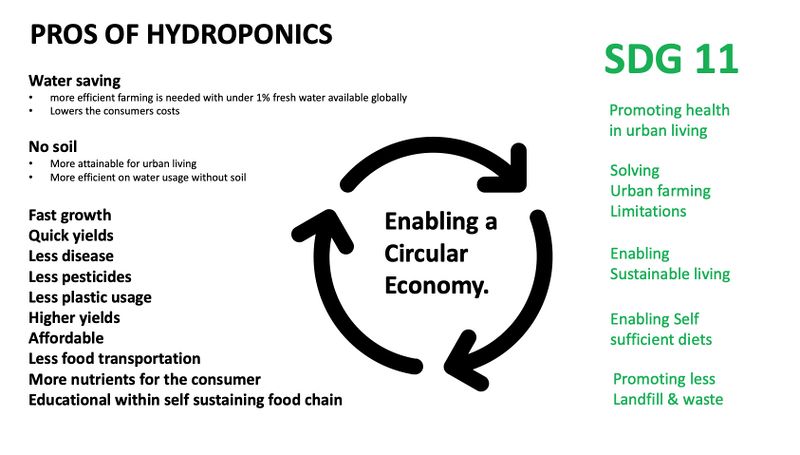
Water saving
more efficient farming is needed with under 1% fresh water available globally
Lowers the consumers costs
No soil
More attainable for urban living
More efficient on water usage without soil
General Benefits
- Fast growth
- Quick yields
- Less disease
- Less pesticides
- Less plastic usage
- Higher yields
- Affordable
- Less food transportation
- More nutrients for the consumer
- Educational within self sustaining food chain
Published
 Français
 English
 Deutsch
 Español
 Italiano
 Português