| Ligne 151 : | Ligne 151 : | ||
{{Info|Text=Si vous cochez "Ajouter les pages que je modifie à ma liste de suivi" dans l'onglet "Liste de suivi" de vos préférences utilisateur, alors la boîte "Suivre cette page " sera sélectionnée par défaut quand vous modifiez des pages. }} | {{Info|Text=Si vous cochez "Ajouter les pages que je modifie à ma liste de suivi" dans l'onglet "Liste de suivi" de vos préférences utilisateur, alors la boîte "Suivre cette page " sera sélectionnée par défaut quand vous modifiez des pages. }} | ||
| − | <h3> | + | <h3>Notification par courriel</h3> |
Watching a tutorial allows you to receive e-mail notification of changes to it. To enable this feature, select "Email me when a page or file on my watchlist is changed" at Special:Preferences. (Currently, it is not possible to limit email notifications by page – you will receive notification when any page on your watchlist is changed.) | Watching a tutorial allows you to receive e-mail notification of changes to it. To enable this feature, select "Email me when a page or file on my watchlist is changed" at Special:Preferences. (Currently, it is not possible to limit email notifications by page – you will receive notification when any page on your watchlist is changed.) | ||
Version du 18 juin 2018 à 15:22
Premiers pas
Temps de lecture : 6 min
1. Créer un tutoriel
Tout le monde peut créer un projet, et tout le monde peut aussi modifier un tutoriel existant pour l'améliorer. Un tutoriel se compose de plusieurs étapes, avec des la liste des outils et matériaux nécessaires, les instructions, des fichiers et des images - tout ce qu'il faut pour saisir le projet. Avec Wikifab, il est facile d'ajouter, de déplacer ou de supprimer des étapes.
To create a tutorial
1. Dans le coin en haut à droite, cliquer sur le bouton "Créer un tutoriel".
2. Donner un titre au projet, puis cliquer sur "Créer".
3. Rédiger un courte description en moins de 75 caractères.
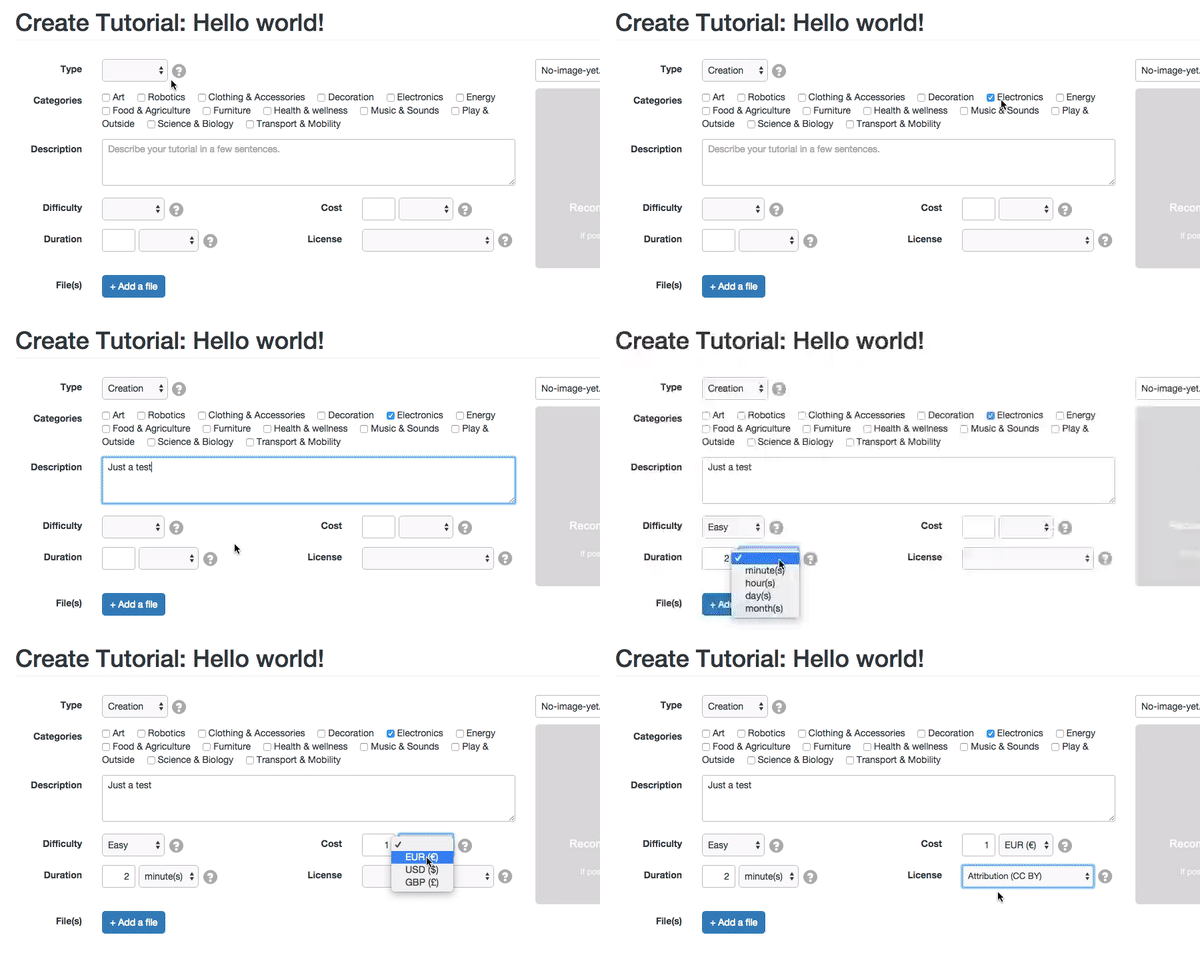
4. Remplir les informations (Type, Catégories, Difficulté, Durée, Coût et Licence)
Modifier un tutoriel
1. Cliquer sur l'onglet "Modifier" en haut de la page.
2. Faire les modifications nécessaires.
3. Cliquer sur "Enregistrer".
Les modifications apportées au tutoriel apparaisse maintenant dans la section "Historique des versions", accessible en cliquant sur l'onglet "Historique" en haut de la page.
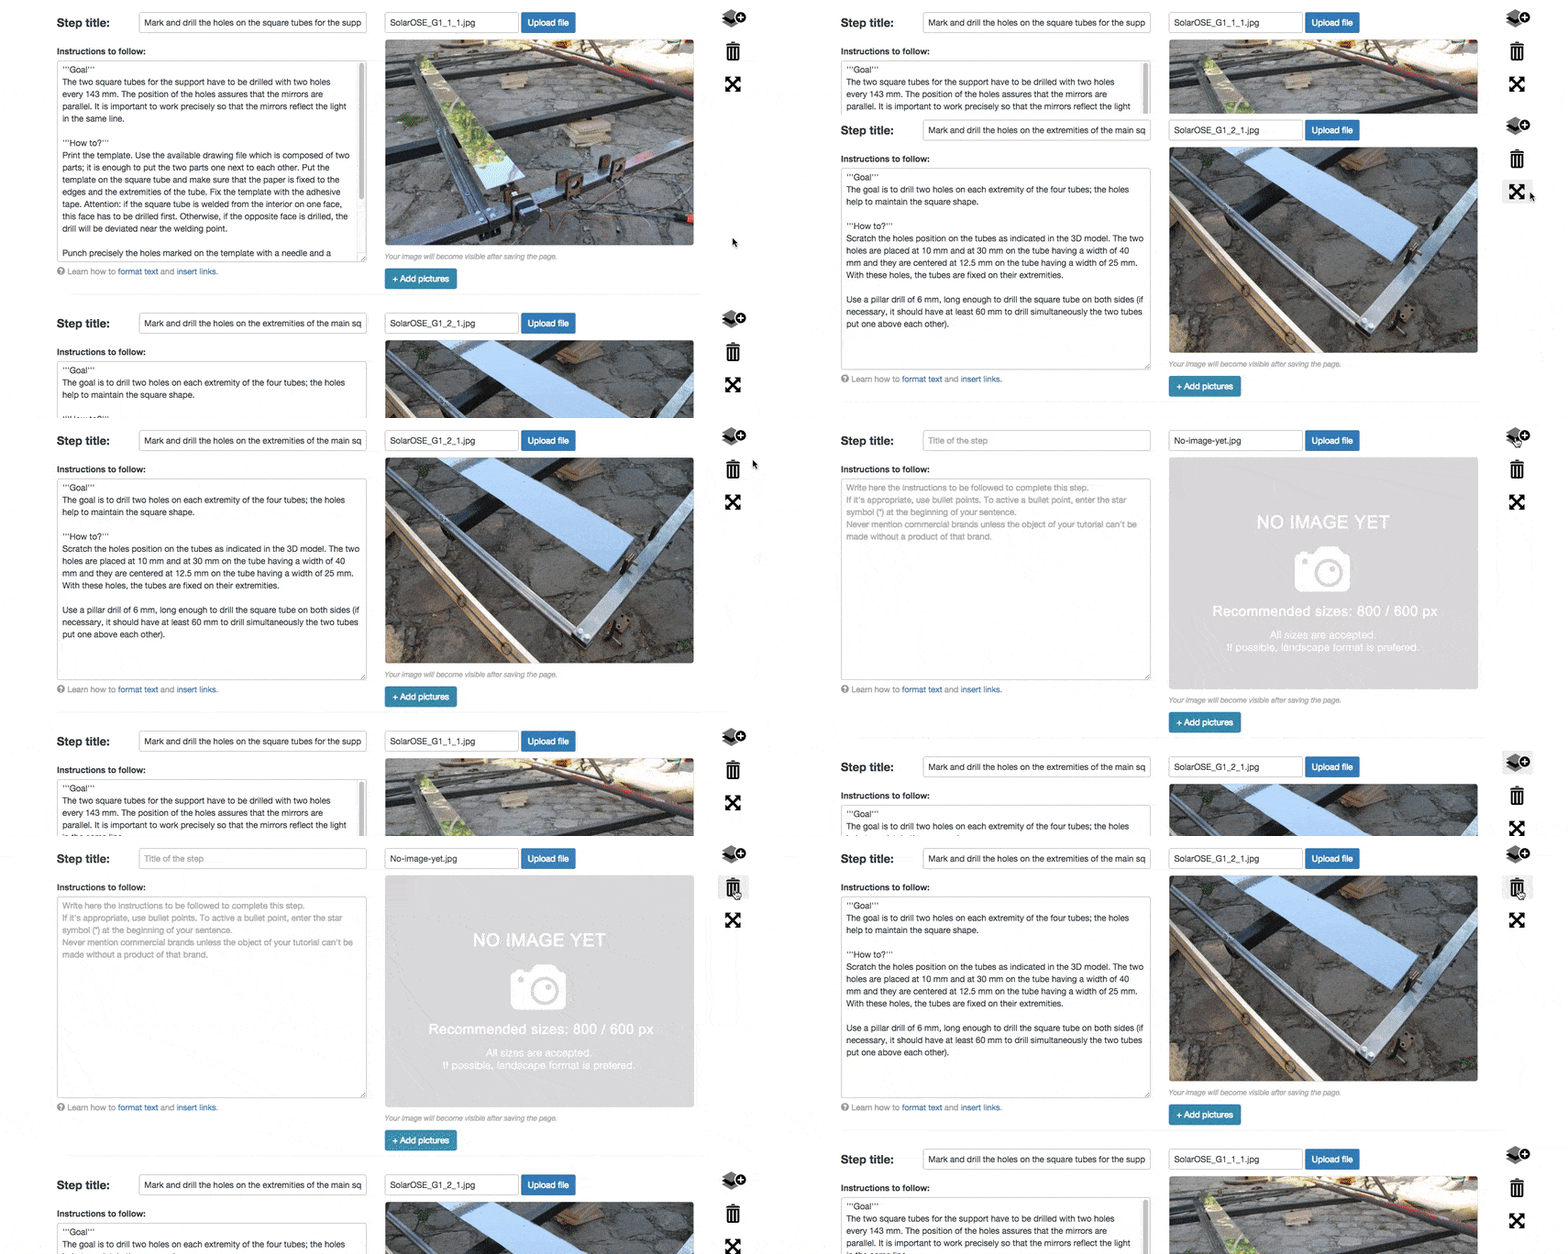
2. Déplacer, supprimer ou ajouter une étape.
Bouger simplement une étape (tenir cliqué, bouger, lâcher). Supprimer ou ajouter une étape au-dessus avec les 2 icônes à droite de la boîte d'explication.
3. Format du texte
Il est très simple d'ajouter du contenu à un wiki - il suffit de connaître quelques bases de la syntax wiki. Qu'est-ce que la syntax wiki ? C'est un ensemble de commandes qui sert à formater un wiki. Pas de panique; Pas besoin d'être un crack en informatique pour l'utiliser. Avec un peu de pratique, la syntax wiki sera rapidement une évidence pour vous.
Voici une liste des commandes de base dont vous aurez besoin pour écrire votre propre wiki.
Text formatting markup×
| Description | You type | You get |
|---|---|---|
| Bullet points | * |
|
| Bold text | '''Bold''' |
Bold |
| Italic text | ''Italic'' |
Italic |
| Strike text | <s>Strike text</s> |
|
| Underline text | <u>Underline text</u> |
Underline text |
Inserting help icons
| Description | You type | You get |
|---|---|---|
| Internal link | [[Main Page]] |
Main Page |
| Internal link with different label | [[Main Page|different text]] |
different text |
| External link | http://wikipedia.org |
http://wikipedia.org |
| External link with different label | [http://wikipedia.org Link to Wikipedia] |
Link to Wikipedia |
4. Liste de suivi
Suivre un tutoriel signifie que les modifications apportées à ce tutoriel ou à sa page de discussion seront notifiées dans votre Liste de tutoriel (Spécial:Liste_de_suivi). Les actions sur la page, comme son renommage, sa suppression, sa protection, apparaissent aussi sur la liste de suivi. Par exemple, si vous suivez un tutoriel qui n'a pas encore de page de discussion, vous aurez une notification sur votre Liste de suivi quand quelqu'un créé cette page de discussion.
Ajouter un tutoriel à votre page de discussion
Pour contrôler quel tutoriel vous suivez, lorsque vous modifiez un tutoriel, cocher ou décocher "Suivre cette page" au moment d'enregistrer (à gauche du bouton "Cochez cette case si vous considérez ce tutoriel terminé").
Notification par courriel
Watching a tutorial allows you to receive e-mail notification of changes to it. To enable this feature, select "Email me when a page or file on my watchlist is changed" at Special:Preferences. (Currently, it is not possible to limit email notifications by page – you will receive notification when any page on your watchlist is changed.)
5. Using a history page
The page history shows all past changes to the tutorial listed in reverse-chronological order, including the date and time (in UTC) of each edit, the username or IP address of the user who made it, and their edit summary.
View history and compare
- To view a specific version, click a date.
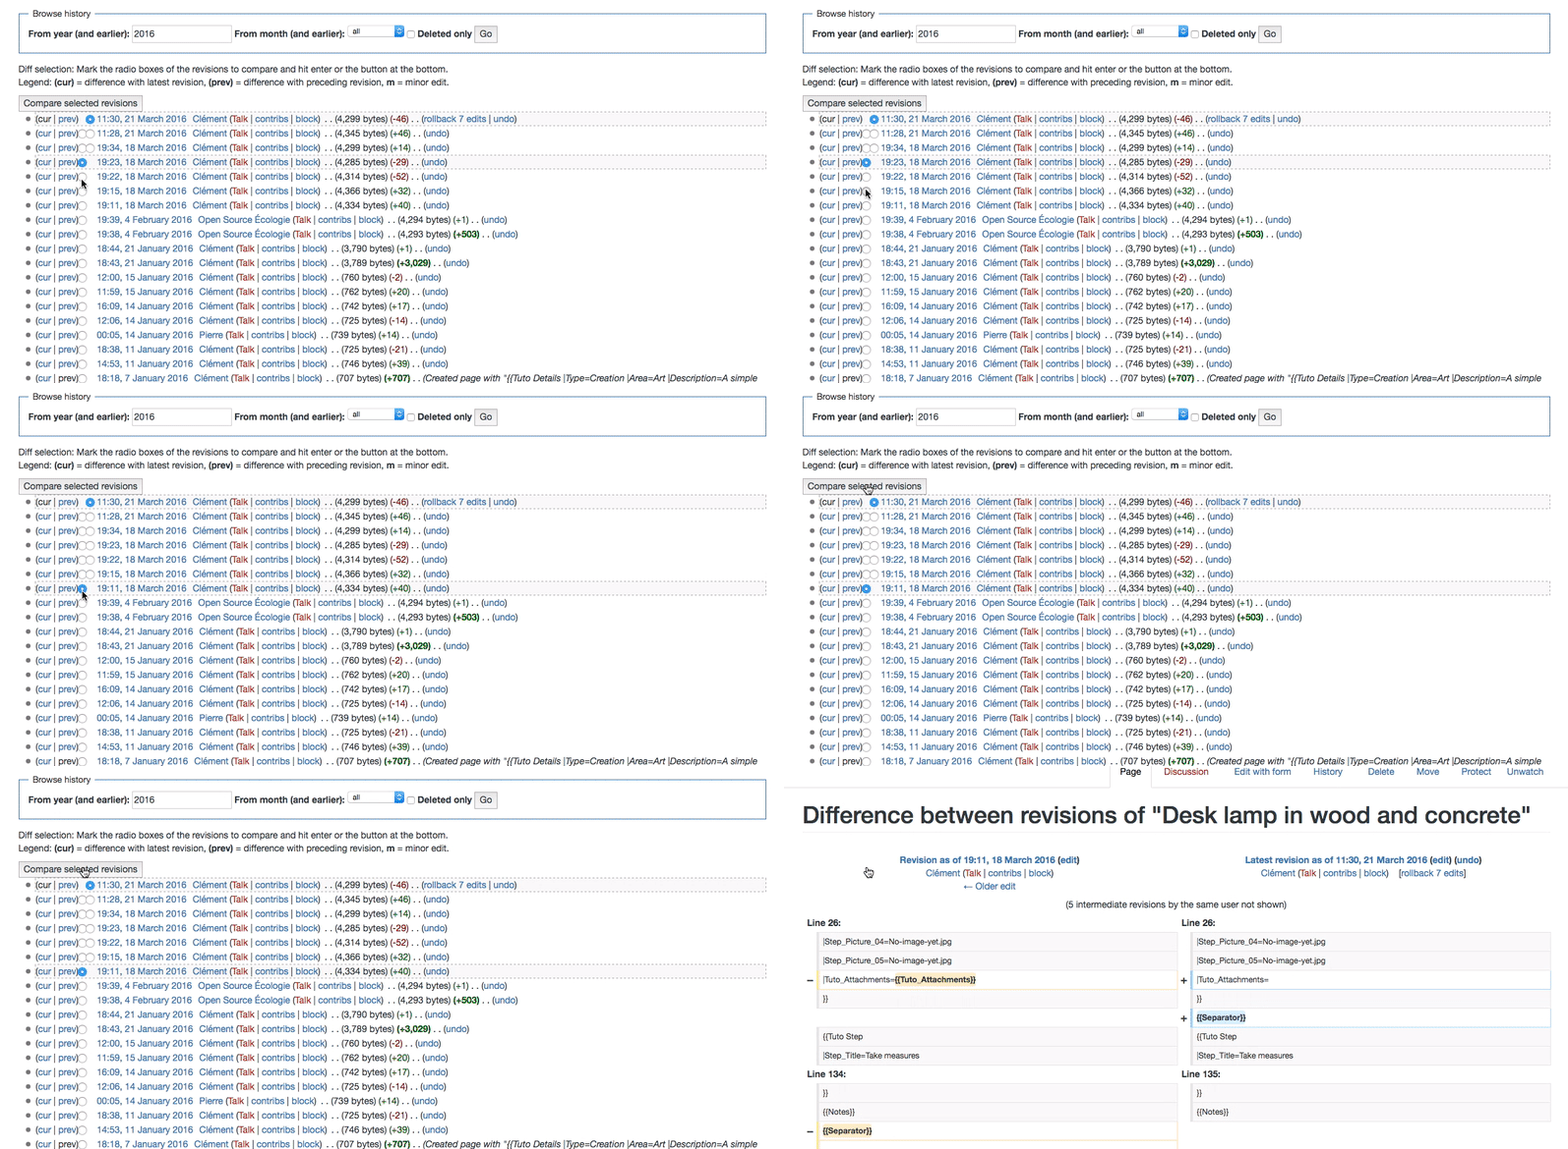
- To compare an old version with the current version, go to the old version, click cur.
- To compare a version with its predecessor, click prev.
- To compare two specific versions, click the left-column radio button of the older version and the right-column radio button of the newer version, and then click the "Compare selected versions" button.
It is possible to restore an old version of a tutorial by following the link to that version, clicking "edit" and then saving. This should be done with caution, as it means that all changes made to the tutorial since the time of that version will be lost.
Undo changes
Wikifab sometimes enables editors to easily revert (undo) changes from the history of a tutorial, without simultaneously undoing all constructive changes that have been made since. This feature removes the need to manually redo useful changes that were made after the edit that is being reverted.
1. View the page history or the diff for the edit
2. Click on "undo" next to the edit in question
The Wikifab software will attempt to create an edit page with a version of the tutorial in which the undesirable edit has been removed, but all later edits are retained.
It is also possible to undo several consecutive edits, even if they conflict among themselves: view the "diff" to be removed (by selecting the earliest and most recent revisions in the history and clicking "compare selected revisions"), and click the "undo" link.


 Français
 English
 Deutsch
 Español
 Italiano
 Português