(Mise à jour pour être en accord avec la nouvelle version de la source de la page) |
(update property name) |
||
| Ligne 1 : | Ligne 1 : | ||
| − | {{ | + | {{Tuto Details |
|Main_Picture=Montaje_P3steel_-_Tutorial_1_-_Estructura_y_eje_Y_Tutorial_1_Portada.jpg | |Main_Picture=Montaje_P3steel_-_Tutorial_1_-_Estructura_y_eje_Y_Tutorial_1_Portada.jpg | ||
|Licences=Attribution (CC BY) | |Licences=Attribution (CC BY) | ||
| Ligne 14 : | Ligne 14 : | ||
|IsTranslation=1 | |IsTranslation=1 | ||
}} | }} | ||
| − | {{ | + | {{Introduction |
|Introduction=Este es el primer tutorial de la impresora 3DSteel, en el que vamos a montar la estructura de la misma y el eje Y. | |Introduction=Este es el primer tutorial de la impresora 3DSteel, en el que vamos a montar la estructura de la misma y el eje Y. | ||
| Ligne 28 : | Ligne 28 : | ||
[https://www.hta3d.com/3dsteel www.hta3d.com/3dsteel] | [https://www.hta3d.com/3dsteel www.hta3d.com/3dsteel] | ||
}} | }} | ||
| − | {{ | + | {{Materials |
|Step_Picture_00=Montaje_P3steel_-_Tutorial_1_-_Estructura_y_eje_Y_aviso_peligro_5_5-4.jpg | |Step_Picture_00=Montaje_P3steel_-_Tutorial_1_-_Estructura_y_eje_Y_aviso_peligro_5_5-4.jpg | ||
|Material=Tornillería: | |Material=Tornillería: | ||
| Ligne 73 : | Ligne 73 : | ||
* Mazo de goma | * Mazo de goma | ||
}} | }} | ||
| − | {{ | + | {{Separator}} |
| − | {{ | + | {{Tuto Step |
|Step_Title=Soporte de los motores del eje Z | |Step_Title=Soporte de los motores del eje Z | ||
|Step_Content=Empezamos por los soportes para los motores del eje Z. Hay que montar dos conjuntos, uno para el motor derecho y otro para el izquierdo. | |Step_Content=Empezamos por los soportes para los motores del eje Z. Hay que montar dos conjuntos, uno para el motor derecho y otro para el izquierdo. | ||
| Ligne 95 : | Ligne 95 : | ||
|Step_Picture_01_annotation={"version":"2.4.1","objects":[{"type":"wfarrow2circle","version":"2.4.1","originX":"center","originY":"center","left":124,"top":153,"width":16,"height":16,"fill":"#aaa","stroke":"#666","strokeWidth":0,"strokeDashArray":null,"strokeLineCap":"butt","strokeLineJoin":"miter","strokeMiterLimit":4,"scaleX":1,"scaleY":1,"angle":0,"flipX":false,"flipY":false,"opacity":0.5,"shadow":null,"visible":true,"clipTo":null,"backgroundColor":"","fillRule":"nonzero","paintFirst":"fill","globalCompositeOperation":"source-over","transformMatrix":null,"skewX":0,"skewY":0,"radius":8,"startAngle":0,"endAngle":6.283185307179586},{"type":"wfarrow2circle","version":"2.4.1","originX":"center","originY":"center","left":228,"top":237,"width":16,"height":16,"fill":"#aaa","stroke":"#666","strokeWidth":0,"strokeDashArray":null,"strokeLineCap":"butt","strokeLineJoin":"miter","strokeMiterLimit":4,"scaleX":1,"scaleY":1,"angle":0,"flipX":false,"flipY":false,"opacity":0.5,"shadow":null,"visible":true,"clipTo":null,"backgroundColor":"","fillRule":"nonzero","paintFirst":"fill","globalCompositeOperation":"source-over","transformMatrix":null,"skewX":0,"skewY":0,"radius":8,"startAngle":0,"endAngle":6.283185307179586},{"type":"wfarrow2line","version":"2.4.1","originX":"center","originY":"center","left":176,"top":195,"width":104,"height":84,"fill":"rgba(255,0,0,0)","stroke":"blue","strokeWidth":3,"strokeDashArray":null,"strokeLineCap":"butt","strokeLineJoin":"miter","strokeMiterLimit":4,"scaleX":1,"scaleY":1,"angle":0,"flipX":false,"flipY":false,"opacity":1,"shadow":null,"visible":true,"clipTo":null,"backgroundColor":"","fillRule":"nonzero","paintFirst":"fill","globalCompositeOperation":"source-over","transformMatrix":null,"skewX":0,"skewY":0,"x1":-52,"x2":52,"y1":-42,"y2":42,"x2a":43.47256783238228,"y2a":28.68523749266707,"x2b":37.18919676150607,"y2b":36.46464929470429}],"height":600,"width":600} | |Step_Picture_01_annotation={"version":"2.4.1","objects":[{"type":"wfarrow2circle","version":"2.4.1","originX":"center","originY":"center","left":124,"top":153,"width":16,"height":16,"fill":"#aaa","stroke":"#666","strokeWidth":0,"strokeDashArray":null,"strokeLineCap":"butt","strokeLineJoin":"miter","strokeMiterLimit":4,"scaleX":1,"scaleY":1,"angle":0,"flipX":false,"flipY":false,"opacity":0.5,"shadow":null,"visible":true,"clipTo":null,"backgroundColor":"","fillRule":"nonzero","paintFirst":"fill","globalCompositeOperation":"source-over","transformMatrix":null,"skewX":0,"skewY":0,"radius":8,"startAngle":0,"endAngle":6.283185307179586},{"type":"wfarrow2circle","version":"2.4.1","originX":"center","originY":"center","left":228,"top":237,"width":16,"height":16,"fill":"#aaa","stroke":"#666","strokeWidth":0,"strokeDashArray":null,"strokeLineCap":"butt","strokeLineJoin":"miter","strokeMiterLimit":4,"scaleX":1,"scaleY":1,"angle":0,"flipX":false,"flipY":false,"opacity":0.5,"shadow":null,"visible":true,"clipTo":null,"backgroundColor":"","fillRule":"nonzero","paintFirst":"fill","globalCompositeOperation":"source-over","transformMatrix":null,"skewX":0,"skewY":0,"radius":8,"startAngle":0,"endAngle":6.283185307179586},{"type":"wfarrow2line","version":"2.4.1","originX":"center","originY":"center","left":176,"top":195,"width":104,"height":84,"fill":"rgba(255,0,0,0)","stroke":"blue","strokeWidth":3,"strokeDashArray":null,"strokeLineCap":"butt","strokeLineJoin":"miter","strokeMiterLimit":4,"scaleX":1,"scaleY":1,"angle":0,"flipX":false,"flipY":false,"opacity":1,"shadow":null,"visible":true,"clipTo":null,"backgroundColor":"","fillRule":"nonzero","paintFirst":"fill","globalCompositeOperation":"source-over","transformMatrix":null,"skewX":0,"skewY":0,"x1":-52,"x2":52,"y1":-42,"y2":42,"x2a":43.47256783238228,"y2a":28.68523749266707,"x2b":37.18919676150607,"y2b":36.46464929470429}],"height":600,"width":600} | ||
}} | }} | ||
| − | {{ | + | {{Tuto Step |
|Step_Title=Polea/tensor del eje Y | |Step_Title=Polea/tensor del eje Y | ||
|Step_Content=Vamos a montar el frontal del marco con el tensor del eje Y. Empezamos por el tensor: | |Step_Content=Vamos a montar el frontal del marco con el tensor del eje Y. Empezamos por el tensor: | ||
| Ligne 115 : | Ligne 115 : | ||
|Step_Picture_01=Montaje_P3steel_-_Tutorial_1_-_Estructura_y_eje_Y_2-a.jpg | |Step_Picture_01=Montaje_P3steel_-_Tutorial_1_-_Estructura_y_eje_Y_2-a.jpg | ||
}} | }} | ||
| − | {{ | + | {{Tuto Step |
|Step_Title=Fijación del tensor del eje Y al frontal del marco | |Step_Title=Fijación del tensor del eje Y al frontal del marco | ||
|Step_Content=Vamos a fijar el conjunto que acabamos de montar al frontal. | |Step_Content=Vamos a fijar el conjunto que acabamos de montar al frontal. | ||
| Ligne 131 : | Ligne 131 : | ||
|Step_Picture_01=Montaje_P3steel_-_Tutorial_1_-_Estructura_y_eje_Y_3-a.jpg | |Step_Picture_01=Montaje_P3steel_-_Tutorial_1_-_Estructura_y_eje_Y_3-a.jpg | ||
}} | }} | ||
| − | {{ | + | {{Tuto Step |
|Step_Title=Paso 4 - Soporte del motor del deje Y | |Step_Title=Paso 4 - Soporte del motor del deje Y | ||
|Step_Content=<big>Componentes:</big> | |Step_Content=<big>Componentes:</big> | ||
| Ligne 159 : | Ligne 159 : | ||
|Step_Picture_01_annotation={"version":"2.4.1","objects":[],"height":429,"width":600} | |Step_Picture_01_annotation={"version":"2.4.1","objects":[],"height":429,"width":600} | ||
}} | }} | ||
| − | {{ | + | {{Tuto Step |
|Step_Title=Fijación del motor del eje Y a la parte trasera del marco | |Step_Title=Fijación del motor del eje Y a la parte trasera del marco | ||
|Step_Content=Ahora vamos a fijar este conjunto a la parte trasera del eje Y. | |Step_Content=Ahora vamos a fijar este conjunto a la parte trasera del eje Y. | ||
| Ligne 175 : | Ligne 175 : | ||
|Step_Picture_01=Montaje_P3steel_-_Tutorial_1_-_Estructura_y_eje_Y_4-a.jpg | |Step_Picture_01=Montaje_P3steel_-_Tutorial_1_-_Estructura_y_eje_Y_4-a.jpg | ||
}} | }} | ||
| − | {{ | + | {{Tuto Step |
|Step_Title=Colocación del soporte de correa del eje Y en carro | |Step_Title=Colocación del soporte de correa del eje Y en carro | ||
|Step_Content=Vamos a preparar el carro del eje Y. Empezamos por el soporte para la correa. Vamos a ver el carro de forma invertida, lo que vemos hacia arriba irá luego montado hacia abajo, ya que es la forma más cómoda para montarlo. | |Step_Content=Vamos a preparar el carro del eje Y. Empezamos por el soporte para la correa. Vamos a ver el carro de forma invertida, lo que vemos hacia arriba irá luego montado hacia abajo, ya que es la forma más cómoda para montarlo. | ||
| Ligne 200 : | Ligne 200 : | ||
|Step_Picture_03=Montaje_P3steel_-_Tutorial_1_-_Estructura_y_eje_Y_8-d.jpg | |Step_Picture_03=Montaje_P3steel_-_Tutorial_1_-_Estructura_y_eje_Y_8-d.jpg | ||
}} | }} | ||
| − | {{ | + | {{Tuto Step |
|Step_Title=Colocación de los rodamientos del eje Y en carro | |Step_Title=Colocación de los rodamientos del eje Y en carro | ||
|Step_Content=<big>Componentes:</big> | |Step_Content=<big>Componentes:</big> | ||
| Ligne 222 : | Ligne 222 : | ||
|Step_Picture_02=Montaje_P3steel_-_Tutorial_1_-_Estructura_y_eje_Y_9-c.jpg | |Step_Picture_02=Montaje_P3steel_-_Tutorial_1_-_Estructura_y_eje_Y_9-c.jpg | ||
}} | }} | ||
| − | {{ | + | {{Tuto Step |
|Step_Title=Marco principal y laterales | |Step_Title=Marco principal y laterales | ||
|Step_Content=Ahora vamos a montar la estructura en sí, utilizando las piezas grandes del marco, a las cuales le iremos añadiendo los subconjuntos montados anteriormente. | |Step_Content=Ahora vamos a montar la estructura en sí, utilizando las piezas grandes del marco, a las cuales le iremos añadiendo los subconjuntos montados anteriormente. | ||
| Ligne 241 : | Ligne 241 : | ||
|Step_Picture_01=Montaje_P3steel_-_Tutorial_1_-_Estructura_y_eje_Y_10-a.jpg | |Step_Picture_01=Montaje_P3steel_-_Tutorial_1_-_Estructura_y_eje_Y_10-a.jpg | ||
}} | }} | ||
| − | {{ | + | {{Tuto Step |
|Step_Title=Refuerzos Marco | |Step_Title=Refuerzos Marco | ||
|Step_Content=<big>Componentes:</big> | |Step_Content=<big>Componentes:</big> | ||
| Ligne 259 : | Ligne 259 : | ||
|Step_Picture_01=Montaje_P3steel_-_Tutorial_1_-_Estructura_y_eje_Y_11-a.jpg | |Step_Picture_01=Montaje_P3steel_-_Tutorial_1_-_Estructura_y_eje_Y_11-a.jpg | ||
}} | }} | ||
| − | {{ | + | {{Tuto Step |
|Step_Title=Soportes motores eje Z en marco principal | |Step_Title=Soportes motores eje Z en marco principal | ||
|Step_Content=<big>Componentes:</big> | |Step_Content=<big>Componentes:</big> | ||
| Ligne 279 : | Ligne 279 : | ||
|Step_Picture_02=Montaje_P3steel_-_Tutorial_1_-_Estrucas.jpg | |Step_Picture_02=Montaje_P3steel_-_Tutorial_1_-_Estrucas.jpg | ||
}} | }} | ||
| − | {{ | + | {{Tuto Step |
|Step_Title=Fijación de la parte trasera del eje Y al frontal del marco | |Step_Title=Fijación de la parte trasera del eje Y al frontal del marco | ||
|Step_Content=<big>Componentes:</big> | |Step_Content=<big>Componentes:</big> | ||
| Ligne 294 : | Ligne 294 : | ||
|Step_Picture_01=Montaje_P3steel_-_Tutorial_1_-_Estructura_y_eje_Y_Tutorial_1_Paso_13_ii.jpg | |Step_Picture_01=Montaje_P3steel_-_Tutorial_1_-_Estructura_y_eje_Y_Tutorial_1_Paso_13_ii.jpg | ||
}} | }} | ||
| − | {{ | + | {{Tuto Step |
|Step_Title=Varillas eje Y | |Step_Title=Varillas eje Y | ||
|Step_Content=Para colocar la parte frontal del eje Y en el marco debemos primero preparar el carro del eje Y y las varillas de este eje. | |Step_Content=Para colocar la parte frontal del eje Y en el marco debemos primero preparar el carro del eje Y y las varillas de este eje. | ||
| Ligne 311 : | Ligne 311 : | ||
|Step_Picture_00=Montaje_P3steel_-_Tutorial_1_-_Estructura_y_eje_Y_8._carro_Y_i.jpg | |Step_Picture_00=Montaje_P3steel_-_Tutorial_1_-_Estructura_y_eje_Y_8._carro_Y_i.jpg | ||
}} | }} | ||
| − | {{ | + | {{Tuto Step |
|Step_Title=Colocación de las varillas y carro en la parte trasera del eje Y | |Step_Title=Colocación de las varillas y carro en la parte trasera del eje Y | ||
|Step_Content=Ahora vamos a colocar el carro en su posición: | |Step_Content=Ahora vamos a colocar el carro en su posición: | ||
| Ligne 322 : | Ligne 322 : | ||
|Step_Picture_00=Montaje_P3steel_-_Tutorial_1_-_Estructura_y_eje_Y_Tutorial_1_Paso_15.jpg | |Step_Picture_00=Montaje_P3steel_-_Tutorial_1_-_Estructura_y_eje_Y_Tutorial_1_Paso_15.jpg | ||
}} | }} | ||
| − | {{ | + | {{Tuto Step |
|Step_Title=Colocación de la parte frontal del eje Y | |Step_Title=Colocación de la parte frontal del eje Y | ||
|Step_Content=<big>Componentes:</big> | |Step_Content=<big>Componentes:</big> | ||
| Ligne 340 : | Ligne 340 : | ||
|Step_Picture_01=Montaje_P3steel_-_Tutorial_1_-_Estructura_y_eje_Y_Tutorial_1_Paso_16_ii.jpg | |Step_Picture_01=Montaje_P3steel_-_Tutorial_1_-_Estructura_y_eje_Y_Tutorial_1_Paso_16_ii.jpg | ||
}} | }} | ||
| − | {{ | + | {{Tuto Step |
|Step_Title=Colocación de la correa | |Step_Title=Colocación de la correa | ||
|Step_Content=<big>Componentes:</big> | |Step_Content=<big>Componentes:</big> | ||
| Ligne 362 : | Ligne 362 : | ||
|Step_Picture_04=Montaje_P3steel_-_Tutorial_1_-_Estructura_y_eje_Y_Marco-y-eje-Y.jpg | |Step_Picture_04=Montaje_P3steel_-_Tutorial_1_-_Estructura_y_eje_Y_Marco-y-eje-Y.jpg | ||
}} | }} | ||
| − | {{ | + | {{Notes |
|Notes= | |Notes= | ||
}} | }} | ||
| − | {{ | + | {{Tuto Status |
|Complete=Published | |Complete=Published | ||
}} | }} | ||
Version du 9 décembre 2019 à 12:44
Montaje 3DSteel - Tutorial 1 - Estructura y eje Y


Difficulté
Facile
Durée
60 minute(s)
Catégories
Machines & Outils
Coût
450 EUR (€)
Sommaire
- 1 Introduction
- 2 Étape 1 - Soporte de los motores del eje Z
- 3 Étape 2 - Polea/tensor del eje Y
- 4 Étape 3 - Fijación del tensor del eje Y al frontal del marco
- 5 Étape 4 - Paso 4 - Soporte del motor del deje Y
- 6 Étape 5 - Fijación del motor del eje Y a la parte trasera del marco
- 7 Étape 6 - Colocación del soporte de correa del eje Y en carro
- 8 Étape 7 - Colocación de los rodamientos del eje Y en carro
- 9 Étape 8 - Marco principal y laterales
- 10 Étape 9 - Refuerzos Marco
- 11 Étape 10 - Soportes motores eje Z en marco principal
- 12 Étape 11 - Fijación de la parte trasera del eje Y al frontal del marco
- 13 Étape 12 - Varillas eje Y
- 14 Étape 13 - Colocación de las varillas y carro en la parte trasera del eje Y
- 15 Étape 14 - Colocación de la parte frontal del eje Y
- 16 Étape 15 - Colocación de la correa
- 17 Commentaires
Introduction
Este es el primer tutorial de la impresora 3DSteel, en el que vamos a montar la estructura de la misma y el eje Y.
Le siguenː
- Tutorial 2 - Eje X, Eje Z y Extrusor
- Tutorial 3 - Cama caliente, Fuente de alimentación y Electrónica
- Tutorial 4 - Puesta a punto
Puedes ver el artículo en nuestra webː

Matériaux
Tornillería:
- M3x8: 2 unidades
- M3x12: 36 unidades
- M3x25: 2 unidades
- M3x30: 4 unidades
- M4x25: 1 unidad
- Tuercas autoblocantes M3: 40 unidades
- Tuerca autoblocante M4: 1 unidad
- Arandelas autoblocantes M3: 4 unidades
- Arandelas M4: 2 unidades
Piezas impresas:
- Separadores para el motor de Y
- Soporte para la correa del eje Y
- Soporte para los rodamientos del eje Y
Piezas de la estructura:
- Marco principal
- Laterales
- Refuerzo marco
- Frontal y trasera del eje Y
- Piezas para tensor del eje Y
- Piezas para el motor del eje Y
- Piezas para los motores el eje Z
- Varillas lisas D=8 L=350 mm: dos unidades
Otros:
- Rodamiento F624zz: 2 unidades
- Rodamientos lineales LM8UU: 4 unidades
- Motor Nema 17: 1 unidad
- Polea GT2 20 dientes: 1 unidad
- Correa GT2: 1 metro aprox.
Outils
- Destornillador allen para M3
- Destornillador allen para M4
- Llave allen para espárragos de la polea
- Tenacillas
- Tijeras o tenacillas de corte
- Mazo de goma
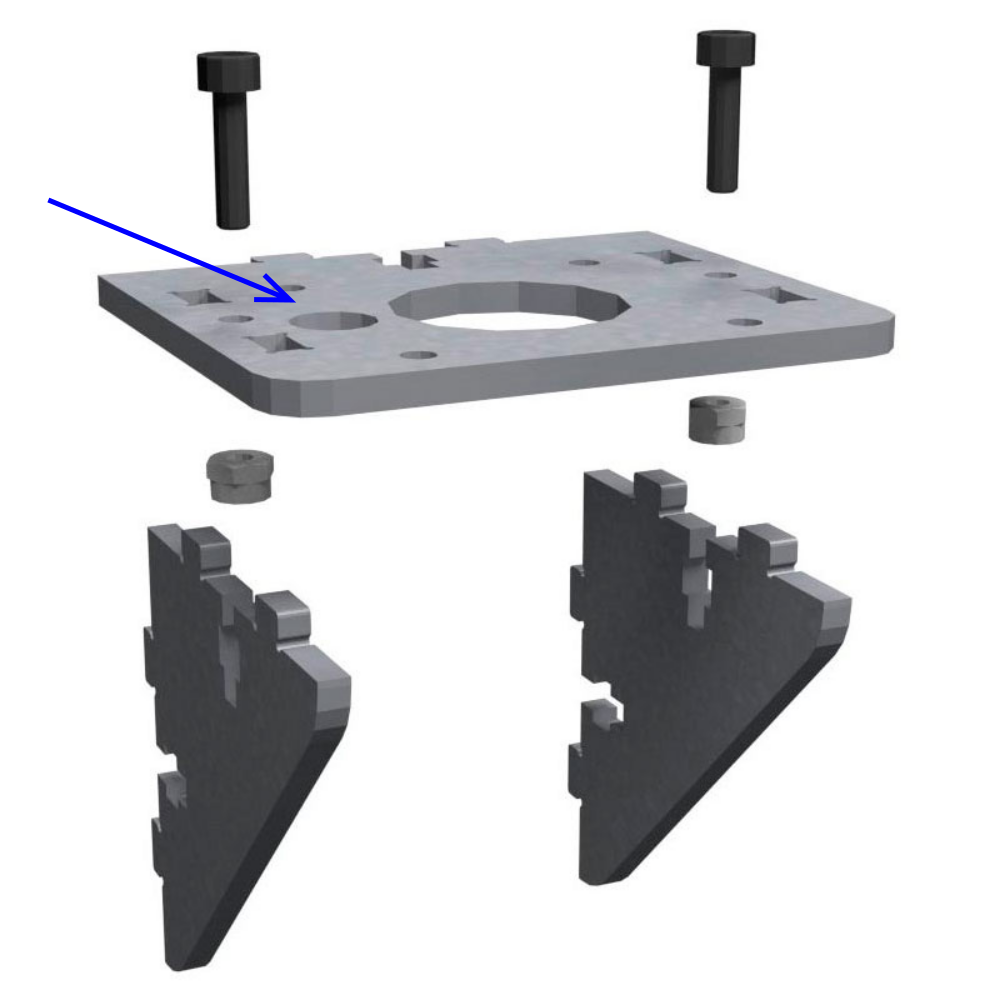
Étape 1 - Soporte de los motores del eje Z
Empezamos por los soportes para los motores del eje Z. Hay que montar dos conjuntos, uno para el motor derecho y otro para el izquierdo.
Componentes:
- Piezas metálicas
- 4 tornillos M3x12 (2 por conjunto)
- 4 tuercas autoblocantes de M3 (2 por conjunto)
Montaje:
- Introducimos los tornillos en los orificios correspondientes de la pieza rectangular y atornillamos ligeramente las tuercas.
- Una vez sujetas las tuercas al tornillo, colocamos los refuerzos triangulares y apretamos ligeramente los tornillos, para que nos permita colocar el conjunto sobre el marco principal en el paso correspondiente.
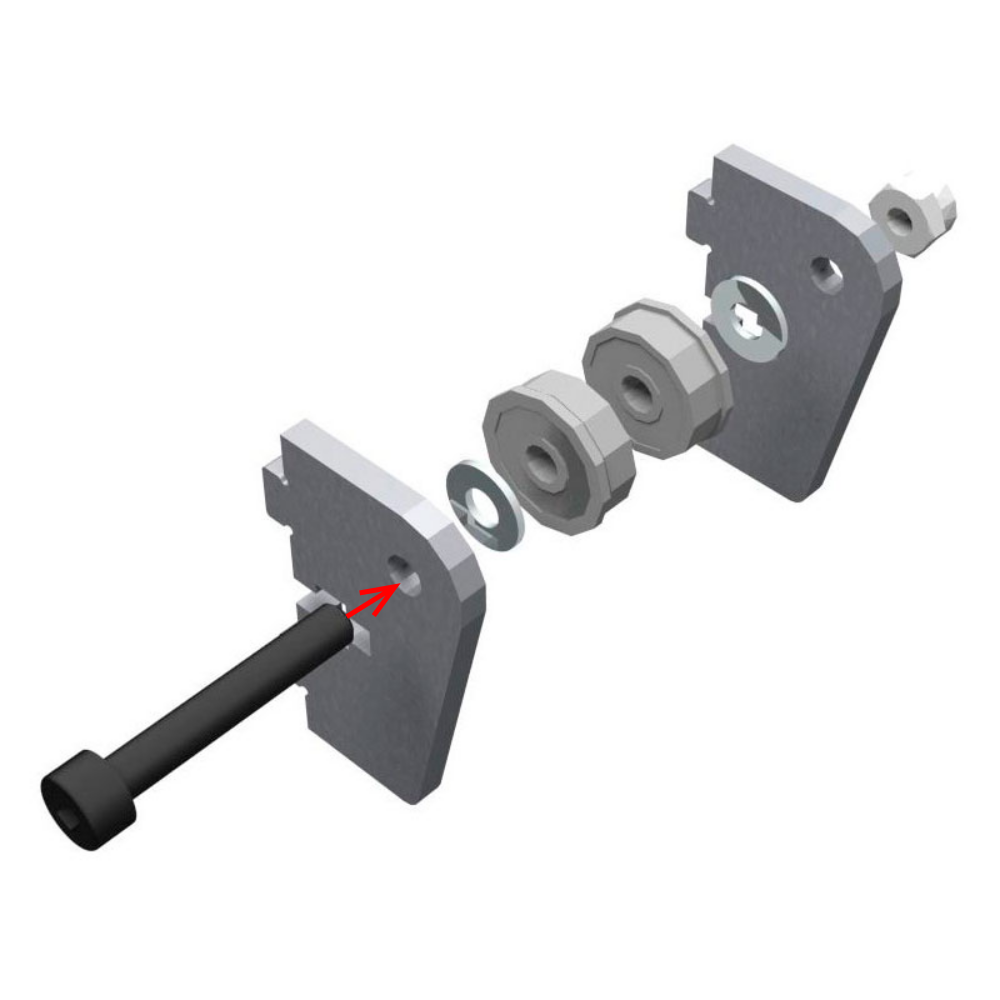
Étape 2 - Polea/tensor del eje Y
Vamos a montar el frontal del marco con el tensor del eje Y. Empezamos por el tensor:
Componentes:
- Piezas metálicas
- 1 tornillo M4x25
- 1 tuerca autoblocante M4
- 2 arandelas M4
- 2 rodamientos F624zz
Montaje:
- Introducimos el tornillo por los componentes en el siguiente orden (según se muestra en la imagen): por el orificio correspondiente de la pieza metálica, una arandela, un rodamiento con el borde ancho direccionado a la pieza metálica, el segundo rodamiento de manera opuesta, otra arandela, la otra pieza metálica y, finalmente, la tuerca.
- Apretamos el tornillo con la tuerca casi por completo, para que quede un poco de juego y nos facilite el resto del montaje.

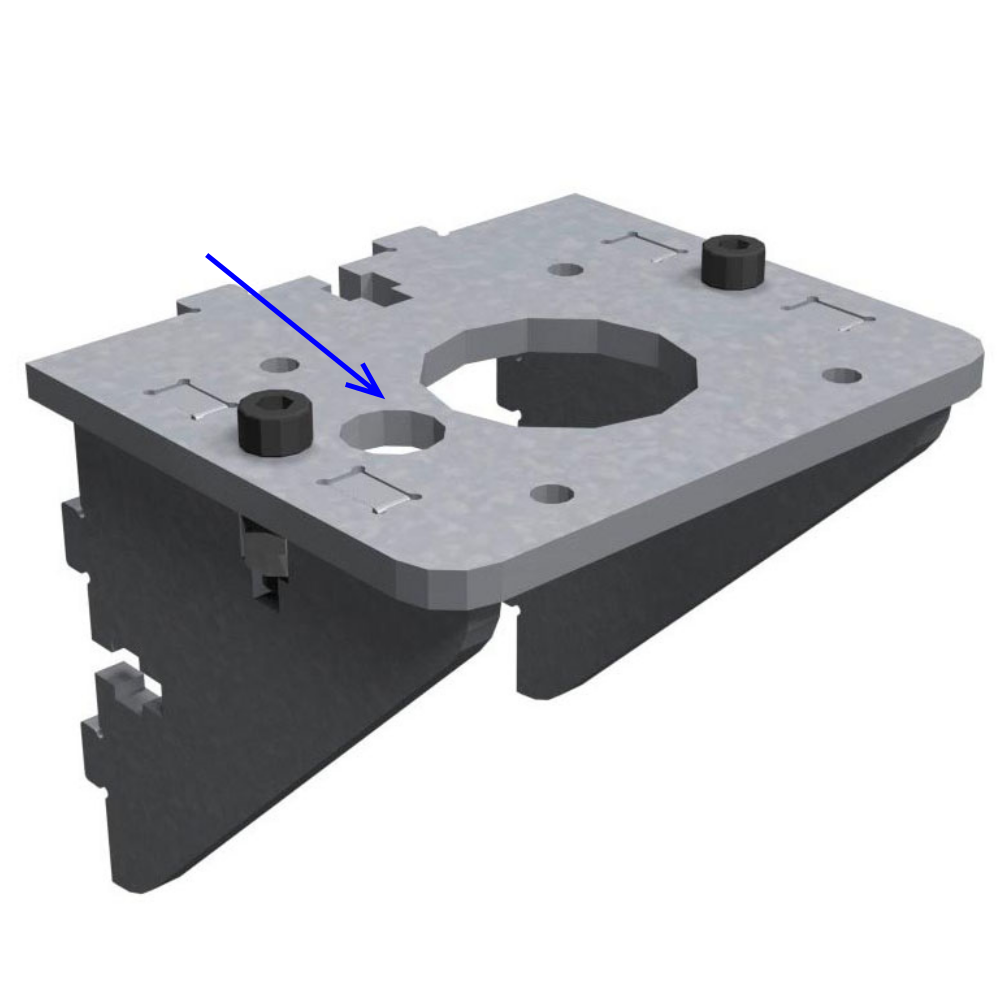
Étape 3 - Fijación del tensor del eje Y al frontal del marco
Vamos a fijar el conjunto que acabamos de montar al frontal.
Componentes:
- 2 tornillos M3x12
- 2 tuercas autoblocantes M3
Montaje:
- Introducimos los tornillos por los orificos correspondientes y atornillamos ligeramente las tuercas.
- Una vez sujetas las tuercas al tornillo, situamos el conjunto y apretamos los tornillos dejando una holgura que nos servirá para tensar el eje con la correa más adelante.

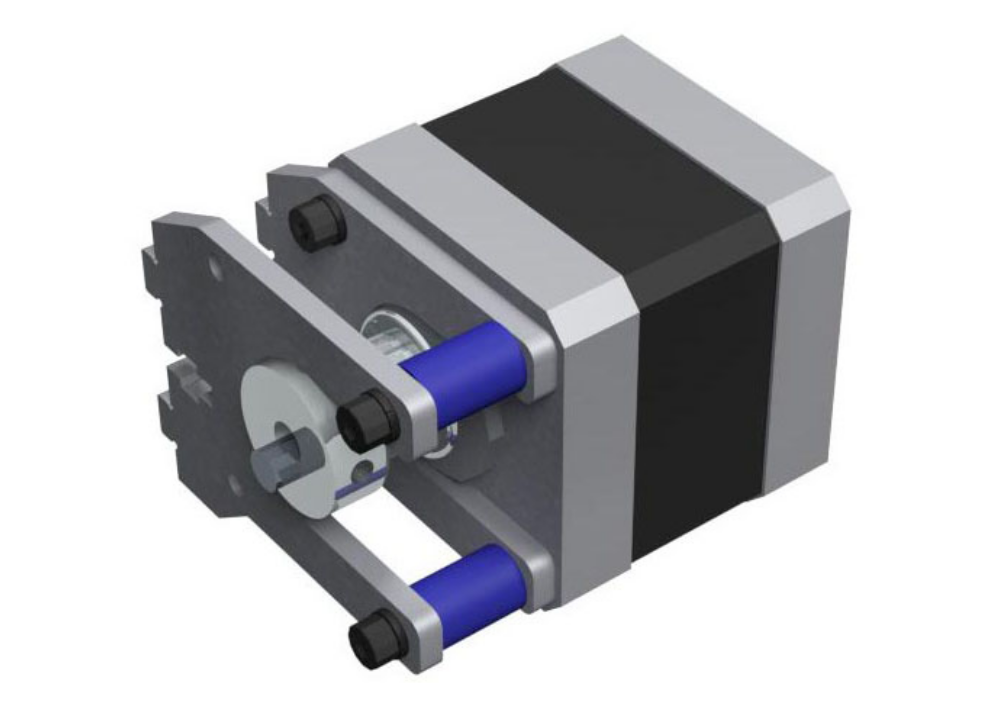
Étape 4 - Paso 4 - Soporte del motor del deje Y
Componentes:
- Las piezas metálicas
- Un motor paso a paso
- Una polea GT2 de 20 dientes
- 2 tornillos M3x25
- 2 tornillos M3x8
- 4 arandelas autoblocantes M3
- Las 2 piezas impresas mostradas (separadores)
Montaje:
- Empezamos con una de las piezas metálicas, los dos tornillos M3x8 y dos arandelas autoblocantes. Introducimos los tornillos en los orificios de la pieza metálica con arandelas entre el tornillo y la pieza y atornillamos al motor sin forzarlo.
- Colocamos la polea (con la parte de los dientes mirando hacia el motor) y la fijamos con los espárragos de la misma (más adelante tendremos que centrarla cuando coloquemos la correa).
- Introducimos los tornillos M3x25 en las dos arandelas restantes, los pasamos por los orificiones correspondientes de la pieza metálica, colocamos los espaciadores y los volvemos a introducir por la pieza metálica ya fijada al motor y atornillamos al motor.

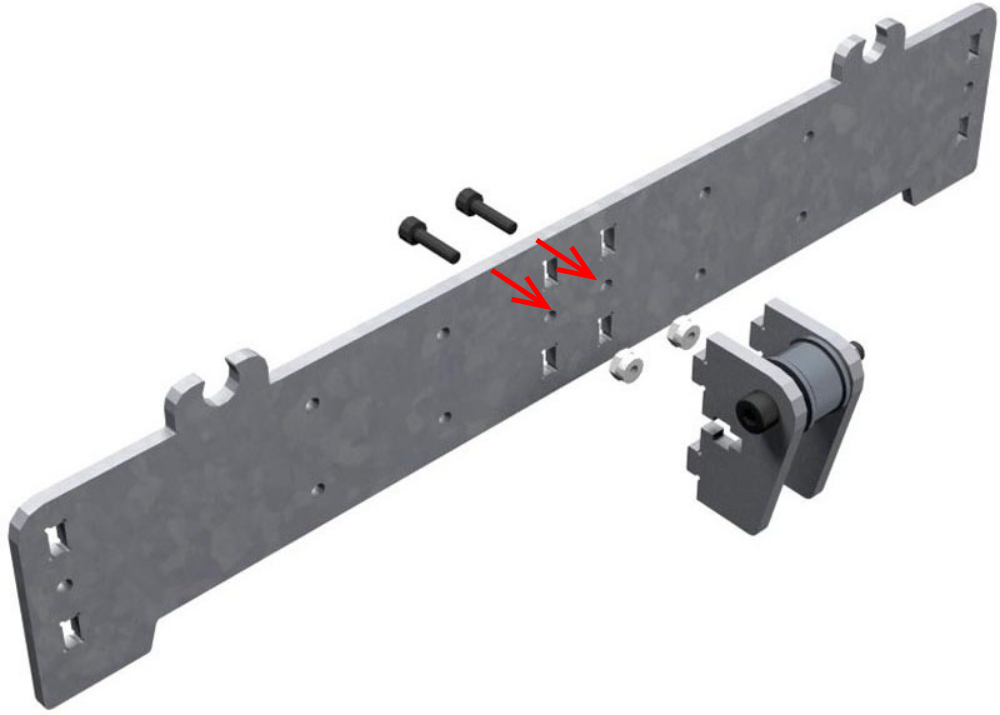
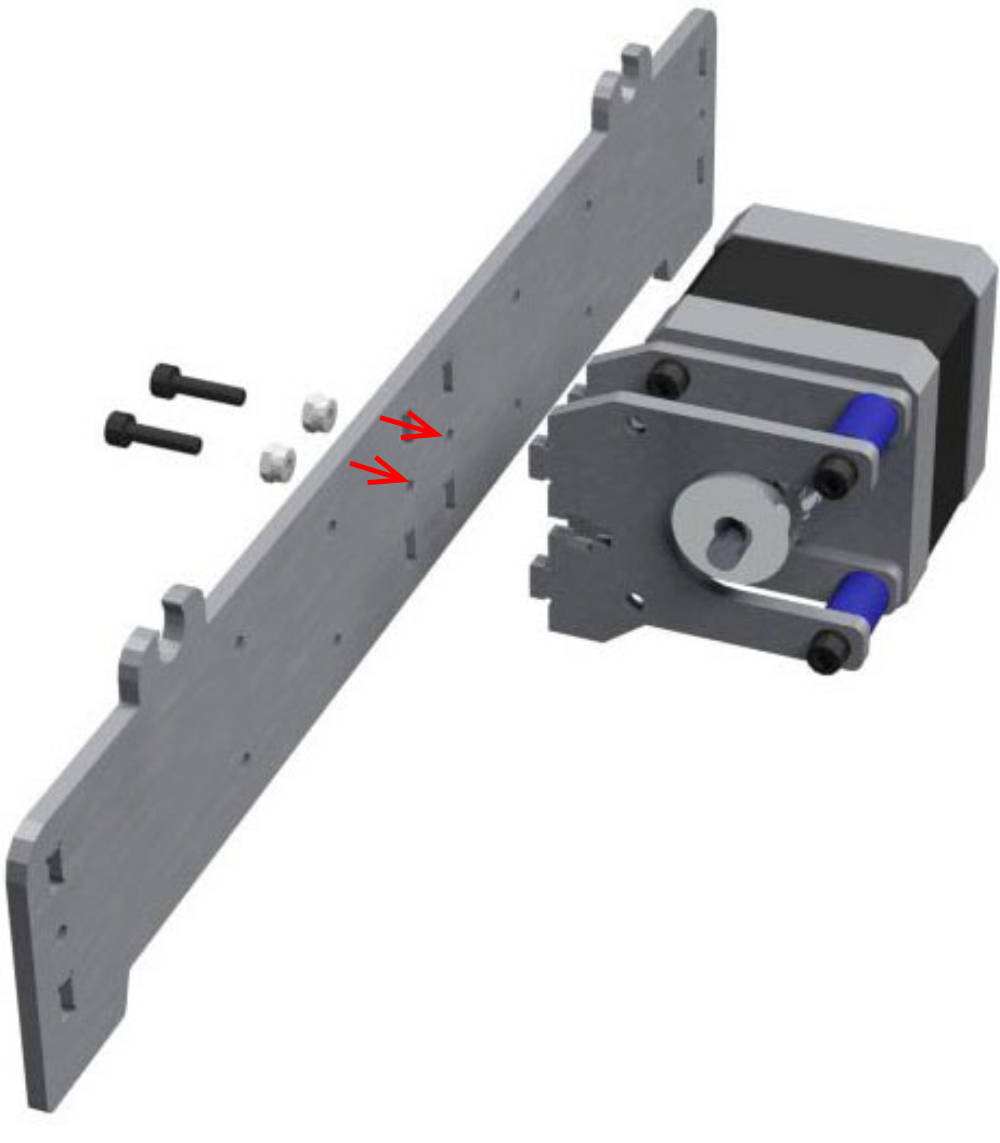
Étape 5 - Fijación del motor del eje Y a la parte trasera del marco
Ahora vamos a fijar este conjunto a la parte trasera del eje Y.
Componentes:
- 2 tornillos M3x12
- 2 tuercas autoblocantes M3
Montaje:
- Introducimos los tornillos en los orificiones correspondientes y atornillamos ligeramente las tuercas.
- Situamos el conjunto anteriormente montado y apretamos los tornillos hasta que quede el conjunto estable como muestra la segunda imagen. La polea deberá quedar con los dientes centrados entre las dos piezas metálicas, más adelante cuando coloquemos la correa podremos ajustar más a conciencia.

Étape 6 - Colocación del soporte de correa del eje Y en carro
Vamos a preparar el carro del eje Y. Empezamos por el soporte para la correa. Vamos a ver el carro de forma invertida, lo que vemos hacia arriba irá luego montado hacia abajo, ya que es la forma más cómoda para montarlo.
Componentes:
- Pieza metálica del carro del eje Y
- Piezas impresas de soporte de la correa
- 4 tornillos M3x30
- 4 tuercas autoblocantes
Montaje:
- Embebemoos las tuercas autoblocantes en las piezas impresas correspondientes (las dos más pequeñas).
- Para colocar la pieza impresa más grande en el carro, tenemos que tener en cuenta la orientación de ella. Una vez identificada la orientación según esquema y nota, colocamos los cuatro tornillos M3x30 en los cuatro orificios que corresponde, introducimos los mismos por las piezas impresas y atornillamos a las tuercas. Podemos dejarlo de manera que quede fija, cuando vayamos a colocar la correa, necesitaremos soltarlo un poco para que entre. Pero ahora nos interesa que quede todo compacto.


Étape 7 - Colocación de los rodamientos del eje Y en carro
Componentes:
- 4 rodamientos lineales LM8UU
- 4 piezas impresas que sujetarán los rodamientos
- 8 tornillos M3x12
- 8 tuercas autoblocantes M3
Montaje:
- Embebemos las 8 tuercas en sus piezas impresas.
- Uno a uno, colocamos dos tornillos m3x12, un rodamiento, una pieza impresa y atornillamos a la tuerca sin apretar el rodamiento en exceso. Debe quedar bien sujeto y estable, pero sin forzarlo. Repetimos este paso con los cuatro rodamientos.
(En la tercera imagen vemos el carro orientado correctamente).


Étape 8 - Marco principal y laterales
Ahora vamos a montar la estructura en sí, utilizando las piezas grandes del marco, a las cuales le iremos añadiendo los subconjuntos montados anteriormente.
Componentes:
- Piezas de metal presentadas: marco principal y aletas laterales
- 6 tornillos M3x12
- 6 tuercas autoblocantes M3
Montaje:
- Introducimos los laterales por las ranuras que tiene el marco para tal fin hasta que encajen con el marco.
- Empezamos por un tornillo M3x12 introduciéndolo en unos de los 6 orificios que nos van a servir para fijar los laterales al marco.
- Situamos una tuerca en su hueco en el marco y empezamos a atornillar el tornillo dentro de la tuerca.
- Uno a uno colocamos los 6 tornillos sin apretarlos del todo, ya que necesitaremos que los laterales queden ligeramente sueltos para el siguiente paso.


Étape 9 - Refuerzos Marco
Componentes:
- Las dos piezas metálicas de refuerzo
- 4 tornillos M3x12
- 4 tuercas autoblocantes M3
Montaje:
- Colocamos uno de los refuerzos.
- Introducimos los dos tornillos por los orificos correspondientes.
- Colocamos las tuercas en su hueco y atornillamos.
- A continuación, apretamos los tres tornillos de este lateral que dejamos un poco sueltos para que nos permitiese mover los laterales e introducir los refuerzos.
- Repetimos los pasos para el otro refuerzo.


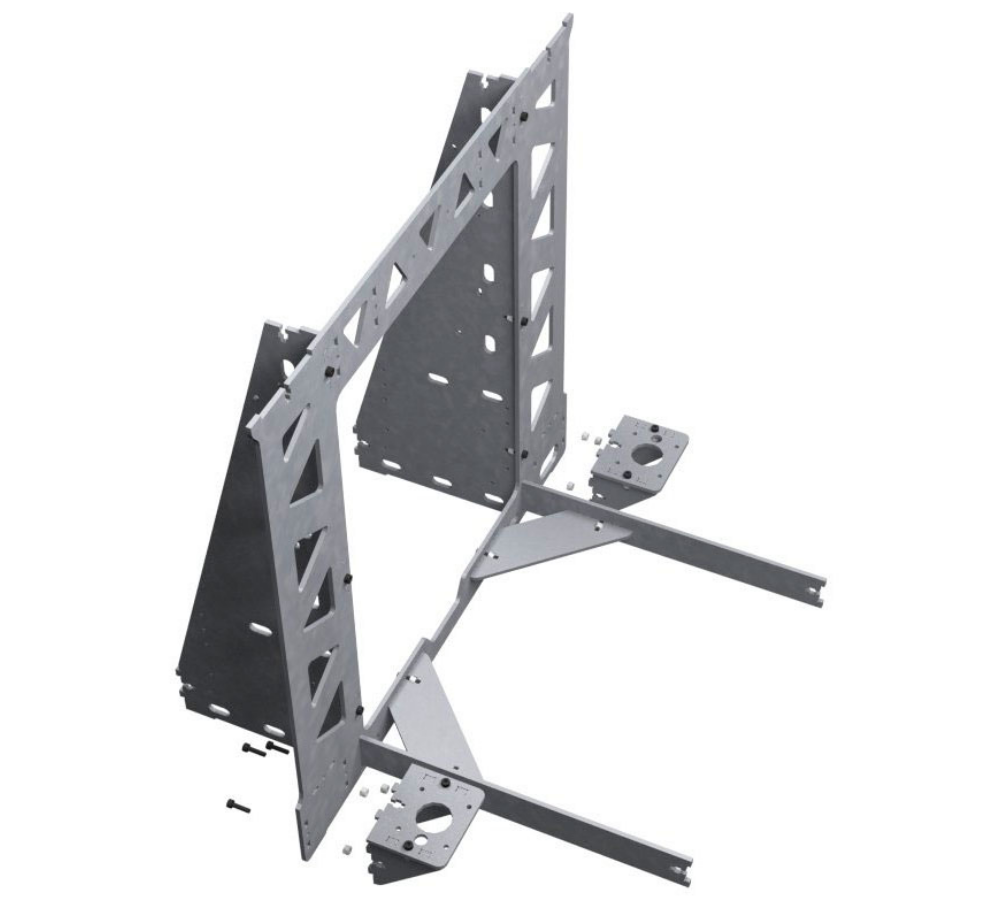
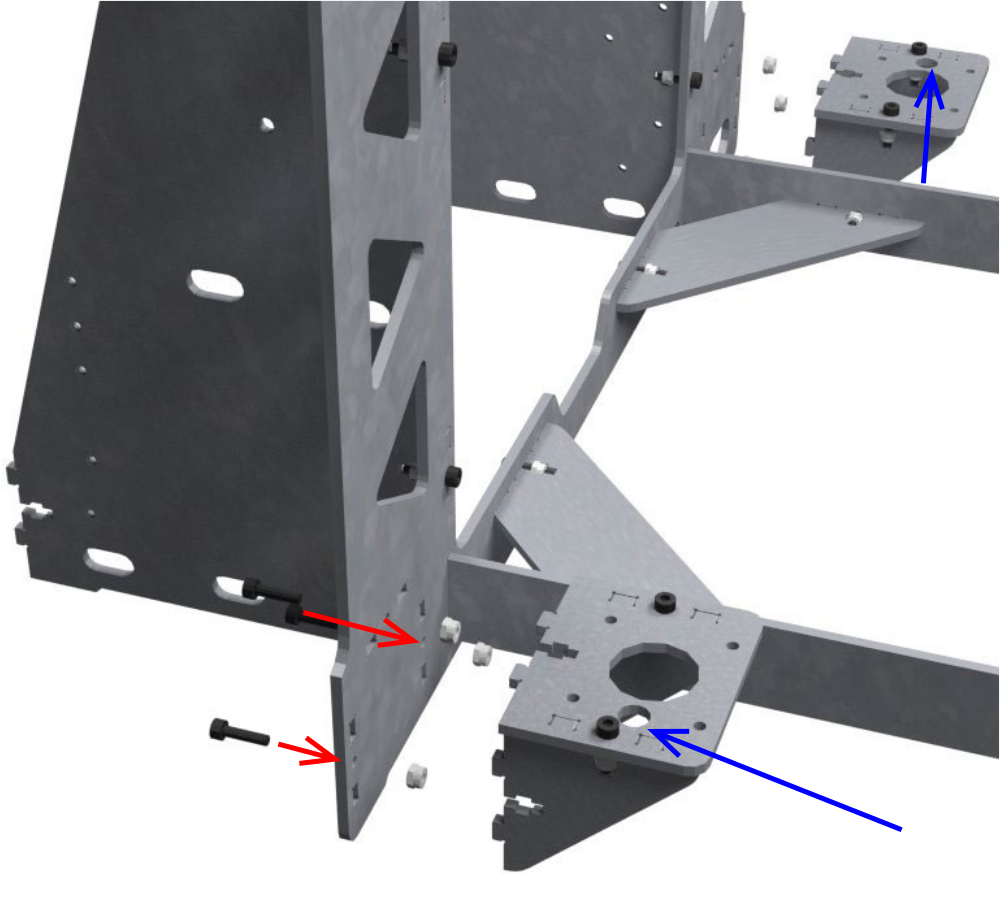
Étape 10 - Soportes motores eje Z en marco principal
Componentes:
- 6 tornillos M3x12
- 6 tuercas autoblocantes M3
Montaje:
- Elegimos uno de los soportes para montarlo primero y lo colocamos en su posición en el marco.
- Introducimos los tornillos uno a uno.
- Colocamos las tuercas y apretamos hasta que quede completamente fijo.
- Repetimos los pasos para el otro soporte.

Étape 11 - Fijación de la parte trasera del eje Y al frontal del marco
Componentes:
- 2 tornillos M3x12
- 2 tuercas autoblocantes M3
Montaje:
- Colocamos el conjunto correspodiente a la parte trasera del eje Y en su posición en el marco.
- Introducimos los dos tornillos en sus respectivos orificios.
- Colocamos las tuercas y apretamos hasta que quede completamente fijo.


Étape 12 - Varillas eje Y
Para colocar la parte frontal del eje Y en el marco debemos primero preparar el carro del eje Y y las varillas de este eje.
Empezaremos presentando las varillas del eje Y en el carro.
Componentes:
- Conjunto montado del carro eje Y
- 2 varillas de 350 mm
Montaje:
- Introducimos con cuidado una a unas las varillas por los rodamientos hasta que quede como en la imagen.

Étape 13 - Colocación de las varillas y carro en la parte trasera del eje Y
Ahora vamos a colocar el carro en su posición:
- Empezamos situando las varilllas en su posición en el marco. Es posible que nos cueste introducirlas, podemos ayudarnos de un mazo de goma y suavemente iremos dándole golpes hasta que poco a poco vaya entrando en su sitio.

Étape 14 - Colocación de la parte frontal del eje Y
Componentes:
- Conjunto montado de la parte delantera del eje Y
- 2 tornillos M3x12
- 2 tuercas autoblocantes M3
Montaje:
- Colocamos la parte frontal en su posición en el marco principal.
- Introducimos los dos tornillos en sus respectivos orificios.
- Colocamos las tuercas y apretamos hasta que quede completamente fijo.
- Ajustamos las varillas para que queden sujetas en ambos extremos del eje Y. Nos ayudamos del mazo de goma hasta que queden colocadas en su posición correcta.


Étape 15 - Colocación de la correa
Componentes:
- Conjunto del marco tras el Paso anterior
- 1 metro de correa GT2 aproximadamente
Montaje:
- Soltamos ligeramente los cuatro tornillos del soporte de la correa para que nos permita introducirlos entre la pieza más grandes y las pequeñas.
- Introducimos la correa con los dientes hacia abajo en la parte frontal del soporte y apretamos los tornillos para que quede fija.
- La conducimos hacia la parte delantera del eje Y, hasta llegar a los rodamientos (también tensor) del eje Y y rodeamos la polea (creada con rodamientos) con la correa hasta pasar la correa completamente alrededor de la polea como se muestra en la segunda imagen.
- La direccionamos hacia la parte trasera y hacemos lo mismo con la polea dentada, coincidiendo en dientes.
- La llevamos de nuevo hacia el carro del eje Y. En este caso la introducimos por la otra parte de la pieza impresa que sujeta la correa, tiramos de ella suficientemente para que el eje quede relativamente tenso, y apretamos los tornillos para que quede fija.
- Cortamos el restante de correa, no al ras, pero corto de manera que no interfiera cuando esté en movimiento con la parte de la correa que queda abajo.
- Tensamos el eje Y utilizando el tensor (que se encuentra en la parte delantera del eje).


Published
 Français
 English
 Deutsch
 Español
 Italiano
 Português