| Ligne 2 : | Ligne 2 : | ||
|Main_Picture=Installing_a_Metal_Roof_to_your_Chicken_Coop_Completed_the_Building_of_the_Chicken_Coop.jpg | |Main_Picture=Installing_a_Metal_Roof_to_your_Chicken_Coop_Completed_the_Building_of_the_Chicken_Coop.jpg | ||
|Licences=Attribution (CC BY) | |Licences=Attribution (CC BY) | ||
| − | |Description=This tutorial contains suggestions and guidelines on how to install a roof to your chicken coop. | + | |Description=<translate>This tutorial contains suggestions and guidelines on how to install a roof to your chicken coop.</translate> |
|Area=House | |Area=House | ||
|Type=Technique | |Type=Technique | ||
| Ligne 16 : | Ligne 16 : | ||
}} | }} | ||
{{ {{tntn|Introduction}} | {{ {{tntn|Introduction}} | ||
| − | |Introduction=One of the harders parts of adding a roof to your chicken coops is to get the right list of materials you'll need. | + | |Introduction=<translate>One of the harders parts of adding a roof to your chicken coops is to get the right list of materials you'll need.</translate> |
}} | }} | ||
{{ {{tntn|Materials}} | {{ {{tntn|Materials}} | ||
| − | |Material=metal roofing, roofing screws, metal ridge, | + | |Material=<translate>metal roofing, roofing screws, metal ridge,</translate> |
| − | |Tools=hammer, roofing screws, tape measure, tin snips, tape measure, | + | |Tools=<translate>hammer, roofing screws, tape measure, tin snips, tape measure,</translate> |
}} | }} | ||
{{ {{tntn|Separator}}}} | {{ {{tntn|Separator}}}} | ||
{{ {{tntn|Tuto Step}} | {{ {{tntn|Tuto Step}} | ||
| − | |Step_Title=Measuring Up | + | |Step_Title=<translate>Measuring Up</translate> |
| − | |Step_Content=One of the hardest parts of adding a roof to your chicken coops is to get the right list of materials you'll need. | + | |Step_Content=<translate>One of the hardest parts of adding a roof to your chicken coops is to get the right list of materials you'll need. |
| − | To work out the exact length each section, get the measurement from the top edge of the coop roof down to the bottom edge of the roofing timber. | + | To work out the exact length each section, get the measurement from the top edge of the coop roof down to the bottom edge of the roofing timber.</translate> |
|Step_Picture_00=Installing_a_Metal_Roof_to_your_Chicken_Coop_Measuring_Up.png | |Step_Picture_00=Installing_a_Metal_Roof_to_your_Chicken_Coop_Measuring_Up.png | ||
}} | }} | ||
{{ {{tntn|Tuto Step}} | {{ {{tntn|Tuto Step}} | ||
| − | |Step_Title=Cutting and fitting | + | |Step_Title=<translate>Cutting and fitting</translate> |
| − | |Step_Content=Before you begin to install the roof you should make sure the frame and all supporting roof members are straight. | + | |Step_Content=<translate>Before you begin to install the roof you should make sure the frame and all supporting roof members are straight. |
Cutting in of the metal roofing materials will need to be done on-site to ensure the best fit for the roofing sheets. | Cutting in of the metal roofing materials will need to be done on-site to ensure the best fit for the roofing sheets. | ||
| − | Some minor cuts or corrections maybe required once the roofing sheets have been fitted over the chicken coop to ensure adequate overhang is provided. | + | Some minor cuts or corrections maybe required once the roofing sheets have been fitted over the chicken coop to ensure adequate overhang is provided.</translate> |
}} | }} | ||
{{ {{tntn|Tuto Step}} | {{ {{tntn|Tuto Step}} | ||
| − | |Step_Title=Fixing Roof Down | + | |Step_Title=<translate>Fixing Roof Down</translate> |
| − | |Step_Content=The metal roofing sheets need to be installed plumb, straight and square to the eave of the coop roof. | + | |Step_Content=<translate>The metal roofing sheets need to be installed plumb, straight and square to the eave of the coop roof. |
| − | When fitting the first roof sheet make sure it is perfectly straight and square to the bottom edge of the chicken coop. | + | When fitting the first roof sheet make sure it is perfectly straight and square to the bottom edge of the chicken coop.</translate> |
|Step_Picture_00=Installing_a_Metal_Roof_to_your_Chicken_Coop_Untitled_1.png | |Step_Picture_00=Installing_a_Metal_Roof_to_your_Chicken_Coop_Untitled_1.png | ||
}} | }} | ||
{{ {{tntn|Tuto Step}} | {{ {{tntn|Tuto Step}} | ||
| − | |Step_Title=Finishing off | + | |Step_Title=<translate>Finishing off</translate> |
| − | |Step_Content=[https://www.no1roofing.com.au/ Roofing sheets] need to be fastened down once in place and this is to be done using the appropriate galvanized roofing screws. | + | |Step_Content=<translate>[https://www.no1roofing.com.au/ Roofing sheets] need to be fastened down once in place and this is to be done using the appropriate galvanized roofing screws. |
| − | For best appearances make sure the roofing screws are fastened in a nice straight, parallel line and a minimum of 200mm apart. | + | For best appearances make sure the roofing screws are fastened in a nice straight, parallel line and a minimum of 200mm apart.</translate> |
|Step_Picture_00=Installing_a_Metal_Roof_to_your_Chicken_Coop_Untitled.png | |Step_Picture_00=Installing_a_Metal_Roof_to_your_Chicken_Coop_Untitled.png | ||
}} | }} | ||
{{ {{tntn|Notes}} | {{ {{tntn|Notes}} | ||
| − | |Notes= | + | |Notes=<translate></translate> |
}} | }} | ||
{{ {{tntn|Tuto Status}} | {{ {{tntn|Tuto Status}} | ||
| − | |Complete= | + | |Complete=Published |
}} | }} | ||
Version du 2 septembre 2019 à 05:09
Introduction
Matériaux
metal roofing, roofing screws, metal ridge,
Outils
hammer, roofing screws, tape measure, tin snips, tape measure,
Étape 1 - Measuring Up
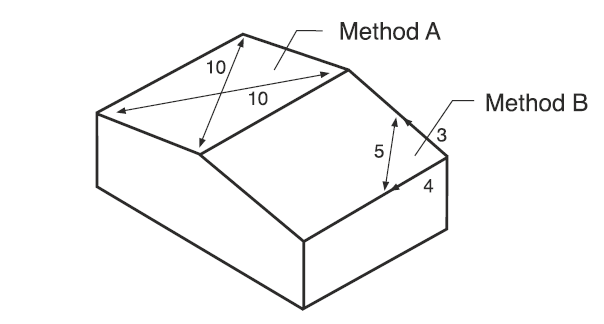
One of the hardest parts of adding a roof to your chicken coops is to get the right list of materials you'll need.
To work out the exact length each section, get the measurement from the top edge of the coop roof down to the bottom edge of the roofing timber.
Étape 2 - Cutting and fitting
Before you begin to install the roof you should make sure the frame and all supporting roof members are straight.
Cutting in of the metal roofing materials will need to be done on-site to ensure the best fit for the roofing sheets.
Some minor cuts or corrections maybe required once the roofing sheets have been fitted over the chicken coop to ensure adequate overhang is provided.
Étape 3 - Fixing Roof Down
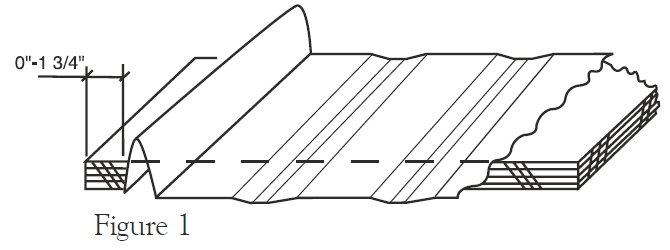
The metal roofing sheets need to be installed plumb, straight and square to the eave of the coop roof.
When fitting the first roof sheet make sure it is perfectly straight and square to the bottom edge of the chicken coop.
Étape 4 - Finishing off
Roofing sheets need to be fastened down once in place and this is to be done using the appropriate galvanized roofing screws.
For best appearances make sure the roofing screws are fastened in a nice straight, parallel line and a minimum of 200mm apart.
Published


 Français
 English
 Deutsch
 Español
 Italiano
 Português