m (Disisid a déplacé la page ESP3 DHT22 IFTTT vers ESP32 DHT22 IFTTT) |
|||
| (10 révisions intermédiaires par le même utilisateur non affichées) | |||
| Ligne 1 : | Ligne 1 : | ||
{{Tuto Details | {{Tuto Details | ||
| + | |Main_Picture=ESP32___DHT22___IFTTT_306268167_427924746149632_7414040424516888266_n.jpg | ||
| + | |Main_Picture_annotation={"version":"2.4.6","objects":[{"type":"image","version":"2.4.6","originX":"left","originY":"top","left":64,"top":0,"width":2048,"height":2047,"fill":"rgb(0,0,0)","stroke":null,"strokeWidth":0,"strokeDashArray":null,"strokeLineCap":"butt","strokeDashOffset":0,"strokeLineJoin":"miter","strokeMiterLimit":4,"scaleX":0.22,"scaleY":0.22,"angle":0,"flipX":false,"flipY":false,"opacity":1,"shadow":null,"visible":true,"clipTo":null,"backgroundColor":"","fillRule":"nonzero","paintFirst":"fill","globalCompositeOperation":"source-over","transformMatrix":null,"skewX":0,"skewY":0,"crossOrigin":"","cropX":0,"cropY":0,"src":"https://wikifab.org/images/8/81/ESP32_DHT22_IFTTT_306268167_427924746149632_7414040424516888266_n.jpg","filters":[]}],"height":449.83748645720476,"width":600} | ||
|Description=<translate>Send DHT22 temperature and humidity values to a google sheet through ESP32 and Webhooks</translate> | |Description=<translate>Send DHT22 temperature and humidity values to a google sheet through ESP32 and Webhooks</translate> | ||
|Area=Electronics | |Area=Electronics | ||
| Ligne 54 : | Ligne 56 : | ||
|Step_Title=<translate>Set up Applet</translate> | |Step_Title=<translate>Set up Applet</translate> | ||
|Step_Content=<translate>Then, hit '''Add''' next to '''IF THIS'''</translate> | |Step_Content=<translate>Then, hit '''Add''' next to '''IF THIS'''</translate> | ||
| − | |Step_Picture_00= | + | |Step_Picture_00=ESP32___DHT22___IFTTT_Create_-_IFTTTS_start.png |
}} | }} | ||
{{Tuto Step | {{Tuto Step | ||
| Ligne 72 : | Ligne 74 : | ||
Otherwise, click the '''connect''' button and follow the steps on their website to create a webhooks account</translate> | Otherwise, click the '''connect''' button and follow the steps on their website to create a webhooks account</translate> | ||
| − | |Step_Picture_00= | + | |Step_Picture_00=ESP3_DHT22_IFTTT_Send_Notifications_from_ESP32_to_sheets_with_IFTTT___GPIO_CC_Learning.png |
}} | }} | ||
{{Tuto Step | {{Tuto Step | ||
| Ligne 127 : | Ligne 129 : | ||
|Step_Title=<translate>Get API key</translate> | |Step_Title=<translate>Get API key</translate> | ||
|Step_Content=<translate>Select the '''Webhooks''' icon on the finished page</translate> | |Step_Content=<translate>Select the '''Webhooks''' icon on the finished page</translate> | ||
| − | |Step_Picture_00= | + | |Step_Picture_00=ESP3_DHT22_IFTTT_If_Maker_Event__esp32___then_Add_row_to_gmail_com_s.png |
}} | }} | ||
{{Tuto Step | {{Tuto Step | ||
| Ligne 185 : | Ligne 187 : | ||
</syntaxhighlight><br /></translate> | </syntaxhighlight><br /></translate> | ||
| − | |Step_Picture_00= | + | |Step_Picture_00=ESP3_DHT22_IFTTT_Thonny__-___UsersDHT22_Code_public_py_____13___6.png |
}} | }} | ||
{{Tuto Step | {{Tuto Step | ||
| Ligne 201 : | Ligne 203 : | ||
}} | }} | ||
{{Tuto Status | {{Tuto Status | ||
| − | |Complete= | + | |Complete=Published |
}} | }} | ||
Version actuelle datée du 15 janvier 2023 à 03:19
Send DHT22 temperature and humidity values to a google sheet through ESP32 and Webhooks


Difficulté
Moyen
Durée
1 heure(s)
Catégories
Électronique
Coût
0 USD ($)
Sommaire
- 1 Introduction
- 2 Étape 1 - Install Thonny or Other Python IDLE
- 3 Étape 2 - Setup Circuit
- 4 Étape 3 - Setup IFTTT
- 5 Étape 4 - Create a new applet
- 6 Étape 5 - Set up Applet
- 7 Étape 6 - Select webhooks
- 8 Étape 7 - Select request type
- 9 Étape 8 - Set up Webhooks Account
- 10 Étape 9 - Name event for trigger
- 11 Étape 10 - Set up reaction
- 12 Étape 11 - Select google sheets
- 13 Étape 12 - Set up sheets
- 14 Étape 13 - Connect to sheets
- 15 Étape 14 - Sign in using gmail
- 16 Étape 15 - Configure spreadsheet
- 17 Étape 16 - Finish applet
- 18 Étape 17 - Name applet
- 19 Étape 18 - Get API key
- 20 Étape 19 - Go to documentation
- 21 Étape 20 - Copy API key
- 22 Étape 21 - Source Code for thonny (insert api key and URL from previous step)
- 23 Étape 22 - View output in spreadsheet
- 24 Commentaires
Introduction
ESP32 connected to DHT22, to read temperature and humidity. Use IFTTT to create a webhook applet and write the DHT22 measured values to a google sheets document
Matériaux
Outils
Étape 1 - Install Thonny or Other Python IDLE
You will need a Python IDE such as Thonny for this project. You can use any IDE, but for this project, we are using Thonny. To install and use Thonny:
- Go to https://thonny.org/
- Download
- Install and then open

Étape 2 - Setup Circuit
This is how your circuit should look like. You will need the ESP32 microcontroller, DHT22 temp/humidity module, breadboard and jumper wires.
- + pin on DHT22 to VCC on ESP
- out pin on DHT22 to GPIO pin 15 on ESP(can change depending on code)
- - pin on DHT22 to GND on ESP


Étape 3 - Setup IFTTT
Go to https://ifttt.com/join
Sign up and create an account using the appropriate options

Étape 4 - Create a new applet
First, click create in the upper right hand corner

Étape 5 - Set up Applet
Then, hit Add next to IF THIS

Étape 6 - Select webhooks
Once you are on "choose a service", type in Webhooks in the search bar and click Webhooks

Étape 7 - Select request type
On webhooks, select receive a web request

Étape 8 - Set up Webhooks Account
- If you already have a webhooks account, skip this step
Otherwise, click the connect button and follow the steps on their website to create a webhooks account

Étape 9 - Name event for trigger
Name the event for the trigger esp32 (it is case sensitive so be careful)

Étape 10 - Set up reaction
Once the trigger is set up, click Add next to Then That

Étape 11 - Select google sheets
In the search bar, search sheets and click google sheets

Étape 12 - Set up sheets
Select Add row to spreadsheet

Étape 13 - Connect to sheets
Click the Connect button

Étape 14 - Sign in using gmail
Use your gmail to sign in to sheets

Étape 15 - Configure spreadsheet
Select all the values you want returned to the spreadsheet, along with the path the sheet has to follow in your drive.
For this project, we are returning Temperature and Humidity values from the DHT22, so we will select Value1 and Value2


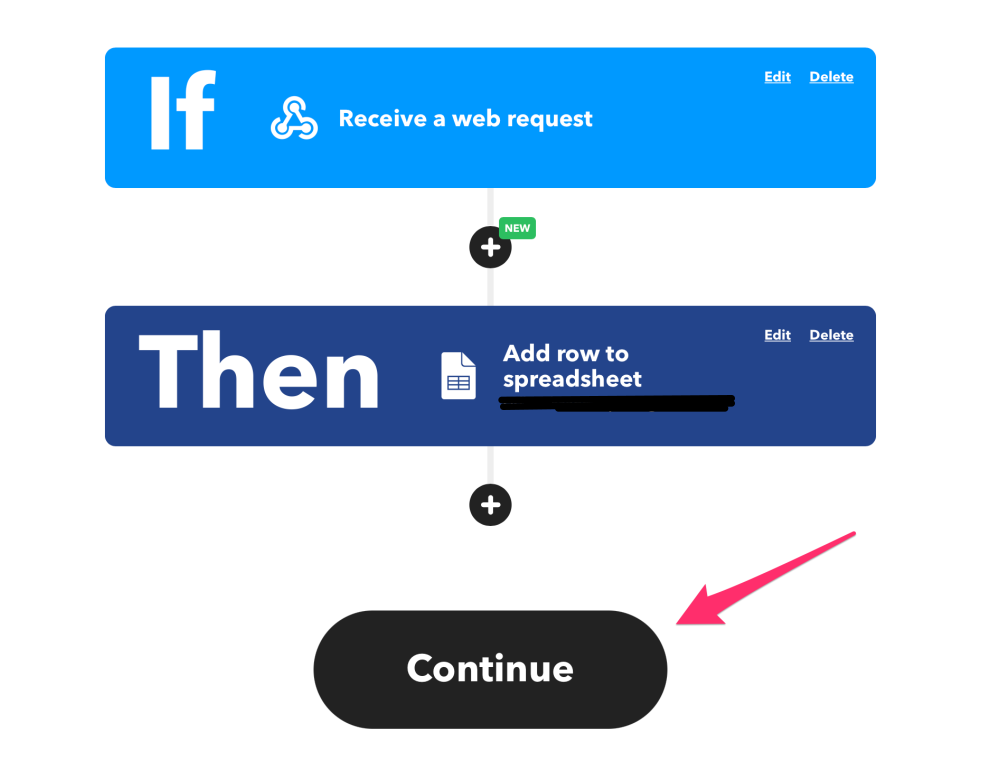
Étape 16 - Finish applet
Once you have finished all the previous steps, hit continue on the applet page
Étape 17 - Name applet
Rename the applet to an appropriate name

Étape 18 - Get API key
Select the Webhooks icon on the finished page

Étape 19 - Go to documentation
Click documentation on the webhooks page

Étape 20 - Copy API key
Once you get onto this page, copy the api key and URL to paste into the code in Thonny

Étape 21 - Source Code for thonny (insert api key and URL from previous step)
import network
import urequests as requests
from machine import Pin
from dht import DHT22
from time import sleep
#Replace the values below with the correct WIFI SSID and Password
wifi_ssid = "WIFI NAME"
wifi_password = "WIFI PASS"

#This is the webhook URL with API Key from IFTTT

webhook_url = "https://maker.ifttt.com/trigger/esp32/with/key/<insert api key here>"


sta_if = network.WLAN(network.STA_IF)
sta_if.active(True)

if sta_if.isconnected() == False:
    sta_if.connect(wifi_ssid, wifi_password)

while sta_if.isconnected() == False:
    #sta_if = network.WLAN(network.STA_IF)
    #sta_if.active(True)
    #sta_if.connect(wifi_ssid, wifi_password)
    sleep(1)
    print(".", end = "")

dht22 = DHT22(Pin(15))

while True:
    dht22.measure()
    temperature = dht22.temperature()
    humidity = dht22.humidity()
    temp = temperature * 9/5 + 32
    url = webhook_url + "?value1=" +  str(temp) + " F" + "&value2=" + str(humidity) + "%"
    try:
        r = requests.get(url)
        print(r.text)
    except Exception as e:
        print(e, "error")
    sleep(30)

Étape 22 - View output in spreadsheet
Go to whichever path you set the spreadsheet to in your drive

Published
 Français
 English
 Deutsch
 Español
 Italiano
 Português