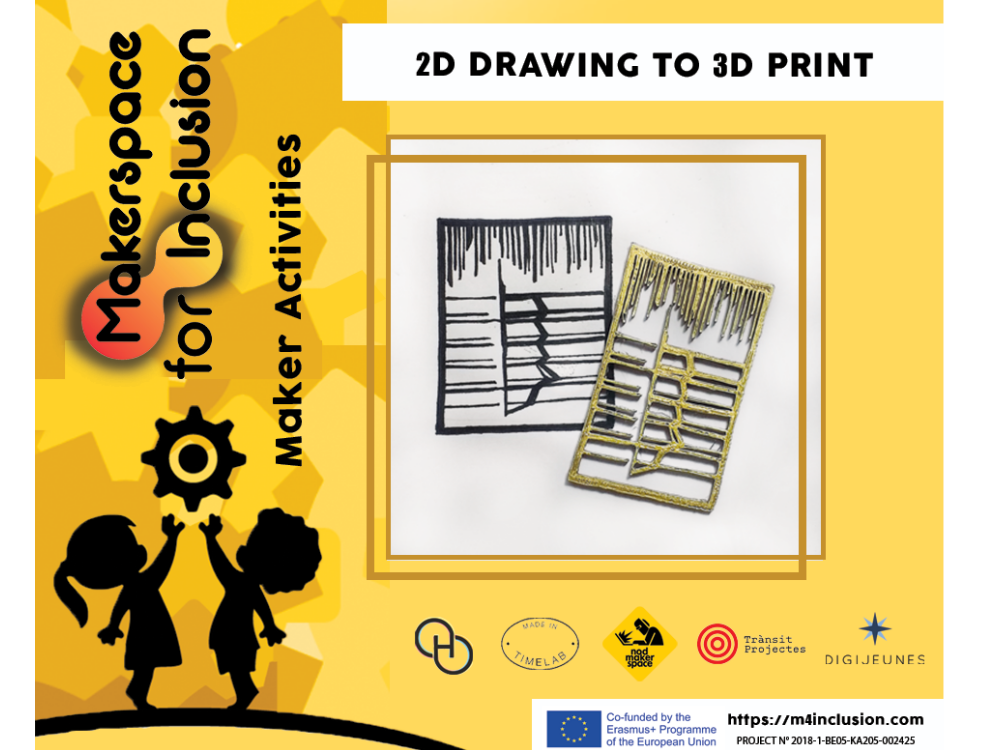
This activity involves participants creating a 2D drawing which they can bring to life through 3D printing.

Difficulté
Facile
Durée
1 heure(s)
Catégories
Électronique
Coût
10 EUR (€)
Sommaire
- 1 Introduction
- 2 Étape 1 - Download the Software
- 3 Étape 2 - Draw Your Design
- 4 Étape 3 - Make Sure There Are No White Gaps!
- 5 Étape 4 - Scan Your Drawing
- 6 Étape 5 - Upload Your Image
- 7 Étape 6 - Import Image to Inkscape
- 8 Étape 7 - Vectorise Image
- 9 Étape 8 - Save Image As JPEG
- 10 Étape 9 - Upload Image File Into Printer Software
- 11 Étape 10 - Make Print Configuration
- 12 Étape 11 - Slice Your Print
- 13 Étape 12 - Transfer File to Printer and PRINT!
- 14 Commentaires
Introduction
This will involve drawing on paper and transferring the image onto the computer. The activity will involve editing and transferring the image to a file that can successfully read by a printer.
The 3D printed drawings can then be used for further activities such as stencils, stamps or creating keyrings.
This activity is a great way of introducing 3D printing and Design for Manufacturing. It is accessible to all ages and abilities by not requiring participants to design something on the computer. It allows participants to be less restricted with their creativity as well as showing them how to transfer an image into a file that can be understood by a printer.
AGES: 6 to 17 years
TIME: 1 to 2 hours
Activities Aims and Learning Objectives
- Exciting way of bringing creative designs to life
- Integration of different disciplines (free hand drawing and 3D printing)
- Using a computer to transfer the 2D design into a 3D printable design
- To be given an introduction to 3D printers and what files they can understand
- To learn about vectorisation of an image
- To gain experience using drawing software such as Inkscape
- To learn about Design for Manufacture and creating a design that is printable
- To gain experience using a 3D printer
Supplies:
- 3D printer
- Computer with InkScape software downloaded
- Phone with CamScanner downloaded
- Paper
- Black felt tip marker pens
- USB stick or SD card (depending on your 3D printer)
Matériaux
Outils
Étape 1 - Download the Software
Make sure you have downloaded all the software you will need for the activity. These include:
CamScanner: Free app that can be found on the Google Play Store. (Make sure you press 'skip' when asked to trial Premium for free.)
Inkscape: Free Open Source software for drawing on your computer. It can be downloaded from their website which is easily found through Google.
Suitable software for your 3D printer: Such as FlashPrint or Ultimaker Cura. This will depend on the model of 3D printer you have but should be free to download online.

Étape 2 - Draw Your Design
Create your free-hand drawing on paper making sure to use a black marker pen.
This is where the Educator/Youth worker can talk about the ideas behind Design for Manufacturing. When you make a design you need to think about certain elements that will be effected by the manufacturing process.
For example:
- You will need to think about how your drawing will print out. If some parts of the drawing are not connected, they will print out as separate parts and not together.
- You will need to think about time, money and material.
How long do you want your print to take?
How much material do you have to use?
How much will your print cost?
The more complex the drawing or the more filled in spaces, the longer it will take to print, the more material it will use and the more expensive it will be.
- You will need to think about the limitations of the 3D printer. For example;
It is only able to print in one colour
Fragility of the print and having to remove it from the printer or raft - therefore considerations should be made as to how thin lines should be made.

Étape 3 - Make Sure There Are No White Gaps!
After creating your drawing, it is important to make sure that there is a large contrast between the black drawing and the white paper. This will help with scanning and vectorising the image.
Make sure there are no small white gaps in the drawing and that the intensity of the black ink is consistent
Étape 4 - Scan Your Drawing
Using CamScanner, take a photo of your drawing to scan it.
When cropping the image, make sure to leave a white border around the main outline.
Once cropped, choose the 'Magic Color' filter to make sure there is a good contrast between the drawing and the paper. If any white gaps appear at this point, it may be necessary to edit your drawing and re-do this step to remove these.

Étape 5 - Upload Your Image
Save your image as a JPEG file and share it to yourself. Send it to your email or over Facebook so that you can easily access it on the computer.

Étape 6 - Import Image to Inkscape
After downloading your JPEG file, open Inkscape and import your image.

Étape 7 - Vectorise Image
Vectorise your image in Inkscape by selecting it and going to Path > Trace to Bitmap > Remove background > Update > OK
This should make a copy of the image above the existing one. Make sure to delete the old image below.
Here the Educator could discuss with the participants about what this action is doing and what it means if an image is vectorised. Vectorisation is where a raster image (an image made up of square pixels) is changed to a vectorised image (an image made of geometric objects, such as lines, curves and points, that can be defined mathematically). Through doing this, they can be better read by a computer, are of higher quality and more easily scalable.

Étape 8 - Save Image As JPEG
Save your new vectorised image as a JPEG, making sure to select .jpg under file type.
Étape 9 - Upload Image File Into Printer Software
Import your .jpg image file into your printer software. Depending on your software you may get asked to add thickness via a pop up window or you may have to edit the object once it has loaded in the printer window.
Make sure you scale the print correctly according to how much time and material you would like to use.


Étape 10 - Make Print Configuration
Depending on your printer and the quality of print you are wanting to reach, make sure to apply the correct settings.
This will include adapting the speed, quality and density of the print. Also it can sometimes be best to add a Raft to the print to help with its removal after it has finished, especially if some parts are thin and fragile.

Étape 11 - Slice Your Print
Slice your print and save it as a .gx file which the printer can recognise.
At this point the Educator can explain what is happening here. For example, the image, as seen on the screen, is being turned into a simple text file which includes just lines of code that the printer can read. It provides co-ordinates for where the nozzle should move to and where it should turn on and off to lay plastic.
Étape 12 - Transfer File to Printer and PRINT!
Using the method best suited for your printer (usually either a USB or SD card), transfer your .gx file onto the printer. On the printer press print and watch you 2D drawing come to life!

Draft
 Français
 English
 Deutsch
 Español
 Italiano
 Português