
| Ligne 92 : | Ligne 92 : | ||
{{Tuto Step | {{Tuto Step | ||
|Step_Title=<translate>Table Build - Side Legs 1</translate> | |Step_Title=<translate>Table Build - Side Legs 1</translate> | ||
| − | |Step_Content=<translate>==== Tools ==== | + | |Step_Content=<translate>====Tools==== |
1/2" Socket Wrench | 1/2" Socket Wrench | ||
| − | ==== Parts ==== | + | ====Parts==== |
4x 800mm 4040 Aluminum extrusion | 4x 800mm 4040 Aluminum extrusion | ||
| Ligne 108 : | Ligne 108 : | ||
8x t-nuts | 8x t-nuts | ||
| − | ==== Steps ==== | + | ====Steps==== |
| − | # Slot 2 t-nuts into one rail of the 300mm extrusion | + | #Slot 2 t-nuts into one rail of the 300mm extrusion |
| − | # Secure corner brackets on the rail, ensuring that the ends are flush with the beam. | + | #Secure corner brackets on the rail, ensuring that the ends are flush with the beam. |
| − | # Slide a t-nut into a rail on the 800mm extrusion about 12in from the end. | + | #Slide a t-nut into a rail on the 800mm extrusion about 12in from the end. |
| − | # Secure one side of the short beam to the long beam. | + | #Secure one side of the short beam to the long beam. |
| − | # Repeat on the other side. | + | #Repeat on the other side. |
| − | # Repeat steps 1-5 so you have 2 "H" assemblies.</translate> | + | #Repeat steps 1-5 so you have 2 "H" assemblies.</translate> |
|Step_Picture_00=PP_Extruder_Pro_PXL_20211130_234025463.jpg | |Step_Picture_00=PP_Extruder_Pro_PXL_20211130_234025463.jpg | ||
|Step_Picture_01=PP_Extruder_Pro_PXL_20211130_234120995.jpg | |Step_Picture_01=PP_Extruder_Pro_PXL_20211130_234120995.jpg | ||
| Ligne 121 : | Ligne 121 : | ||
|Step_Picture_03=PP_Extruder_Pro_PXL_20211130_234307027.jpg | |Step_Picture_03=PP_Extruder_Pro_PXL_20211130_234307027.jpg | ||
|Step_Picture_04=PP_Extruder_Pro_PXL_20211130_234437395.jpg | |Step_Picture_04=PP_Extruder_Pro_PXL_20211130_234437395.jpg | ||
| + | }} | ||
| + | {{Tuto Step | ||
| + | |Step_Title=<translate>Table Build - Side Legs 2</translate> | ||
| + | |Step_Content=<translate>====Tools==== | ||
| + | 1/2" Socket Wrench | ||
| + | ====Parts==== | ||
| + | 2 "H" Assemblies from previous step | ||
| + | |||
| + | Top deck Assembly | ||
| + | |||
| + | ==== Steps ==== | ||
| + | |||
| + | # Shift the top deck assembly off your worksurface so that 2 corners are free hanging in space. | ||
| + | # Position an H assembly underneath the corners, aligning the pre-attached t-nuts to the external rail slots. This requires you to adjust the t-nuts so they are perfectly vertical. | ||
| + | # Once in place, tighten down the bolts | ||
| + | # Repeat on the other side.</translate> | ||
| + | |Step_Picture_00=PP_Extruder_Pro_PXL_20211130_234615364.jpg | ||
| + | |Step_Picture_01=PP_Extruder_Pro_PXL_20211130_234624196.jpg | ||
| + | |Step_Picture_02=PP_Extruder_Pro_PXL_20211130_235219618.jpg | ||
}} | }} | ||
{{Notes | {{Notes | ||
Version du 3 décembre 2021 à 22:25
This tutorial documents the build process for the Precious Plastic Extruder Pro as supplied by Citizen Scientific Workshop out of Idaho, United States.
Difficulté
Moyen
Durée
2 jour(s)
Catégories
Machines & Outils, Recyclage & Upcycling
Coût
3000 USD ($)
Matériaux
Outils
Étape 1 - Table Build-Top deck 1
Tools
1/2" Socket
Parts
2x 1000mm 4080 extrusion
4x 300mm 4040 extrusion
40x t-nuts
22x M8x20 bolts
22x M8 Washers
12x Corner Brackets
Steps
- Slide 6 t nuts into the top side of the 1000mm extrusion. (repeat for other beam)
- For the 300mm beams, 2 pairs of 2 will be identical, one "I" shaped, and one "C" shaped.
- For the C-shaped beam, Slide two t-nuts into one rail. Attach the corner brackets at the ends, ensuring the bracket is flush with the beams end. *Always use the side of the bracket with a flat face (non-lipped) first. This ensures you can get a tool onto the 2nd bolt without being blocked.
- For the I-Beams, repeat the same steps for the C-beam, but on both sides.
- Repeat so you have 2 I-beams and 2-C beams.
- *Optional* Add bolts to all remaining bracket holes and loosely attach t-nuts. (as seen in the right two beams in image 3)


Étape 2 - Table Build- Top deck 2
Tools
1/2" Socket Wrench
Parts
Assemblies from previous step
Steps
- If you have already attached the bolts/and t-nuts from the optional step - Slide beams into the upper channel (as seen in image 1) Otherwise, thread the nuts into the channel and attach LOOSELY with bolts.
- Repeat for the bottom rail.
- Secure the C beams in place with the socket wrench, but leave the I-beams LOOSE as they will need to be shifted later.


Étape 3 - Table Build- Top deck 3
Tools
1/2" Socket Wrench
Parts
Assembly from previous step
4x Steel Corner Brackets
32x M8x20 Bolts
32x M8 washers
32x t-nuts
Steps
- On the exterior corner of the 4080 extrusion, slide 3 t-nuts into each top/bottom rail.
- Secure corner plate to rale with accompanying 6 bolt/washer combos.
- Add 2 additional bolt/washer/t-nut combos to the 2 remaining vertical holes. Keep these very loose as we'll slide them into another assembly later.
- Repeat on all corners.


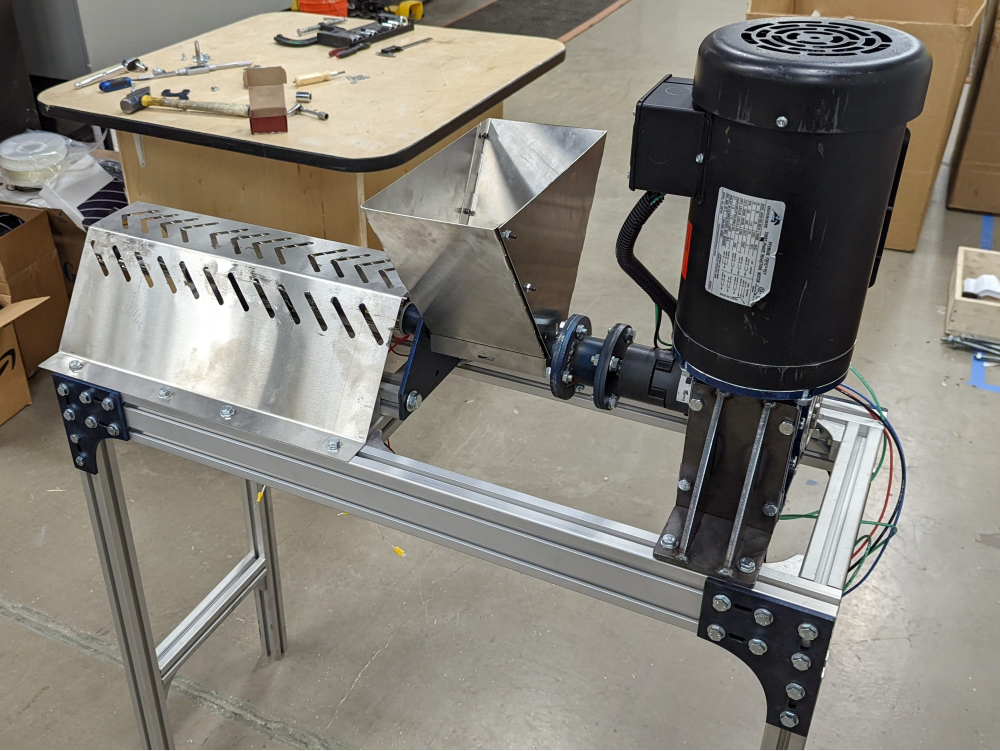
Étape 4 - Table Build - Side Legs 1
Tools
1/2" Socket Wrench
Parts
4x 800mm 4040 Aluminum extrusion
2x 300mm 4040 Aluminum extrusion
4x corner Brackets
8x M8x20 Bolts
8x M8 washers
8x t-nuts
Steps
- Slot 2 t-nuts into one rail of the 300mm extrusion
- Secure corner brackets on the rail, ensuring that the ends are flush with the beam.
- Slide a t-nut into a rail on the 800mm extrusion about 12in from the end.
- Secure one side of the short beam to the long beam.
- Repeat on the other side.
- Repeat steps 1-5 so you have 2 "H" assemblies.


Étape 5 - Table Build - Side Legs 2
Tools
1/2" Socket Wrench
Parts
2 "H" Assemblies from previous step
Top deck Assembly
Steps
- Shift the top deck assembly off your worksurface so that 2 corners are free hanging in space.
- Position an H assembly underneath the corners, aligning the pre-attached t-nuts to the external rail slots. This requires you to adjust the t-nuts so they are perfectly vertical.
- Once in place, tighten down the bolts
- Repeat on the other side.


Draft
 Français
 English
 Deutsch
 Español
 Italiano
 Português