(Mise à jour pour être en accord avec la nouvelle version de la source de la page) |
(update property name) |
||
| Ligne 1 : | Ligne 1 : | ||
| − | {{ | + | {{Tuto Details |
|Main_Picture=Connected_house_publishes_sensor_data_on-line_1_-_Copie.PNG | |Main_Picture=Connected_house_publishes_sensor_data_on-line_1_-_Copie.PNG | ||
|Licences=Attribution (CC BY) | |Licences=Attribution (CC BY) | ||
| Ligne 15 : | Ligne 15 : | ||
|IsTranslation=1 | |IsTranslation=1 | ||
}} | }} | ||
| − | {{ | + | {{Introduction |
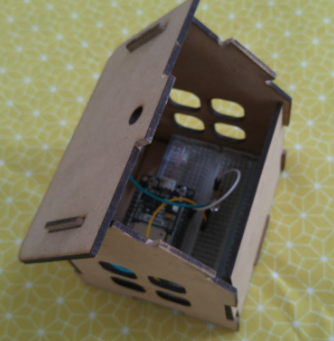
|Introduction=In this tutorial we will create a connected house using the ESP32 board, that publishes the values recorded by a photoresistor and an internal temperature sensor online, specifically on https://adafruit.io. | |Introduction=In this tutorial we will create a connected house using the ESP32 board, that publishes the values recorded by a photoresistor and an internal temperature sensor online, specifically on https://adafruit.io. | ||
}} | }} | ||
| − | {{ | + | {{Materials |
|Material=- ESP32 board | |Material=- ESP32 board | ||
| Ligne 30 : | Ligne 30 : | ||
|Tools=- computer with Arduino IDE and internet connection | |Tools=- computer with Arduino IDE and internet connection | ||
}} | }} | ||
| − | {{ | + | {{Separator}} |
| − | {{ | + | {{Tuto Step |
|Step_Title=Set up an account on adafruit.io | |Step_Title=Set up an account on adafruit.io | ||
|Step_Content= | |Step_Content= | ||
|Step_Picture_00=Connected_house_publishes_sensor_data_on-line_1.PNG | |Step_Picture_00=Connected_house_publishes_sensor_data_on-line_1.PNG | ||
}} | }} | ||
| − | {{ | + | {{Tuto Step |
|Step_Title=Create a new Feed on adafruit.io | |Step_Title=Create a new Feed on adafruit.io | ||
|Step_Content=Create a new feed by reaching https://io.adafruit.com/ > Feeds > Actions and then name it, for example “lightsensorvalue”. | |Step_Content=Create a new feed by reaching https://io.adafruit.com/ > Feeds > Actions and then name it, for example “lightsensorvalue”. | ||
|Step_Picture_00=Connected_house_publishes_sensor_data_on-line_2.PNG | |Step_Picture_00=Connected_house_publishes_sensor_data_on-line_2.PNG | ||
}} | }} | ||
| − | {{ | + | {{Tuto Step |
|Step_Title=Prepare the ESP32 board on your computer | |Step_Title=Prepare the ESP32 board on your computer | ||
|Step_Content=Follow the [https://github.com/espressif/arduino-esp32/blob/master/README.md#installation-instructions instructions provided on GitHub] for your Operating System. For example, if you have Windows 7 or 10, choose “Instructions for Windows” / if you have a MacBook, choose “Instructions for Mac”. | |Step_Content=Follow the [https://github.com/espressif/arduino-esp32/blob/master/README.md#installation-instructions instructions provided on GitHub] for your Operating System. For example, if you have Windows 7 or 10, choose “Instructions for Windows” / if you have a MacBook, choose “Instructions for Mac”. | ||
}} | }} | ||
| − | {{ | + | {{Tuto Step |
|Step_Title=Check that the board is correctly configured | |Step_Title=Check that the board is correctly configured | ||
|Step_Content=Launch Arduino IDE and select “ESP32 Dev Module” from the Tools menu > Board. | |Step_Content=Launch Arduino IDE and select “ESP32 Dev Module” from the Tools menu > Board. | ||
| Ligne 91 : | Ligne 91 : | ||
|Step_Picture_01=Connected_house_publishes_sensor_data_on-line_3.PNG | |Step_Picture_01=Connected_house_publishes_sensor_data_on-line_3.PNG | ||
}} | }} | ||
| − | {{ | + | {{Tuto Step |
|Step_Title=Wiring the photoresistor and the temperature sensor to the ESP32 | |Step_Title=Wiring the photoresistor and the temperature sensor to the ESP32 | ||
|Step_Content= | |Step_Content= | ||
| Ligne 99 : | Ligne 99 : | ||
|Step_Picture_03=Connected_house_publishes_sensor_data_on-line_7.PNG | |Step_Picture_03=Connected_house_publishes_sensor_data_on-line_7.PNG | ||
}} | }} | ||
| − | {{ | + | {{Tuto Step |
|Step_Title=Programming on tuniot | |Step_Title=Programming on tuniot | ||
|Step_Content=Let’s create a program that registers the values recorded by the photoresistor and the internal temperature sensor and publishes them online. | |Step_Content=Let’s create a program that registers the values recorded by the photoresistor and the internal temperature sensor and publishes them online. | ||
| Ligne 118 : | Ligne 118 : | ||
|Step_Picture_01=Connected_house_publishes_sensor_data_on-line_9.PNG | |Step_Picture_01=Connected_house_publishes_sensor_data_on-line_9.PNG | ||
}} | }} | ||
| − | {{ | + | {{Tuto Step |
|Step_Title=Install Adafruit_MQTT.h and Adafruit_MQTT_Client.h libraries on Arduino IDE | |Step_Title=Install Adafruit_MQTT.h and Adafruit_MQTT_Client.h libraries on Arduino IDE | ||
|Step_Content=For that we need to run Arduino IDE and go to Sketch > Include Library > Manage Libraries… > Search for “Adafruit mqtt library” and install the first result. | |Step_Content=For that we need to run Arduino IDE and go to Sketch > Include Library > Manage Libraries… > Search for “Adafruit mqtt library” and install the first result. | ||
|Step_Picture_00=Connected_house_publishes_sensor_data_on-line_11.PNG | |Step_Picture_00=Connected_house_publishes_sensor_data_on-line_11.PNG | ||
}} | }} | ||
| − | {{ | + | {{Tuto Step |
|Step_Title=Programming on Arduino IDE | |Step_Title=Programming on Arduino IDE | ||
|Step_Content=To upload the code on Arduino IDE, click on the “Copy Arduino code into clipboard” button. | |Step_Content=To upload the code on Arduino IDE, click on the “Copy Arduino code into clipboard” button. | ||
| Ligne 135 : | Ligne 135 : | ||
|Step_Picture_01=Connected_house_publishes_sensor_data_on-line_13.PNG | |Step_Picture_01=Connected_house_publishes_sensor_data_on-line_13.PNG | ||
}} | }} | ||
| − | {{ | + | {{Notes |
|Notes= | |Notes= | ||
}} | }} | ||
| − | {{ | + | {{Tuto Status |
|Complete=Published | |Complete=Published | ||
}} | }} | ||
Version actuelle datée du 9 décembre 2019 à 11:29
Sommaire
- 1 Introduction
- 2 Étape 1 - Set up an account on adafruit.io
- 3 Étape 2 - Create a new Feed on adafruit.io
- 4 Étape 3 - Prepare the ESP32 board on your computer
- 5 Étape 4 - Check that the board is correctly configured
- 6 Étape 5 - Wiring the photoresistor and the temperature sensor to the ESP32
- 7 Étape 6 - Programming on tuniot
- 8 Étape 7 - Install Adafruit_MQTT.h and Adafruit_MQTT_Client.h libraries on Arduino IDE
- 9 Étape 8 - Programming on Arduino IDE
- 10 Commentaires
Introduction
Matériaux
- ESP32 board
- jumper wires
- power cable
- breadboard
- light sensor
Outils
- computer with Arduino IDE and internet connection
Étape 2 - Create a new Feed on adafruit.io
Create a new feed by reaching https://io.adafruit.com/ > Feeds > Actions and then name it, for example “lightsensorvalue”.
Étape 3 - Prepare the ESP32 board on your computer
Follow the instructions provided on GitHub for your Operating System. For example, if you have Windows 7 or 10, choose “Instructions for Windows” / if you have a MacBook, choose “Instructions for Mac”.
Étape 4 - Check that the board is correctly configured
Launch Arduino IDE and select “ESP32 Dev Module” from the Tools menu > Board.
Fetch the Blink example from File > Examples > 01.Basics > Blink.
write int LED_BUILTIN = 2; at the top of the code
/*
ESP 32 Blink
Turns on an LED on for one second, then off for one second, repeatedly.
The ESP32 has an internal blue LED at D2 (GPIO 02)
*/
int LED_BUILTIN = 2;
void setup()
{
pinMode(LED_BUILTIN, OUTPUT);
}
void loop()
{
digitalWrite(LED_BUILTIN, HIGH); // turn the LED on (HIGH is the voltage level)
delay(1000); // wait for a second
digitalWrite(LED_BUILTIN, LOW); // turn the LED off by making the voltage LOW
delay(1000); // wait for a second
}
Finally, upload the code by using the right arrow (→) button at the top right corner of the window, by choosing Sketch > Upload or by pressing Ctrl+U on the keyboard.
Étape 5 - Wiring the photoresistor and the temperature sensor to the ESP32
Étape 6 - Programming on tuniot
Let’s create a program that registers the values recorded by the photoresistor and the internal temperature sensor and publishes them online.
For that we need to reach: http://easycoding.tn/esp32/demos/code/
Choose the appropriate blocks to create the code displayed below: (see image)
- “Variables” section - Declare ‘i’ type ‘int’ Value + “Math” section - the actual value “0”
- “IOT” section > “Web services” subsection - Adafruit MQTT Setup (User Name and Key are retrievable from https://io.adafruit.com/ > View your AIO Key)
- “Various” section - Delay Ms 3000
- “Serial” section - Print on new line ‘Start’
- “IOT” section > “IOT Station” subsection - Connect Network ssid… password… (the ssid is the name of your local wifi network connection and its password)
- “Loops” section - repeat while.. do + “Logic” section - not + “IOT” section > “IOT Station” subsection - Is Connected
- “IOT” section > “IOT Station” subsection - Local IP
The “User Name” and “Key” are available here (just click on View AIO Key):
Étape 7 - Install Adafruit_MQTT.h and Adafruit_MQTT_Client.h libraries on Arduino IDE
For that we need to run Arduino IDE and go to Sketch > Include Library > Manage Libraries… > Search for “Adafruit mqtt library” and install the first result.
Étape 8 - Programming on Arduino IDE
To upload the code on Arduino IDE, click on the “Copy Arduino code into clipboard” button.
then paste the code onto Arduino IDE, and upload it to the ESP32.
If you click on Serial Monitor (top right of the Arduino IDE screen, below the “X” button), you should see the values recorded by the light sensor and by the temperature sensor:
It means that your ESP32 is connected to the internet, and that it’s sending the value recorded by the photoresistor and by the internal temperature sensor online, on https://adafruit.io.
Published


 Français
 English
 Deutsch
 Español
 Italiano
 Português